Introduction
If you have spent any time scrolling TikTok, Instagram Reels, or YouTube Shorts lately, you already know the truth: polished, studio-style commercials are losing the attention war. The clips that stop your thumb feel raw, personal, and surprisingly human. They look like a friend recommending a product, not a brand selling one. That is the magic of user generated content, and it is the reason brands are spending millions on UGC creators every month.
But here is the problem most marketers and founders run into. Hiring UGC creators is slow, expensive, and unpredictable. You brief ten creators, wait two weeks, get back five usable clips, and then realize three of them missed the brand voice entirely. By the time you are ready to test, your competitor has already shipped twenty variations.
That is exactly where AI changes the game. With the right tool, you can turn a single product photo into a scroll-stopping UGC video in under five minutes, without a camera, a creator, or a studio. In this guide, I will walk you through exactly how to make UGC videos with AI using Fliki’s Product Image to Marketing Video tool, the four ad presets you can choose from, and the prompting tricks I use to get clips that actually convert.
Let’s get into it.

What Are UGC Videos and Why Do They Convert So Well?
User generated content, often shortened to UGC, refers to videos that look and feel like they were shot by a real customer rather than by a brand. Think shaky selfie reviews, quick unboxings, casual product demos, and on-the-street reactions. According to a Nielsen consumer trust study, 88 percent of buyers trust recommendations from people they know more than any other form of advertising, and UGC style content taps directly into that psychology.
For brands, UGC ads typically deliver higher click through rates, lower cost per acquisition, and longer watch times compared to traditional polished creatives. Shopify’s own data on UGC backs this up across nearly every direct to consumer category, from skincare to consumer electronics.
The catch has always been production. Real UGC requires real people, real homes, real streets, and a lot of coordination. AI removes that friction.
Why Use AI to Create UGC Videos?
When I first started experimenting with AI generated UGC, I was skeptical. I assumed the output would look uncanny or stiff. Two years and thousands of generated clips later, I can say with confidence that the technology has crossed the line where most viewers cannot tell the difference, especially in the nine to fifteen second window that matters for paid social.
Here is what AI gives you that traditional UGC cannot. You can iterate on creative in minutes rather than weeks, which means you can test more hooks, more angles, and more demographics in a single afternoon than most brands test in a quarter. You also get full creative control over what the “creator” says, how they look, and what setting they appear in, so brand safety and message accuracy stop being a guessing game. And the unit economics are simply different. A single AI generated UGC clip costs a fraction of a sponsored creator video, which means your testing budget stretches dramatically further.
If you want a deeper look at how AI fits into modern video workflows, Fliki’s overview of AI video generation is a good companion read.
The 4 UGC Ad Styles You Can Create With Fliki
Inside Fliki’s Product Image to Marketing Video tool, there are four built-in ad presets, and each one is designed for a specific stage of the buyer journey. Picking the right preset is the single biggest lever you can pull for performance, so let me break them down.
1. UGC Selfie
This is the workhorse of paid social. A creator-style character holds your product up to the camera in a familiar setting like a bedroom, kitchen, or bathroom, and delivers a casual, conversational pitch. It feels like a TikTok review your friend might send you.
UGC selfie videos are ideal for direct response campaigns on TikTok, Instagram Reels, and Meta Advantage Plus. They are particularly strong for skincare, supplements, kitchen gadgets, and any product where a personal endorsement carries weight.
2. UGC Street Interview
The street interview format mimics the on-the-street vox pop style that has exploded across TikTok. Two characters, usually one holding a microphone, capture a candid reaction or quick endorsement in an outdoor setting like a city sidewalk or a park.
This preset works beautifully for social proof angles, “what do strangers think of this product” hooks, and trend-based content. It performs well for fashion, food and beverage, and lifestyle products where authenticity matters more than polish.
3. UGC Podcast Style Ad
A character sits behind a podcast microphone with headphones on, delivering a longer-form, expert-style endorsement. The framing signals authority and depth, which is why this format converts so well for considered purchases.
Use podcast style ads when you are selling supplements, software, courses, financial products, or anything where the buyer wants to feel like they are getting insight from someone who knows what they are talking about.
4. Hyper Motion Ad
This is your high-energy, cinematic product shot. Think dramatic lighting, sweeping camera moves, fast cuts synced to a beat, and your product spinning hero-style against a moody backdrop. It is the closest AI equivalent to the type of premium product films you see from Apple, Nike, or Coca Cola.
Use hyper motion ads when you are launching a new product, running an awareness campaign, or trying to create that “this looks expensive” perception that lifts perceived value. They work especially well for tech, fashion, beverages, and footwear.
How to Make UGC Videos With AI: A Step-by-Step Walkthrough
Now let’s get into the actual workflow. I will assume you already have a Fliki account. If not, you can create one and follow along in real time. The whole process takes less than five minutes once you know the steps.
Step 1: Open the Tools Panel
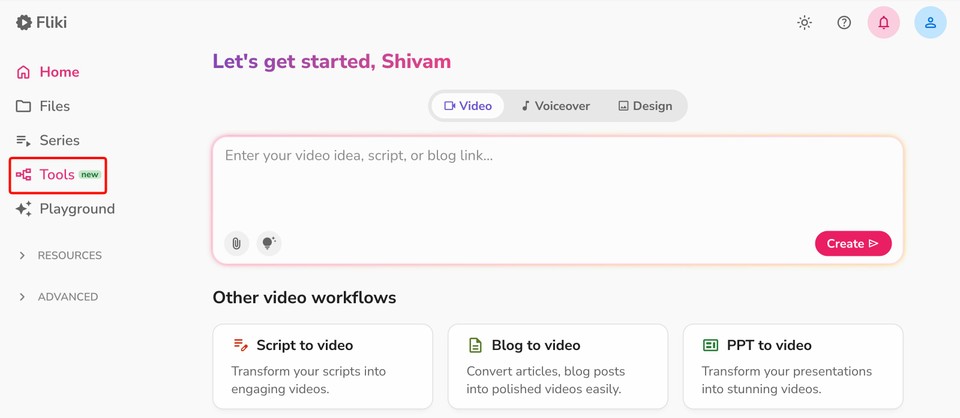
Once you are logged into Fliki, look at the left side panel of your dashboard. You will see options like Home, Files, Series, Tools, and Playground. Click on Tools. This opens up Fliki’s library of single-purpose AI utilities, which are perfect when you want a quick output without building a full project from scratch.
Step 2: Select Product Image to Marketing Video
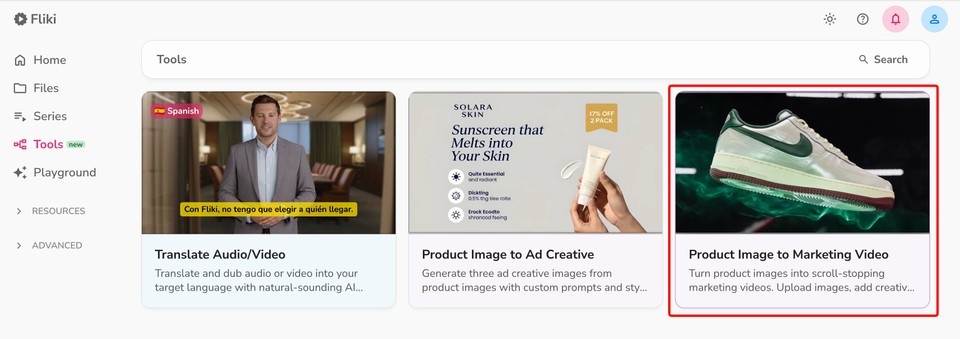
Inside the Tools section, find and click on Product Image to Marketing Video. This is the tool we are using today. It is purpose-built to turn static product images into short-form video ads, and it ships with the four UGC presets we just covered.
You will land on a clean interface with a reference image upload box, a prompt field, an ad preset selector, and an aspect ratio dropdown. There is also a sample preview on the right side so you can see what the output looks like before you generate.
Step 3: Upload Your Reference Images
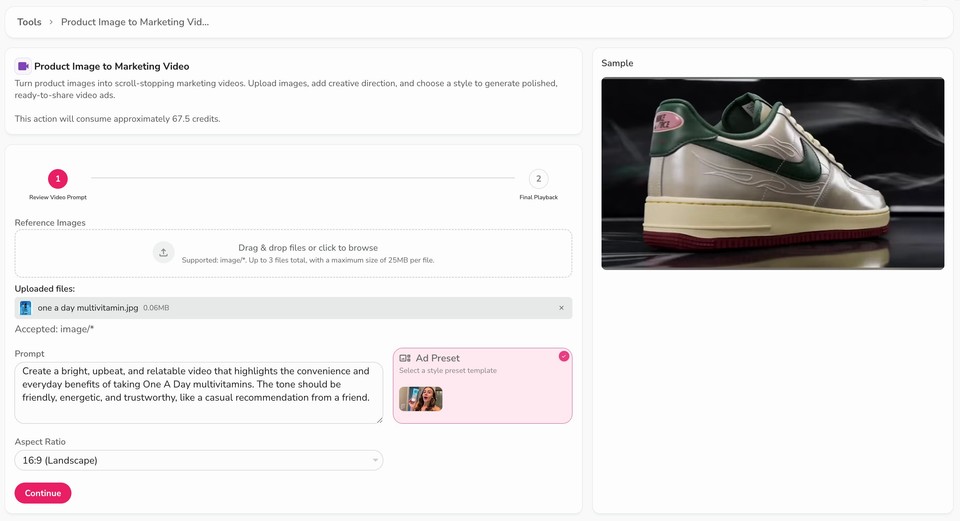
Click the Reference Images upload box, or drag and drop your files in. The tool accepts up to three images, with a maximum of 25 MB per file.
This is the step most people get wrong, so pay attention. The quality of your reference images directly determines the quality of your output. Here is how I think about it.
At minimum, upload a clean, well-lit product image with a neutral background. If your product has multiple angles or a key feature you want highlighted, use a second slot for that. The third slot is where things get interesting. If you are using a UGC preset like selfie or street interview, you can upload a character reference image, which is a photo of the type of person you want as your AI creator. This gives you control over demographics, age, style, and vibe, which matters enormously for targeting.
For example, if you are selling a Gen Z skincare product, uploading a character reference of a young creator with the right aesthetic will produce dramatically better results than letting the AI guess.
Step 4: Write Your Prompt
Below the upload box you will find the Prompt field. This is where you describe the tone, style, and key message of your video. The placeholder text inside Fliki gives you excellent guidance, but here is how I structure my prompts for each preset.
For UGC selfie and street interview prompts, include actual dialogue or talking points. The AI will use these as the spoken script, so write the way real people talk. Short sentences. Casual phrasing. A clear hook in the first line. End with a call to action like “link in bio” or “shop now.”
For hyper motion prompts, focus on movement, pacing, and visual rhythm. Describe the camera moves, the lighting, the on-screen text overlays, and the energy. Something like, “Dark studio background, product rotates slowly, then three fast zoom cuts synced to the beat. Bold white text flashes: Fast. Lightweight. Built to last. End on logo with shop now.”
For podcast style ads, write in a voice that sounds like an authority sharing a recommendation. A line like, “I have tested over thirty of these and this is the only one I actually keep using” lands far better than generic marketing copy.
Step 5: Choose Your Ad Preset
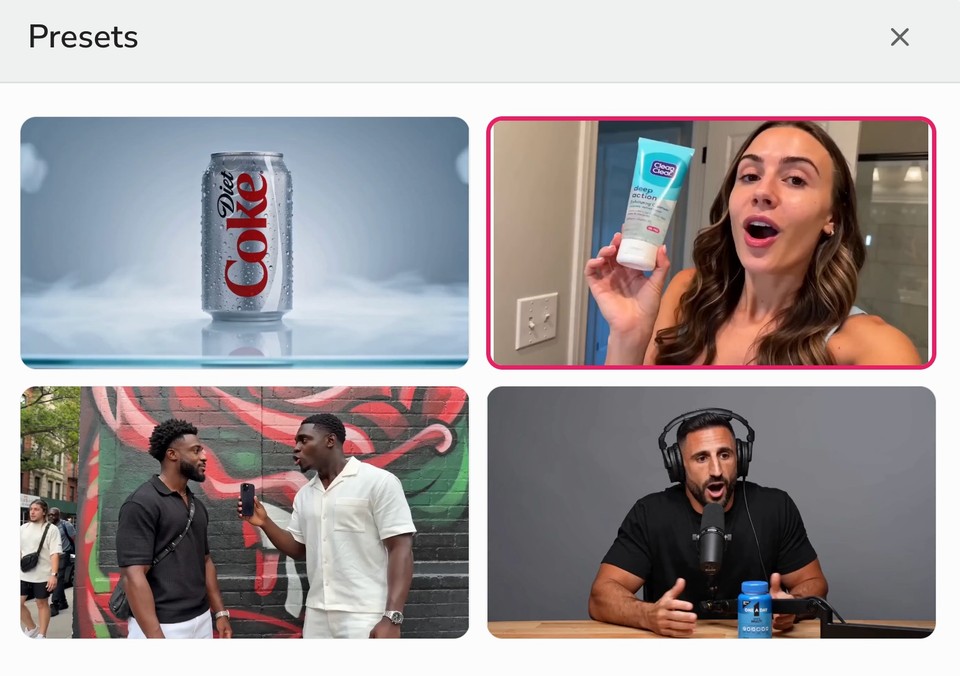
Click the Ad Preset card on the right side of the prompt area. A modal will pop up showing all four presets as visual thumbnails. Click the one that matches your campaign goal. The selected preset will guide the AI’s visual style, framing, and motion language while still respecting your prompt and reference images.
If you are not sure which one to pick, my rule of thumb is this. Start with UGC Selfie for direct response, Hyper Motion for awareness, Street Interview for social proof angles, and Podcast Style for considered purchases.
Step 6: Pick Your Aspect Ratio
Use the Aspect Ratio dropdown to choose the format that matches where you plan to publish. You have three options. 9:16 portrait is the default for TikTok, Reels, Shorts, and Stories. 1:1 square works well for Instagram feed and some Meta placements. 16:9 landscape is best for YouTube in-stream, connected TV, and desktop placements.
If you are running Meta Advantage Plus campaigns, I recommend exporting in 9:16 first since that is where the bulk of your impressions will land, then repurposing later.
Step 7: Click Continue and Generate
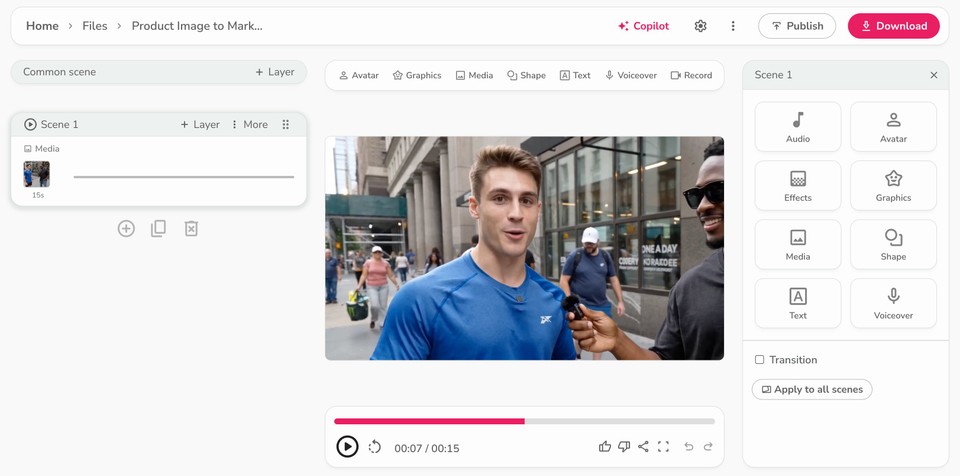
Hit the pink Continue button. Fliki will process your inputs and generate a prompt which you can review. Once satisfied, hit next and Fliki will render your UGC video. Depending on length and complexity, this typically takes a couple of minutes. You will see a progress indicator and then land on the Final Playback screen, where you can preview, download, and share your finished clip.
If the output is not quite right, do not start over from scratch. Adjust your prompt by double clicking the media, swap in a different reference image, or try a different preset.
Pro Tips for Higher Converting AI UGC Videos
After running hundreds of AI generated UGC ads across Meta, TikTok, and YouTube, here are the lessons that consistently move the needle.
Lead with a pattern interrupt in the first second. The hook is everything. Whether it is a surprising statement, a visual gag, or a bold question, your first frame has to stop the scroll. TikTok’s own creative best practices emphasize this repeatedly.
Match the preset to the platform. Selfie and street interview presets tend to outperform on TikTok and Reels. Podcast and hyper motion presets often do better on YouTube and Meta feed placements. Test both, but start where the format fits the audience.
Iterate on hooks, not full ads. Once you find a winning preset and character, generate ten variations of just the opening line. Small changes in the hook often produce 2x to 3x lifts in click through rate without touching anything else.
Layer captions and music after generation. Fliki’s main editor lets you add subtitles, background music, and brand overlays after the AI generation step. Captions in particular are non negotiable since most social video is watched on mute. You can use Fliki’s auto subtitle generator to handle this in seconds.
Keep a swipe file. Every time you scroll, save the UGC ads that stop you. When you sit down to prompt, you will have a library of proven hooks and angles to draw from instead of starting blank.
Common Mistakes to Avoid
The biggest mistake I see is treating AI UGC like a one-and-done generator. It is a creative system, not a vending machine. The marketers who win are the ones who treat each generation as a test, learn from the result, and refine. The ones who give up after two clips never see what the tool is actually capable of.
The second mistake is over-prompting. Long, paragraph-length prompts with conflicting instructions confuse the model. Keep it focused. One scene, one message, one call to action.
The third mistake is ignoring the character reference. If you skip that third upload slot, you let the AI default to its own interpretation of your audience, which is rarely as targeted as it should be.
Final Thoughts: AI UGC Is the New Creative Standard
The brands that will dominate paid social in the next two years are not the ones with the biggest production budgets. They are the ones that can test the most creative the fastest, and AI generated UGC is the fastest path there. With Fliki’s Product Image to Marketing Video tool and its four built-in presets, you can go from a single product photo to a publish-ready ad in less time than it takes to brief a creator.
If you are just getting started, my advice is simple. Pick one product, generate one video in each of the four presets, and run them as a small test on the platform where your audience actually lives. The data will tell you which preset, which hook, and which character resonates, and from there you scale.