
Introduction
Hey there! If you’ve ever dreamt of turning your blog posts into polished, voice‑narrated videos and getting them onto YouTube—all without lifting a finger - this guide is for you. I’m about to share a step‑by‑step, no‑code guide to video marketing automation, using Make.com and Fliki.ai. I promise you: within a couple of minutes (and a tiny bit of setup), you’ll have an automated workflow that pulls your latest Medium (or WordPress etc.) article, transforms it into a video, and publishes it to your YouTube channel. Imagine waking up to fresh videos that drive engagement, broaden reach, and help you stand out. Ready? Let’s make your content work harder… while you work less.
Why You Should Automate Video Marketing
-
Scale Your Impact You’re already writing blogs - imagine doubling their reach with high-quality videos. Automating means more exposure with zero manual video editing.
-
Consistency Without the Stress Video production takes time. But with an automated process, you can post consistently on YouTube, boosting algorithm signals and audience trust.
-
SEO & Discoverability YouTube is a top search engine. With SEO-optimized titles, descriptions, and regular uploads, you're tapping into a massive discovery engine.
-
Cost-Effective Growth AI tools are affordable; no hiring expensive videographers or editors. What you invest in subscriptions, you gain tenfold in exposure.
Overview of the Automated Workflow
We’re setting up two scenarios in Make:
-
Scenario 1: Detect new blog posts, extract the URL, and auto-create a Fliki video.
-
Scenario 2: Monitor new video renders in Fliki, generate a captivating title via Google Gemini AI, and auto-upload it to YouTube.

Once configured, both can run on schedules you define - daily, hourly, or even real-time. You choose, and the system delivers. Now let me walk you through each piece in detail….
Setup Prerequisites
Before we start:
-
Make.com account (formerly Integromat) - free tier works for learning.
-
Fliki account - must be a paid plan to access API and other advanced features.
-
Medium, WordPress, or your website’s RSS or API URL.
-
YouTube or any other social channel
-
Google Gemini API key (optional - used for generating YouTube video title).
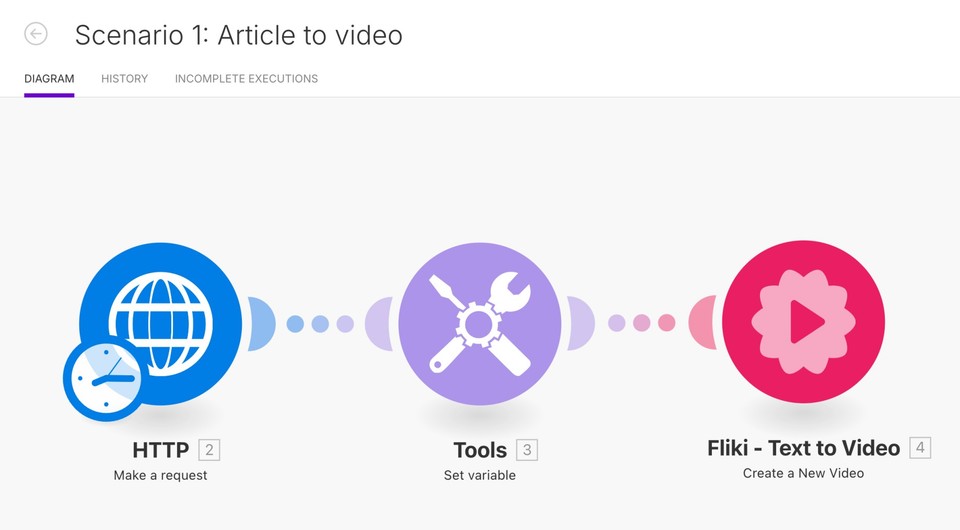
Video Marketing Automation Scenario 1: Turning Blog Posts into Videos
Step 1: HTTP Module – Fetch Latest Post
In Make, create your first scenario.
-
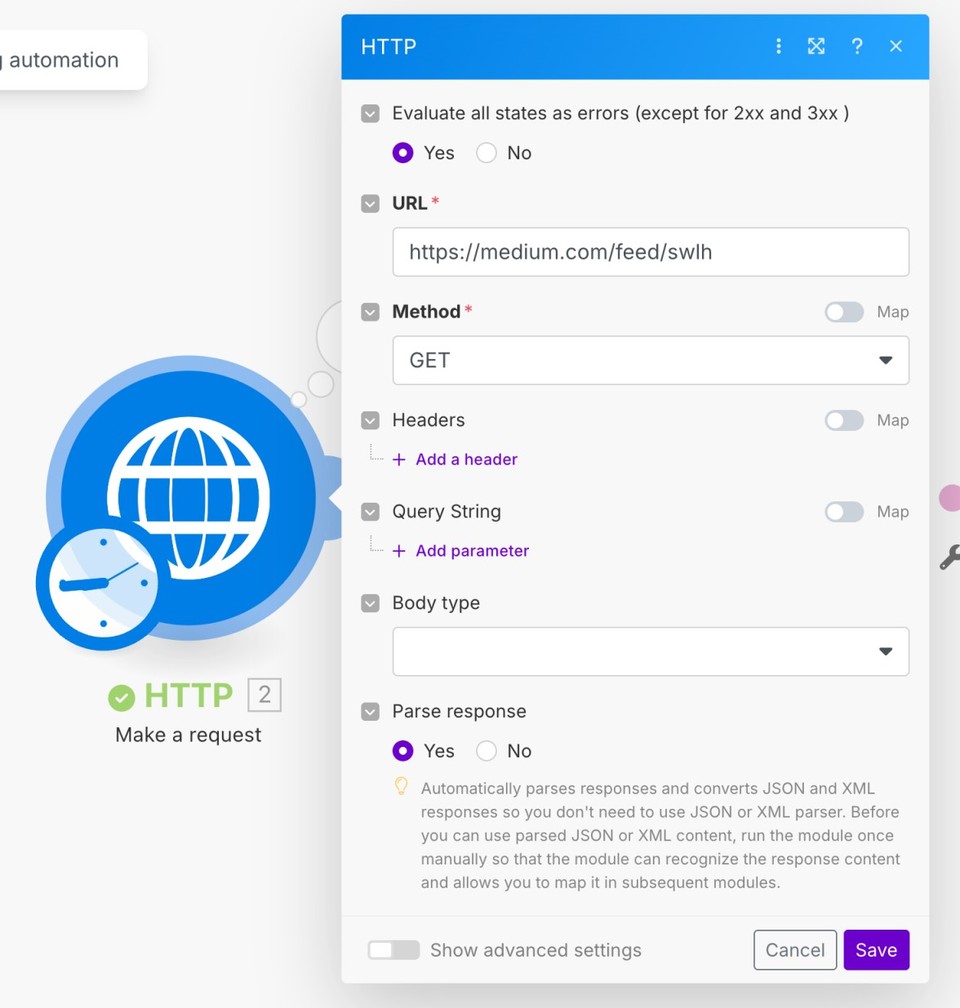
Add an HTTP – Make a Request module.
-
Set Method = GET, URL = your blog’s feed. For Medium:
https://medium.com/feed/your-publication-slug -
Enable Parse Response = Yes to handle XML/RSS easily.
-
This fetches all recent posts - title, link, pubDate, etc.
You can tune this module later for WordPress XML-RPC or REST API endpoints - just change the feed URL.
Step 2: Tools Module – Extract & Store the Latest Link
Next, insert a Tools module - Set variable.
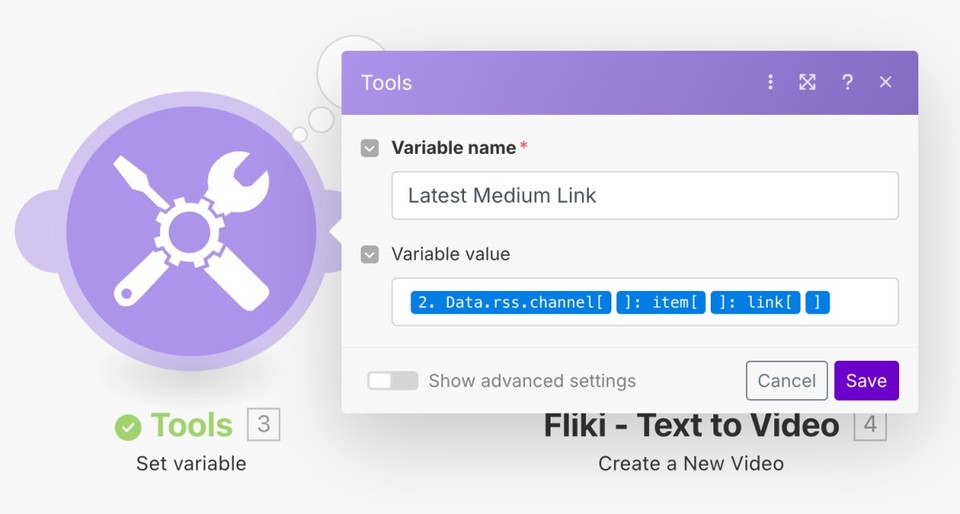
-
Name it something like LatestArticleURL.
-
Map it from the HTTP response path:
Data.rss.channel[0].item[0].link[0]
This dynamically grabs the link to your most recent post. That ensures your workflow always uses the freshest content.
Step 3: Fliki Module – Auto-generate Video
Next. insert a Fliki module - Create a New Video.
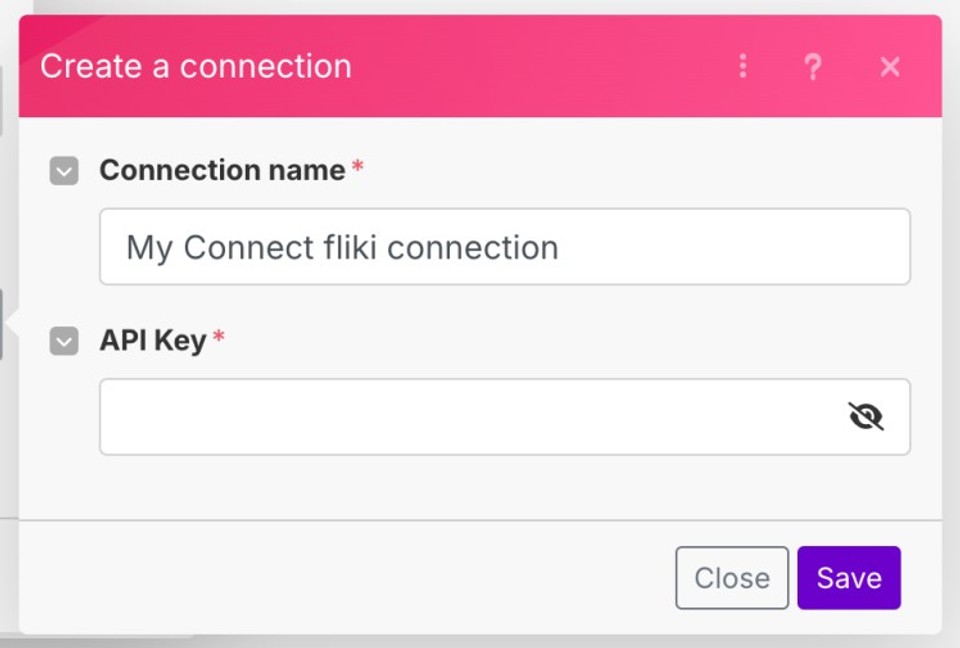
Authenticate Fliki
-
Log into Fliki and visit Automation tab.
-
Generate an API Key (choose “Make” from the dropdown).
-
Copy-paste into your Make connection.
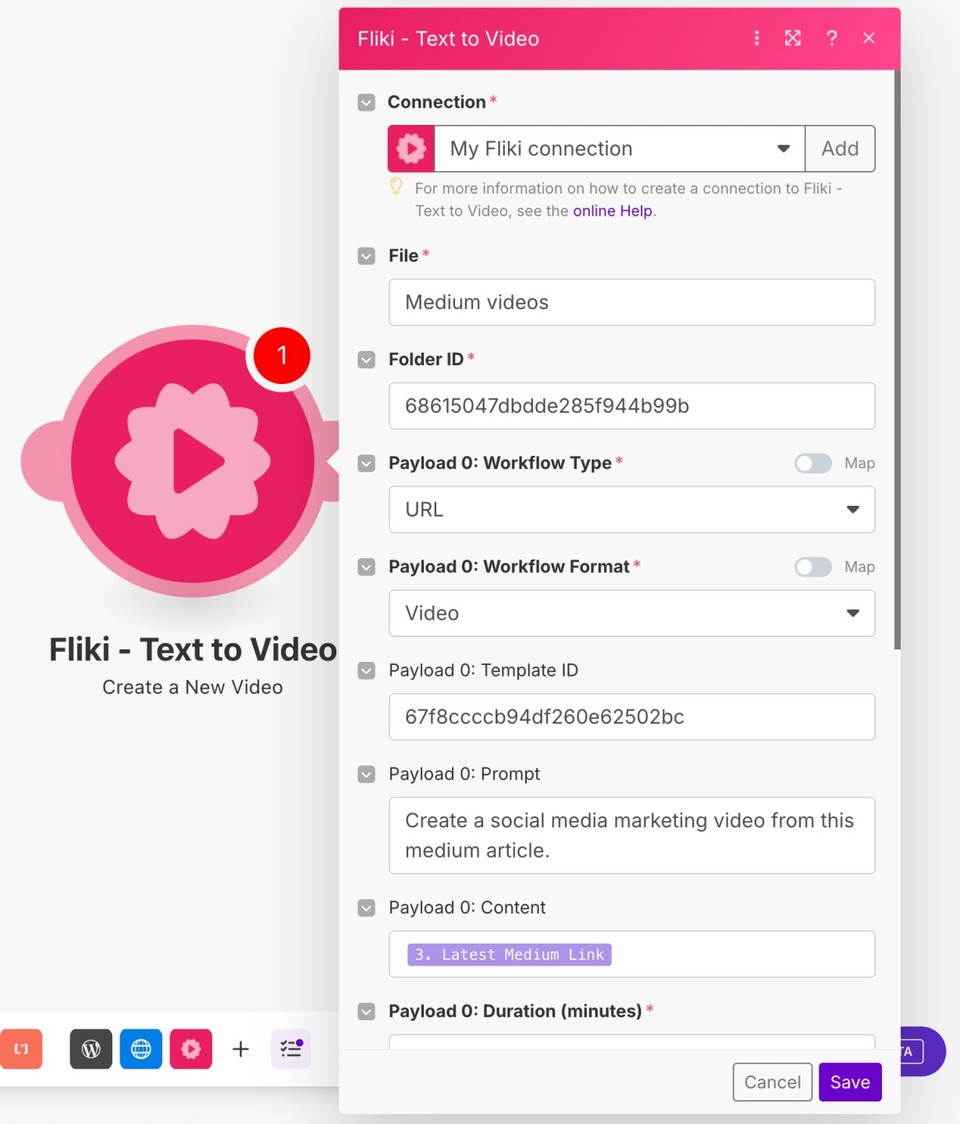
Configure The Create Video Module
-
Folder Name: You can name the folder (e.g. “Blog Videos”); Fliki creates it.
-
Folder ID: (OPTIONAL but recommended)
-
Navigate to that folder in Fliki.
-
Copy the ID from folder=... in the URL.
-
Paste it to ensure videos go exactly where you want.
-
Set Other Fields
-
Workflow Type: url
-
Workflow Format: video
-
Template ID: Copy ID from Fliki template resource page
-
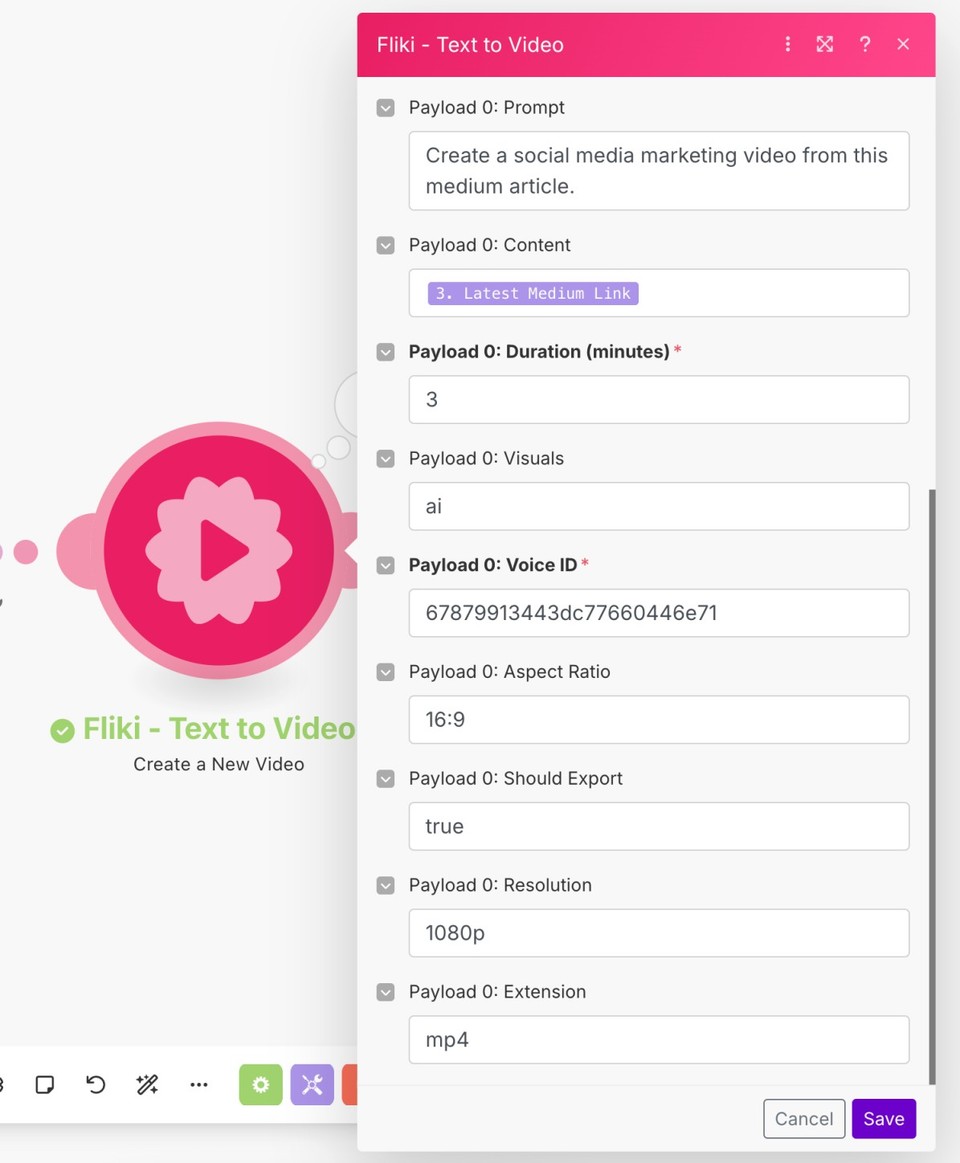
Content: Map your LatestArticleURL variable
-
Duration: 1–15 minutes (numeric only)
-
Visuals: stock or ai
-
Voice ID: Copy ID from Fliki voice resource page
-
Aspect Ratio: 16:9 for YouTube, 9:16 for mobile, 1:1 for Instagram
-
Should Export: true
-
Resolution: 1080p
-
Extension: mp4
-
Save and run once to test; check your Fliki folder for the output video.
That concludes Scenario 1: every time this runs, a polished video appears ready for upload.
Fliki - Create a Video Module - Field-by-Field Breakdown
Below is a detailed guide to every key field, what it does, accepted values, and how to configure it for maximum success across different use-cases
1. Folder Name
|
Field |
Folder Name |
|---|---|
|
Purpose |
Folder name to save generated videos/audio. |
|
Behavior |
- Automatically creates folder if it doesn’t exist. - All files from this module are stored here. |
|
Example Values |
Blog Videos, Marketing Clips |
2. Folder ID
|
Field |
Folder ID |
|---|---|
|
Purpose |
Route output to a specific, existing folder. |
|
How to Find |
From URL: https://app.fliki.ai/files?folder=68615047dbdde285f944b99b → 68615047dbdde285f944b99b |
|
Behavior |
- Overrides the File field if both are set. - Ensures consistent destination folder. |
3. Workflow Type
|
Field |
Workflow Type |
|---|---|
|
Purpose |
Determines how Fliki generates content. |
|
Accepted Values |
|
|
Note |
Leave Content blank if using idea. |
4. Workflow Format
|
Field |
Workflow Format |
|---|---|
|
Purpose |
Defines output type. |
|
Accepted Values |
|
5. Template ID
|
Field |
Template ID |
|---|---|
|
Purpose |
Sets visual style for video. |
|
How to Get ID |
Browse and get template ID at the template resources page. Simply hover over the template name to reveal the copy icon, then click it to copy the template ID. |
|
Note |
Only applies if Workflow Format = video. |
6. Prompt
|
Field |
Prompt |
|---|---|
|
Purpose |
Guide AI when using idea type. |
|
Type |
Plain text |
|
Example |
“Top 5 productivity hacks for remote workers” |
7. Content
|
Field |
Content |
|---|---|
|
Purpose |
Main input for script or URL. |
|
Rules |
|
|
Example |
In our case, we used the variable we set in the previous set variable module - Latest Medium Link. |
8. Duration (minutes)
|
Field |
Duration |
|---|---|
|
Purpose |
Sets the max duration of the video/audio. |
|
Accepted Values |
0 to 15 (minutes) |
|
Special Notes |
- Set to 0 to keep full script as is. - Any other value → AI summarizes content to fit. |
9. Visuals
|
Field |
Visuals |
|---|---|
|
Purpose |
Controls visual content for the video. |
|
Accepted Values |
|
|
Note |
Only applies if Workflow Format = video. Leave blank if Workflow Format = audio. |
10. Voice ID
|
Field |
Voice ID |
|---|---|
|
Purpose |
Select narrator's voice. |
|
How to Get ID |
Browse different voices by gender, accent, and language at voice resources page. |
|
Tip |
Match the voice with your brand tone (e.g., casual, professional). |
11. Aspect Ratio
|
Field |
Aspect Ratio |
|---|---|
|
Purpose |
Defines video dimensions. |
|
Accepted Values |
|
|
Note |
Only applies if Workflow Format = video. Leave blank if Workflow Format = audio. |
12. Should Export
|
Field |
Should Export |
|---|---|
|
Purpose |
Controls file export. |
|
Accepted Values |
|
|
Important |
Must be true to activate Resolution and Extension. |
13. Resolution
|
Field |
Resolution |
|---|---|
|
Purpose |
Set video quality. |
|
Accepted Values |
|
|
Dependencies |
Applies only if: - Workflow Format = video - Should Export = true |
14. Extension
|
Field |
Extension |
|---|---|
|
Purpose |
File format of exported output. |
|
Accepted Values |
For video:
For audio:
|
|
Dependencies |
Applies only if Should Export = true. |
Final Setup Tips
-
Avoid Errors: Double-check every field for typos or unsupported values.
-
Save your Scenario: Once all fields are populated and validated, hit Save.
-
Run it once manually: Make will trigger the request, and Fliki will process the video/audio. Check your designated Fliki folder to confirm the output appears.
Video Marketing Automation Scenario 2: Auto‑Publish to YouTube
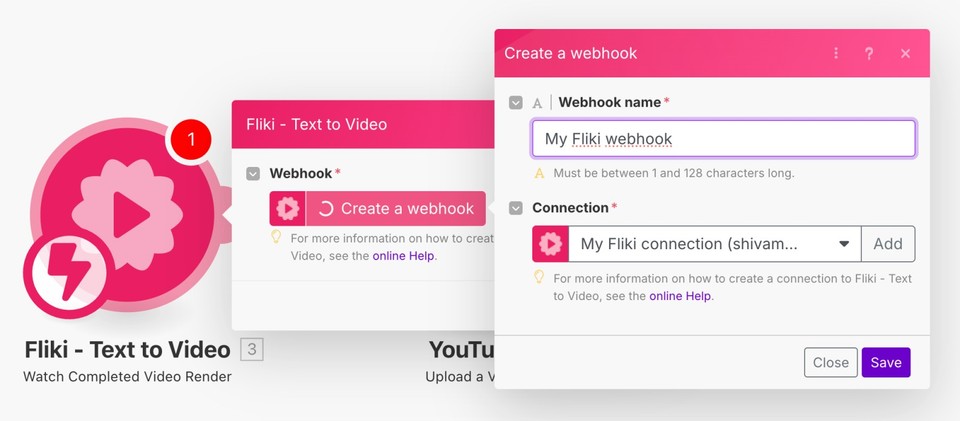
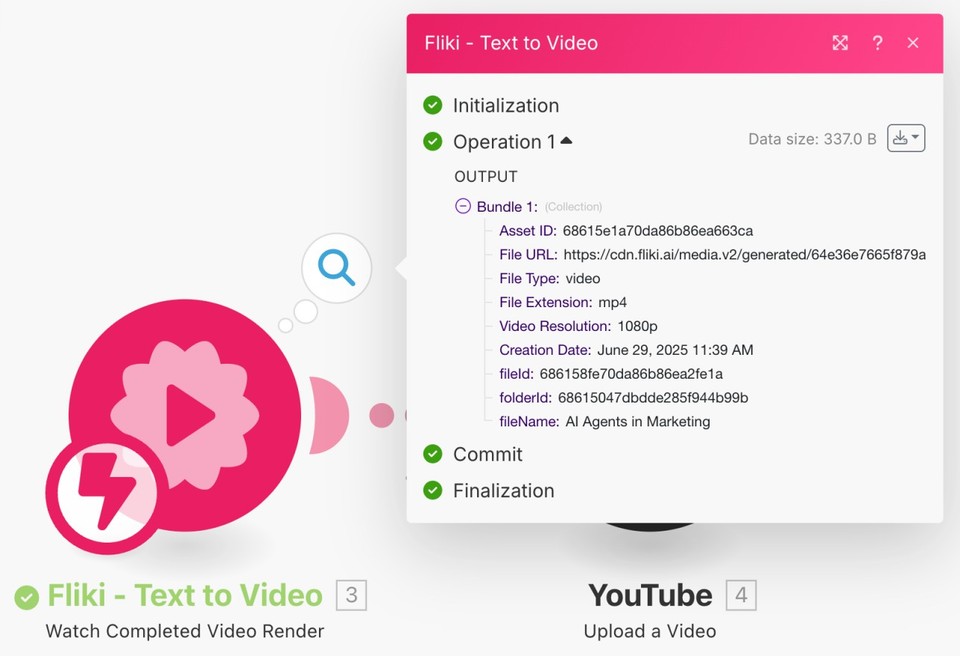
Step 1: Fliki Watch Module – Detect Completed Videos
Start a new scenario.
-
Add Fliki – Watch Export Complete.
-
Connect using your existing API key.
-
Filter by the same folder ID so only your automated videos trigger this.
-
The module outputs key data: fileURL, fileName, folderId, resolution, and more.
Step 2: Google Gemini AI – Generate a Title
Now add the Google Gemini – Create Completion module.
-
Connect with your Gemini API key.
-
Choose model: Gemini 2.0 Flash.
-
Set the following values:
-
role: user
-
type: text
-
-
Add the following prompt in the text field:
Create one highly compelling, click-worthy YouTube video title based on the topic below. Title must spark curiosity and be SEO optimized.Topic: {{fileName}}Make sure to replace fileName with the dynamic value fileName coming from Fliki module.
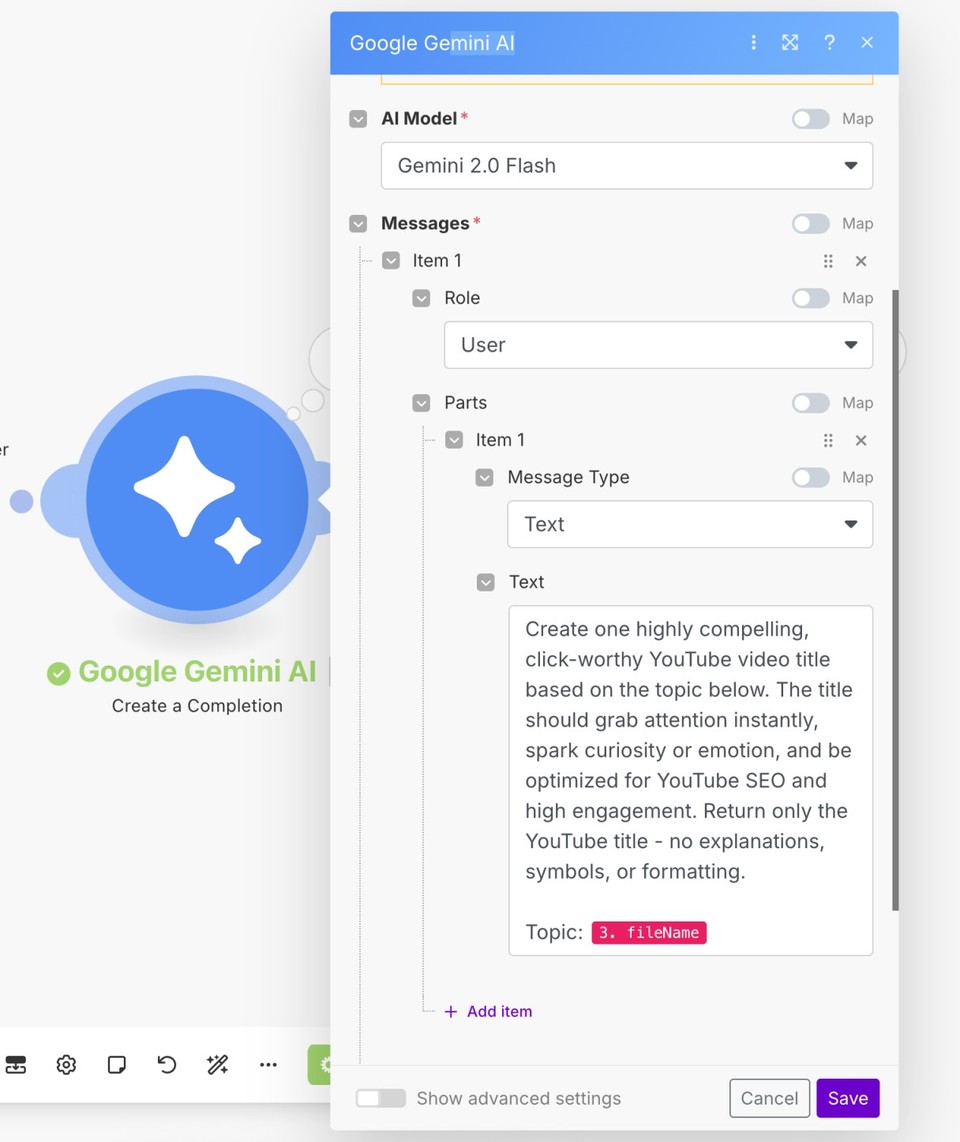
-
Save. This outputs a catchy YouTube title.
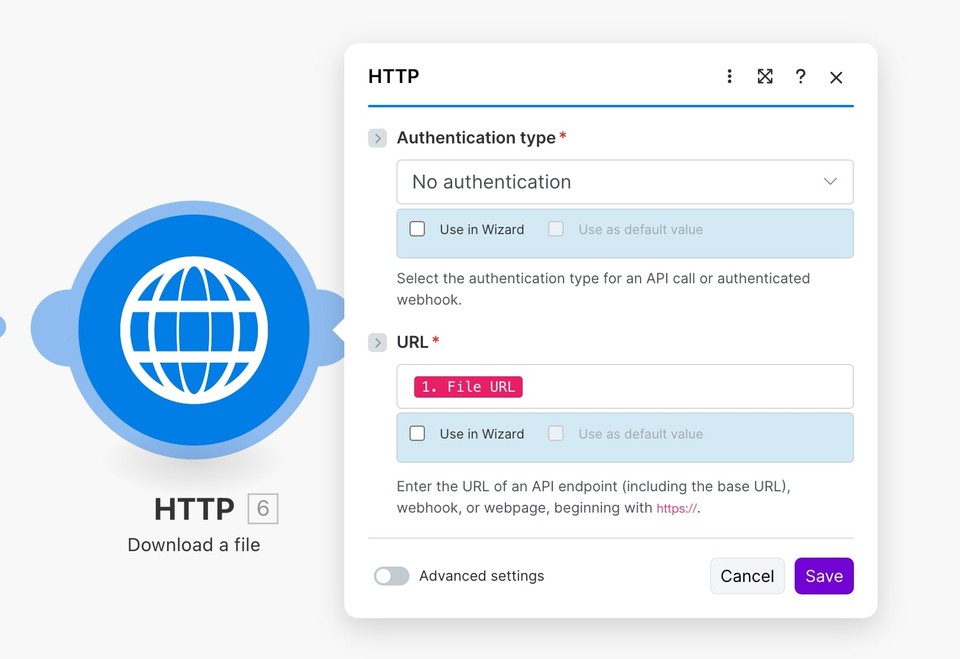
Step 3: HTTP Download a file module
Next, add HTTP Download a file module and set authentication type to 'No authentication' and map Fliki file URL in the URL field.
Step 4: YouTube Upload Module
Finally, add YouTube – Upload a Video.
-
Authenticate with your Google account.
-
Map:
-
Title from Gemini AI
-
File Name from Fliki
-
Data from HTTP - Download a file
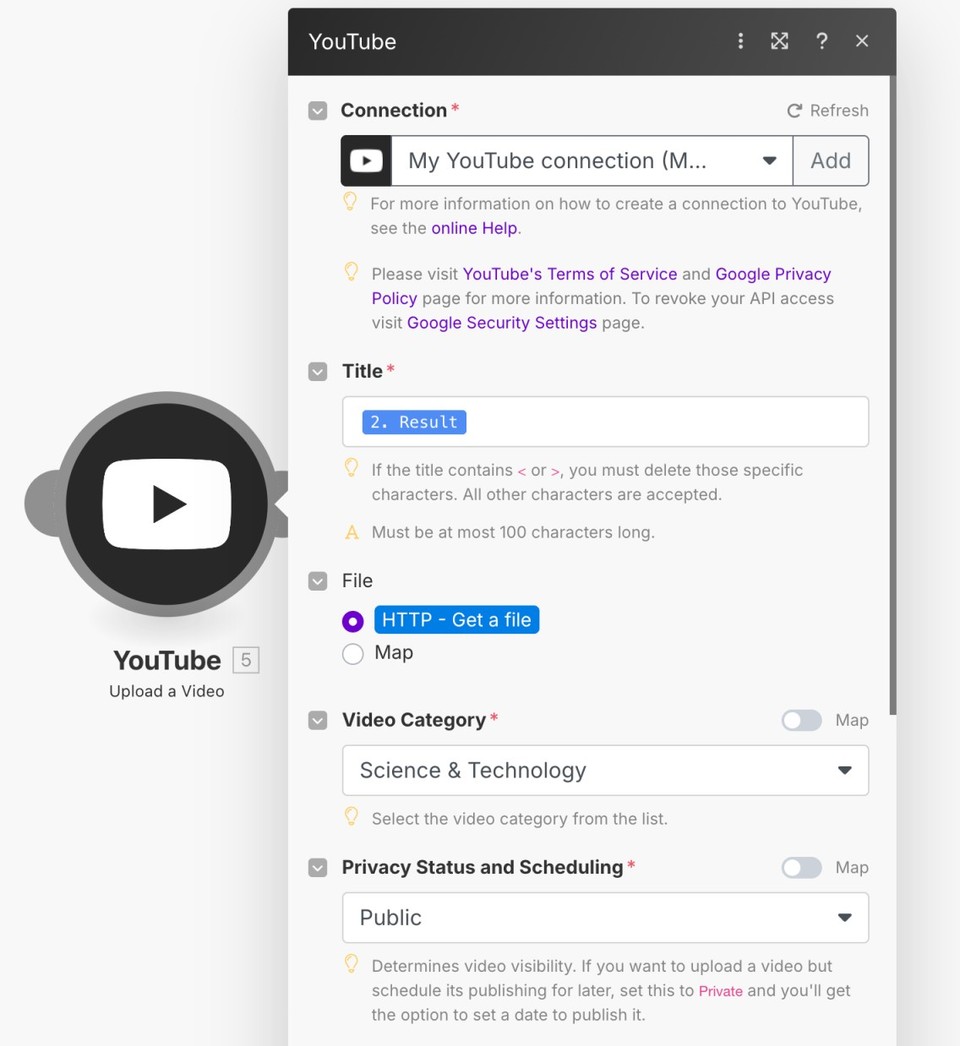
-
-
Set other fields like video category, Privacy Status and Scheduling, description, etc.
-
Save and test. You’ll now have automated uploads, complete with engaging titles and video output—no manual intervention.
Conclusion
And there you have it—your complete video marketing automation system. Once configured:
-
Publish a blog post ➝ Make grabs the link ➝ Fliki turns it into a video.
-
Fliki finishes the video ➝ Gemini writes a title ➝ YouTube publishes the final video.
The result? A consistent, scalable content machine that transforms articles into engaging videos - without the effort. It’s perfect for creators, marketers, and small teams. And because you control schedules, templates, visual styles, and voice, you can tailor it to any brand or platform.
Ready to get started? Set up your Make account, grab your Fliki and Gemini API keys, and walk through the steps above. You’ll soon wake up to fresh videos doing the heavy lifting—while you focus on what you love.