Convert idea to video
Fliki's Idea-to-Video workflow turns a short prompt into a finished video. You describe what you want, pick an optional AI character, answer a few quick tailoring questions, and Fliki writes the script and builds every scene for you. From there you land in the same one-page builder used by Script-to-Video, so you can fine-tune the format, visuals, narrator, and cast before generating.
Step 1 - Describe your idea
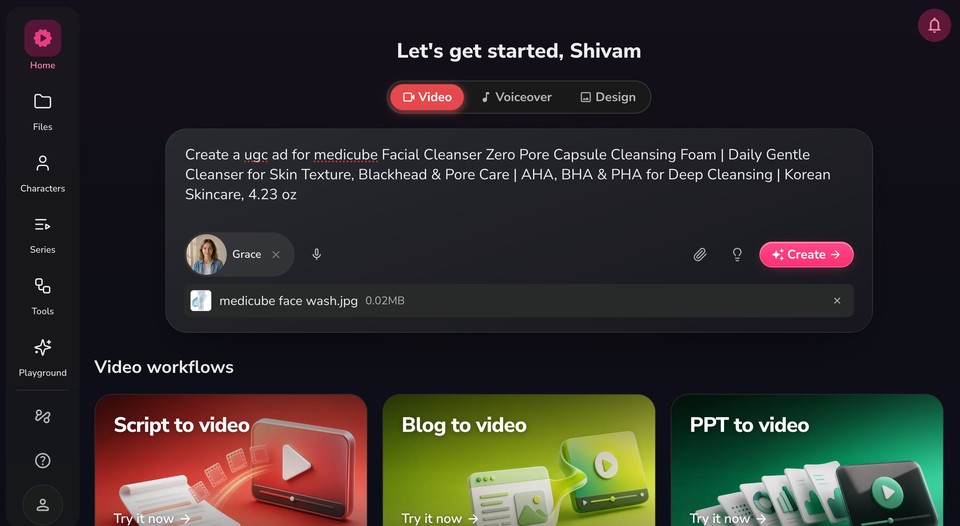
Open the Fliki homepage at app.fliki.ai and make sure the Video tab is selected (you can also switch to Voiceover or Design).
In the prompt box, type your idea or brief. For example: "Create a UGC ad for medicube Facial Cleanser Zero Pore Capsule Cleansing Foam."
Optional: click the character chip (shown here as "Grace") to feature a consistent AI presenter in your video, or remove it to let Fliki decide.
Optional: use the paperclip icon to attach reference material such as a product photo. In this example, medicube face wash.jpg is attached so the product appears in the video.
Click Create to continue.
Step 2 - Choose your character and looks (optional)
If you added a character, Fliki lets you pick who presents your video and which looks to feature.
Pick a character or avatar
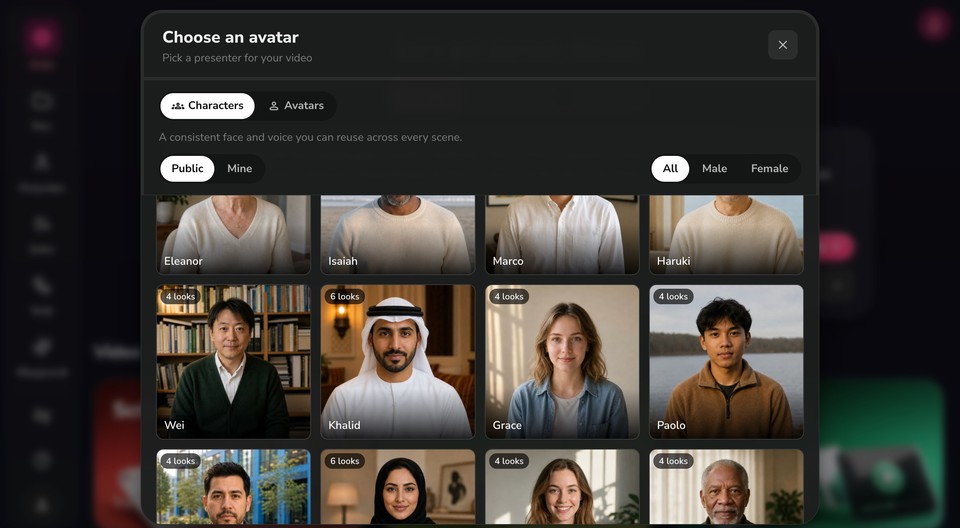
Switch between the Characters tab (a consistent face and voice you can reuse across every scene) and the Avatars tab.
Filter by Public or Mine, and by All, Male, or Female to narrow the list.
Browse the grid and select the presenter you want. Characters with multiple angles show a "looks" badge (for example, "4 looks").
Select the looks to feature
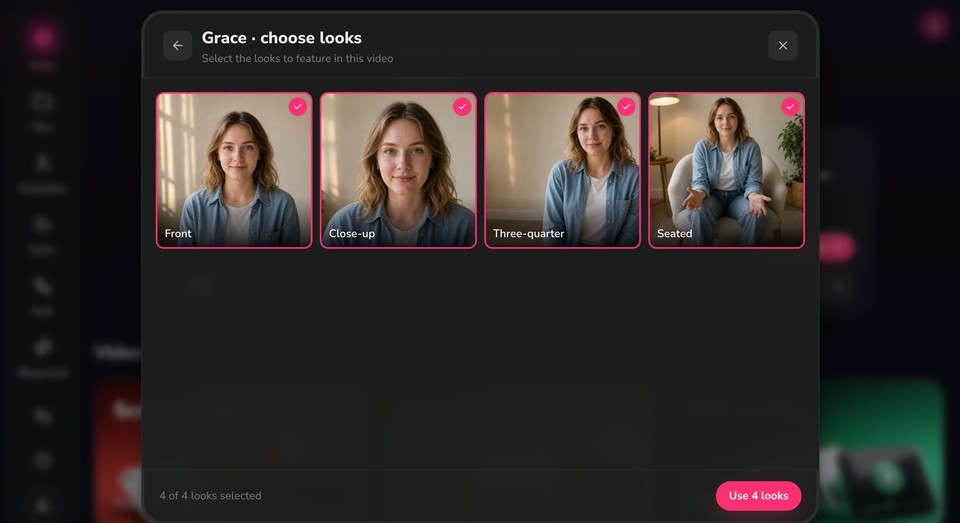
Each character comes with several camera looks, such as Front, Close-up, Three-quarter, and Seated.
Tap any look to toggle it on or off. Selected looks are outlined and checked.
Click Use looks to confirm. Fliki will mix these looks across your scenes for variety.
Step 3 - Tailor your video with Copilot
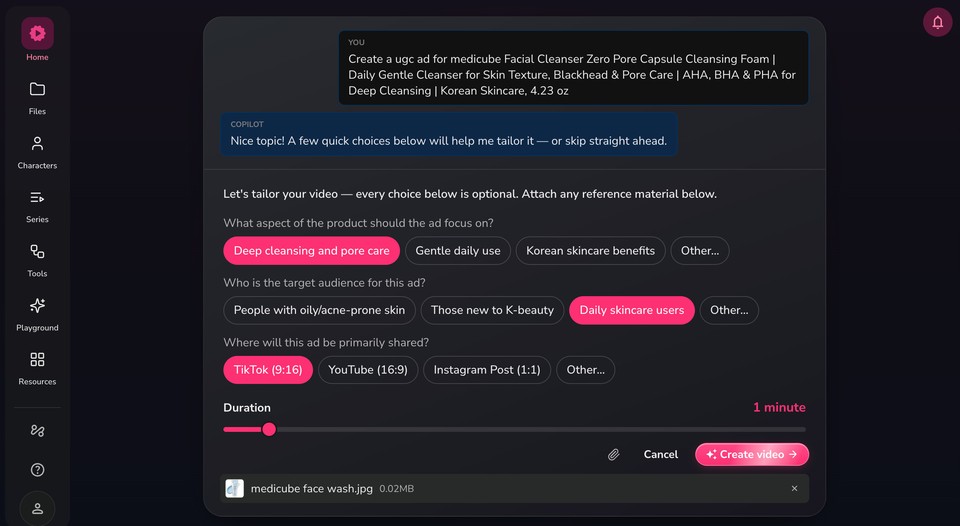
Fliki's Copilot asks a few quick questions so the script matches your goal. Every choice here is optional, and you can skip straight ahead if you prefer.
What aspect of the product should the ad focus on? For example, Deep cleansing and pore care, Gentle daily use, or Korean skincare benefits. Pick "Other" to type your own.
Who is the target audience for this ad? For example, people with oily or acne-prone skin, those new to K-beauty, or daily skincare users.
Where will this ad be primarily shared? This sets your aspect ratio, for example TikTok (9:16), YouTube (16:9), or Instagram Post (1:1).
Duration: drag the slider to set how long the video should be.
Attach any additional reference material with the paperclip icon, then click Create video. Fliki writes your script and opens it in the builder.
Step 4 - Review your script and video settings
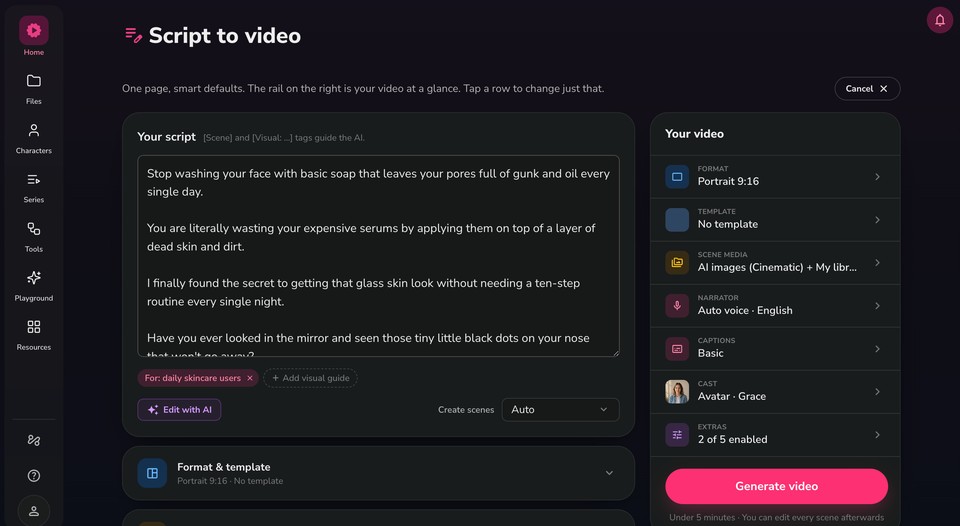
Fliki drops you into a single-page builder. The left side holds your generated script, and the rail on the right ("Your video") summarizes every setting at a glance. Tap any row to change just that part.
Read through the AI-generated script on the left and edit any wording directly in the text box.
Use Edit with AI to rewrite, shorten, or change the tone of the script.
The For: tag (for example, "daily skincare users") reflects the audience Copilot detected. Add a visual guide to steer the imagery if you like.
Leave Create scenes on Auto to let Fliki split the script into scenes, or choose a manual option.
The right rail shows your current Format, Template, Scene media, Narrator, Captions, Cast, and Extras. The next steps cover each of these.
Step 5 - Set format and template
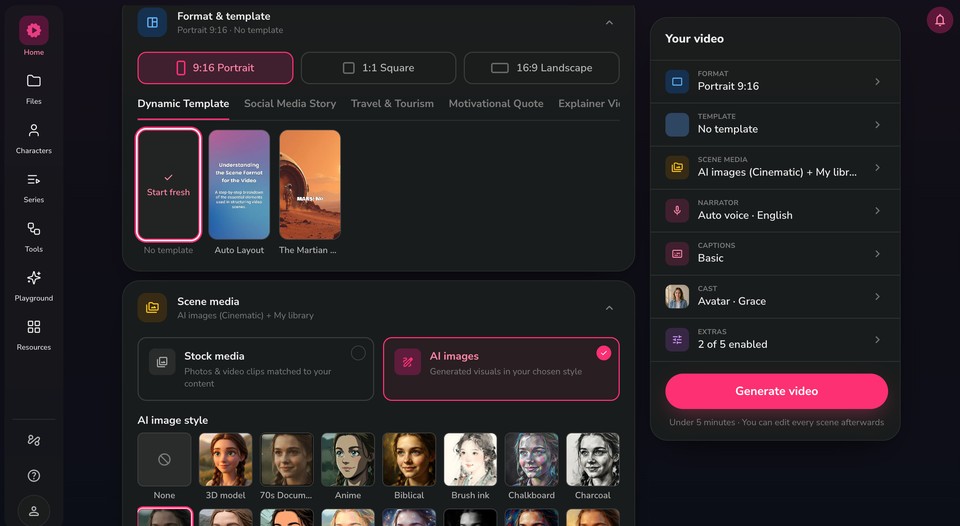
Choose your aspect ratio: 9:16 Portrait, 1:1 Square, or 16:9 Landscape. This is prefilled from the platform you picked with Copilot.
Pick a template to style your scenes, or select Start fresh (No template) to build clean scenes with smart defaults.
Browse template categories such as Dynamic Template, Social Media Story, Travel & Tourism, Motivational Quote, and Explainer Video.
Step 6 - Choose your scene media
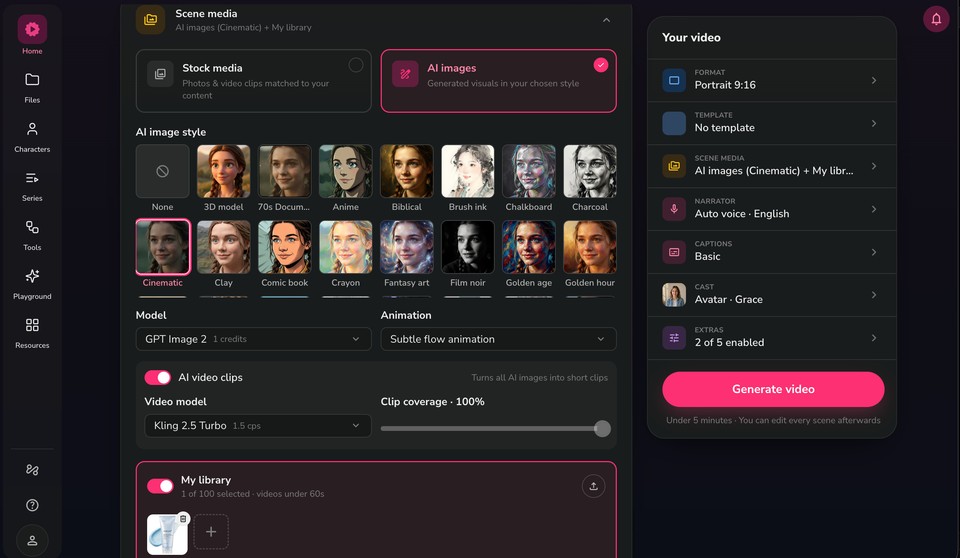
Select Stock media to use photos and video clips matched to your content, or AI images to generate visuals in a chosen style.
If you chose AI images, pick an AI image style from the gallery, for example Cinematic, 3D model, Anime, Comic book, Film noir, or Golden hour.
Set the Model (for example, GPT Image 2) and an Animation style such as Subtle flow animation.
Turn on AI video clips to convert your AI images into short moving clips. Choose a video model (for example, Kling 2.5 Turbo) and set the Clip coverage percentage.
Enable My library to include your own uploaded assets. In this example, the attached product photo is selected so the real product appears in the video.
Step 7 - Set the narrator and captions
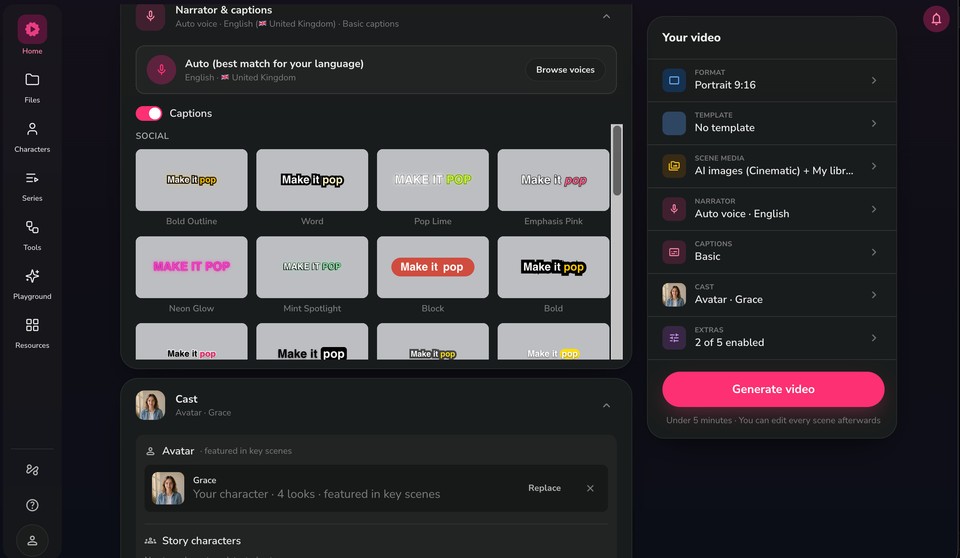
Keep Auto (best match for your language) or click Browse voices to choose a specific voice, language, and dialect.
Toggle Captions on or off.
Pick a caption style from the gallery. Styles are grouped into sets like Social and Retro, with options such as Bold Outline, Word, Pop Lime, Neon Glow, and Block.
Step 8 - Confirm your cast
Under Avatar, review the presenter featured in your key scenes (for example, Grace with 4 looks). Use Replace to swap them out or the X to remove.
Under Story characters, click Detect from script if you want Fliki to find named characters in your script and cast them too.
Step 9 - Adjust extras and advanced options
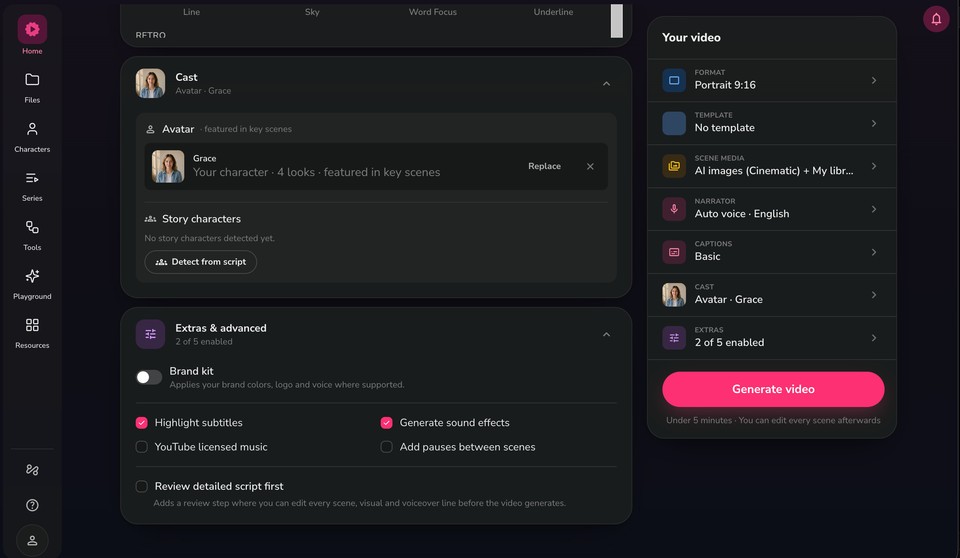
Turn on Brand kit to apply your brand colors, logo, and voice where supported.
Enable extras as needed: Highlight subtitles, Generate sound effects, YouTube licensed music, and Add pauses between scenes.
Check Review detailed script first to add a step where you can edit every scene, visual, and voiceover line before the video generates.
Step 10 - Generate your video
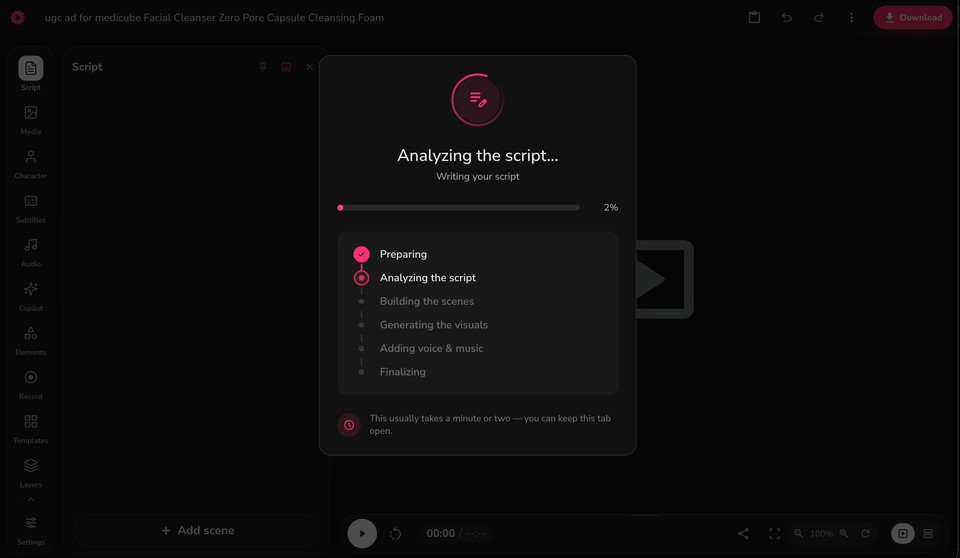
Click Generate video. Generation usually takes under 5 minutes, and you can edit every scene afterward.
Fliki walks through each stage: Preparing, Analyzing the script, Building the scenes, Generating the visuals, Adding voice & music, and Finalizing. You can keep the tab open while it works.
Step 11 - Edit, preview, and download
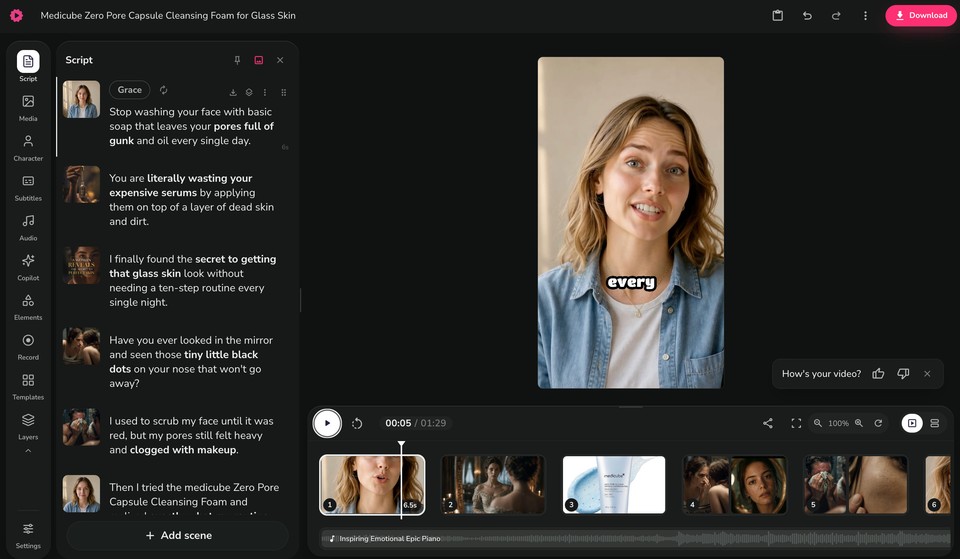
When generation completes, your video opens in the editor. The left panel lists every scene and line of script, and the center shows a live preview.
Use the left sidebar to fine-tune Script, Media, Character, Subtitles, Audio, Elements, and more.
Play back the video, tweak any scene, then click Download to export your video as an MP4.
With Fliki's Idea-to-Video workflow, you can go from a single sentence to a polished, on-brand video in minutes. Try it today and bring your ideas to life effortlessly.