Bulk create with CSV on Fliki
Looking to save time and scale your content production effortlessly? With Fliki's Bulk Create feature, you can generate multiple videos or audio files at once using a single CSV file. Whether you're automating YouTube channels, building personalized learning modules, or batch-creating content for social media, Bulk Create is your ultimate productivity hack.
The CSV now supports many more columns, so you can control visuals, AI video clips, sound effects, subtitles, resolution, and export settings for every row. Let's walk through the steps to get started.
Step 1 - Access bulk create
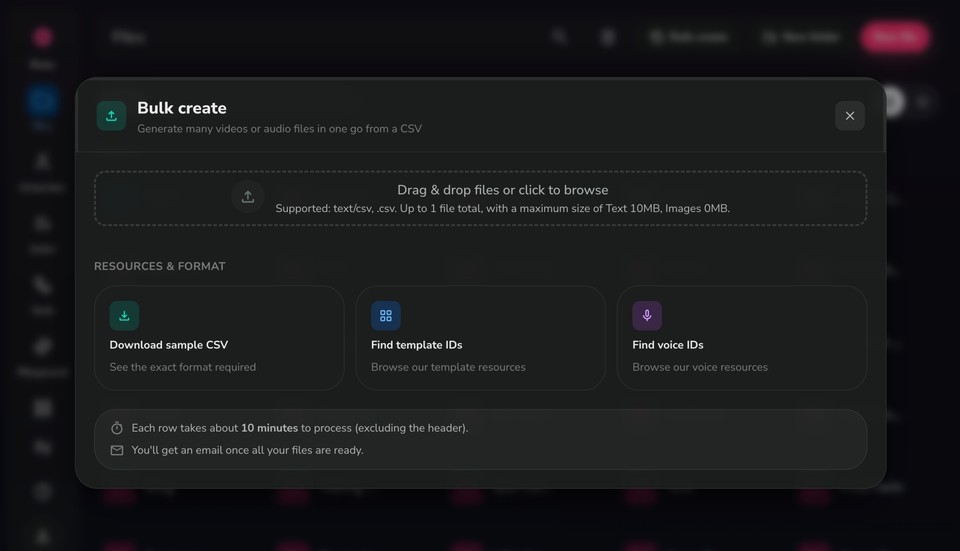
Navigate to the Files page in Fliki and click the Bulk create button in the header.
A pop-up window opens with everything you need:
A Drag & drop area to upload your CSV (supported: text/csv, .csv, up to 1 file, max 10MB).
Download sample CSV to grab a ready-to-edit template with the exact format required.
Find template IDs to browse template resources and copy the ID you want.
Find voice IDs to browse voice resources and copy the ID you want.
Each row takes about 10 minutes to process (excluding the header), and you'll get an email once all your files are ready.
Step 2 - Prepare your CSV file
Each row in your CSV generates one video or audio file. Download the sample CSV from the pop-up and edit it, keeping the columns in the exact order below. Leave a cell blank when a column does not apply to that row (for example, video-only settings on an audio row).
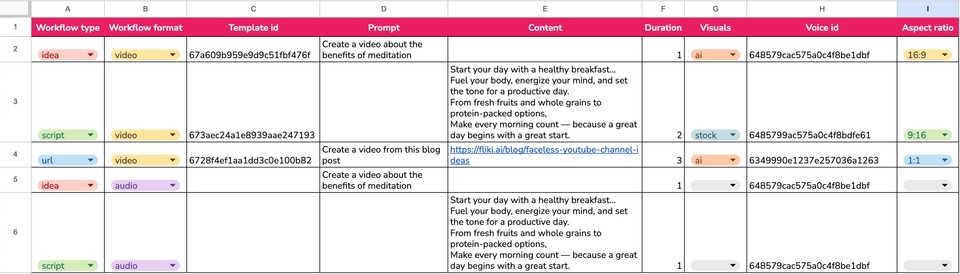
Here is what each column does, in order:
# | Column | Required | Accepted values | Notes |
|---|---|---|---|---|
1 | Format | Yes | video, audio | Whether the row produces a video or an audio file. |
2 | Workflow type | Yes | idea, script, url | How the content is created. idea: Fliki writes the script from your prompt. script: you supply the script. url: Fliki extracts content from a webpage. |
3 | Prompt | For idea / url | Plain text | The topic or idea. Describe it clearly for best results. |
4 | Content | For script / url | Script text or a URL | If script, paste your full script. If url, paste the webpage URL. If idea, leave blank. |
5 | Duration | No | Number, in minutes (1-15) | Target length. Special case: for script, set to 0 to use your script exactly as written, without modification. |
6 | Voice ID | Yes | A voice ID | Narration voice. Copy an ID from Find voice IDs in the pop-up (fliki.ai/info/voice). |
7 | Aspect ratio | No (video) | 16:9, 1:1, 9:16 | Video dimensions. 16:9 landscape, 1:1 square, 9:16 vertical. Leave blank for audio. Default 16:9. |
8 | Template ID | No (video) | A template ID | Layout and visual design. Copy an ID from Find template IDs in the pop-up (fliki.ai/info/template). Leave blank for audio. |
9 | Subtitle ID | No (video) | A subtitle preset ID | Applies a subtitle style. Only used when no Template ID is set. Get it from any project: open a file, then the subtitle preset in the right panel, and copy the ID. |
10 | Visuals | No (video) | stock, ai | stock uses premium stock footage, ai generates visuals with AI. Leave blank for audio. Default stock. |
11 | Style | No (video) | See art styles below | Art style for AI visuals. Only used when Visuals is ai. Default cinematic. |
12 | Auto Export | No | true, false | Automatically export the file after generation. |
13 | Extension | No | Video: mp4, mov. Audio: mp3, wav | Output file format. Default mp4 for video. |
14 | Resolution | No (video) | 1080p, 720p, 480p, 360p | Export resolution. Default 1080p. Leave blank for audio. |
15 | File name | No | Plain text | Name shown for the file in your workspace. Defaults to an untitled file. |
16 | BG music volume | No | Number, 0-100 | Background music volume. 0 mutes it, 100 is full. Default 20. |
17 | Scene breakdown | No (video) | auto, lineBreak, sentence | How the script is split into scenes. auto is recommended, lineBreak splits at each new line, sentence splits at each sentence. |
18 | Image animation | No (video) | None, Mix:Subtle Flow, Mix, Mix:Dramatic | Motion applied to AI images. Only affects AI visuals. Mix:Subtle Flow is a gentle Ken Burns motion, Mix is energetic short-form motion, Mix:Dramatic is bold and high impact. |
19 | Generate sound effects | No (video) | true, false | Adds contextual sound effects per scene. Default true. |
20 | Highlight subtitles | No (video) | true, false | Highlights the spoken word karaoke-style. Default false. |
21 | Add pauses | No | true, false | Inserts natural pauses between sentences in the voiceover. Default false. |
22 | AI video model | No (video) | See AI video models below | Generates moving video clips instead of static AI images. Requires a paid plan. Leave blank to skip. |
23 | AI video clip % | No (video) | Number, 0-100 | Percentage of scenes filled with AI video clips. Only applies when an AI video model is set. Default 20. |
Art styles (Style column)
Use one of these keys when Visuals is ai:
cinematic
realistic
anime
illustration
comicBook
threeDimensionModel
fantasyArt
waterColor
lineArt
modelingCompound
whimsical
biblical
filmNoir
tinyWorld
technicalIllustration
AI video models (AI video model column)
Paid plans only. Leave blank to use stock footage or static AI images instead.
runware-seedance-pro-fast (Seedance Pro Fast): fastest and most affordable, good for drafts and B-roll.
runware-p-video (P-Video): affordable everyday model for social and marketing clips.
runware-pixverse-v5-fast (PixVerse v5 Fast): best for anime, sci-fi, and template-driven viral effects.
runware-ltx-2-fast (LTX-2 Fast): open-source model, supports clips up to 20 seconds.
runware-kling-2.5-turbo (Kling 2.5 Turbo): cinematic look with weighted physics, great for B-roll.
Note: Entering incorrect or invalid values may cause errors during processing. Double-check your CSV to ensure every field is accurate and correctly formatted. If in doubt, start from the Download sample CSV template in the pop-up.
Quick examples
A few example rows to show how the columns work together:
Idea to video (AI visuals): video, idea, "Create a video about the benefits of meditation", , 1, <voiceId>, 16:9, <templateId>, , ai, cinematic, true, mp4, 1080p, , 20, auto, Mix:Subtle Flow, true, false, false, ,
Script to video (stock visuals): video, script, , "Your full script text...", , <voiceId>, 9:16, <templateId>, , stock, , true, mp4, 1080p, , 20, auto, , true, false, false, , (set Duration to 0 to keep your script exactly as written).
URL to video: video, url, "Create a video from this blog post", https://fliki.ai/blog/your-post, 3, <voiceId>, 16:9, <templateId>, , ai, cinematic, false, , , , 20, auto, Mix:Subtle Flow, true, false, false, ,
Idea to audio: audio, idea, "Create audio about the benefits of meditation", , 1, <voiceId>, , , , , , false, , , , , , , , , , , (leave all the video-only columns blank).
Script to audio: audio, script, , "Your full script text...", 1, <voiceId>, , , , , , true, mp3, , , , , , , , , ,
Step 3 - Upload your CSV
Once your file is ready:
Drag and drop it into the upload area in the Bulk create pop-up, or click to browse your computer.
Make sure it is a .csv file and under the 10MB limit.
Fliki begins processing each row. It typically takes around 10 minutes per row (excluding the header).
[SCREENSHOT: Bulk create processing state]
You'll receive an email notification once all your videos or audios are ready.
Step 4 - Review & use your content
Once processing is complete:
Head back to the Files page to find your new files in a folder named after your CSV.
Review the output, then download, share, or edit any file as needed. If you turned on Auto Export, exported files are ready to download right away.
Tips for best results
Finalize your script before uploading. Frequent changes mean more time and potential credit usage.
Keep columns in the exact order from the sample CSV, and leave video-only cells blank on audio rows.
Use descriptive prompts to get better narration and visuals.
Preview templates and voices before adding their IDs so the style and tone match your content.
For large batches, break them into smaller CSVs for smoother processing.
AI video models and higher resolutions use more credits and take longer, so reserve them for the rows that need them.
With Bulk Create, you can produce at scale while staying in full control. Automate, customize, and accelerate your content creation, right inside Fliki.
Bulk create with CSV on Fliki
Looking to save time and scale your content production effortlessly? With Fliki’s Bulk Create feature, you can generate multiple videos or audio files at once using a single CSV file. Whether you're automating YouTube channels, building personalized learning modules, or batch-creating content for social media, Bulk Create is your ultimate productivity hack.
Let’s walk you through the simple steps to get started!
Step 1 - Access bulk create
Navigate to the Files page in Fliki and click on the Bulk create button in the header.
This will open a pop-up window that guides you through uploading your CSV file.
Step 2 - Prepare your CSV file
Each row in your CSV file will generate one video or audio file. To ensure everything runs smoothly, it's important to understand what each column in the file does, what values are accepted, and how they affect your final output.
Below is a breakdown of each column in the required order:
Workflow type – Defines how your content is processed.
Accepted values:
idea – Fliki will generate the script based on your prompt.
script – You will provide a ready-made script.
url – Fliki will extract content from the provided URL.
Note: If set to idea, the “Content” column must be empty
Workflow format – Specifies whether you want a video or audio output.
Accepted values:
video - Fliki will generate a video file
audio - Fliki will generate an audio file
Template id – Indicates the layout or visual design to use (only applicable when workflow format is set to video). Copy the correct ID from the template resources link in the Bulk Create popup.
Note: Preview templates before selecting to match the style of your content.
Prompt – Used to guide the content generation, especially when the workflow type is idea.
Value type: Plain text - Describe your topic clearly for best results.
Content – Depends on what you’ve selected for workflow type:
If idea: Leave this blank.
If script: Enter your complete script here.
If url: Paste the valid webpage URL to extract content from.
Duration Specifies the maximum length of the content.
Value type: Numerical - In minutes (e.g., 2, 10, 15)
Maximum value: 15
Special case: If you’re using ‘script’ in workflow type and want to use your script in content field as is (without modification), then please set the duration field to 0.
Visuals – Only applicable when workflow format is set to video.
Accepted values:
stock – Use pre-existing premium stock visuals.
ai – Generate visuals using AI.
Note: If workflow format is set to audio, leave this blank.
Voice id – Selects the voice for narration. Copy the correct voice ID from the voice resources link in the Bulk Create popup.
Note: Preview voices before selecting to match the tone of your content.
Aspect ratio – Defines the dimensions of your video.
Accepted values:
16:9 – Standard landscape format
1:1 – Square format, ideal for social feeds
9:16 – Vertical format for mobile and stories
⚠️ Note: Entering incorrect or invalid values may lead to errors during processing. Double-check your CSV to ensure all fields are accurate and formatted correctly. Still need help? Click Download a sample CSV to see the required format in the Bulk Create popup to get started with a ready-to-edit CSV template.
Step 3 - Upload your CSV
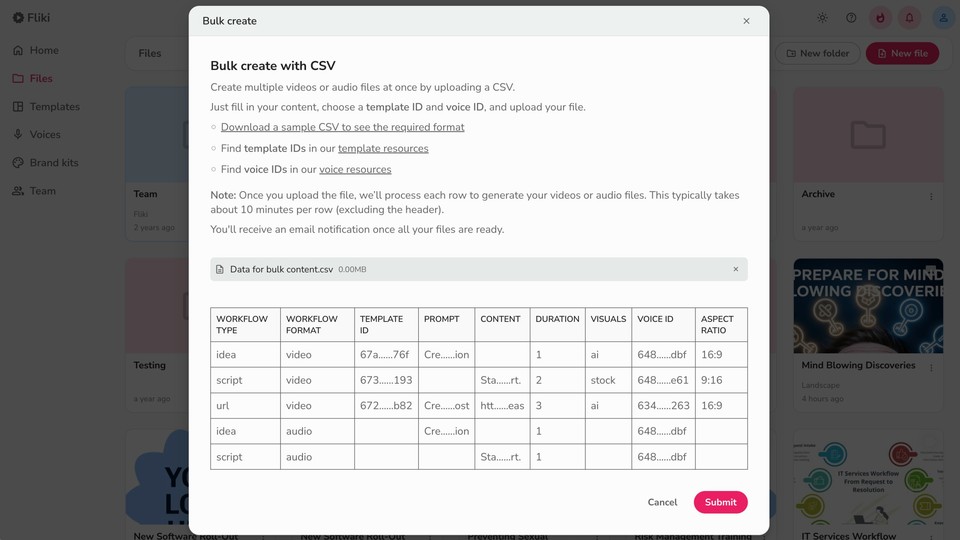
Once your file is ready:
Drag and drop it into the upload area in the Bulk create popup or click to browse your computer.
Make sure it’s a .csv file and under the 10MB limit.
Fliki will begin processing each row. Typically, it takes around 10 minutes per row (excluding the header).
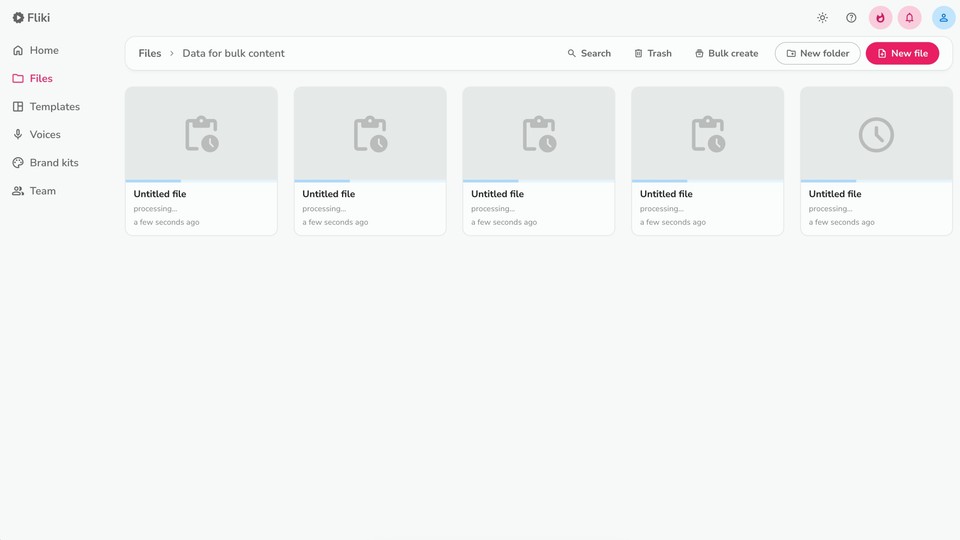
You’ll receive an email notification once all your videos or audios are ready.
Step 4 - Review & use your content
Once processing is complete:
Head back to the Files page to find your newly created video or audio files in a folder named after your CSV.
Review the output and download, share, or edit as needed.
Tips for best results
Finalize your script before uploading. Frequent changes mean more time and potential credit usage.
Use descriptive text prompts to get better narration quality.
For large batches, consider breaking them into smaller CSVs for smoother processing.
With Bulk Create, you can produce at scale while staying in full control. Automate, customize, and accelerate your content creation - right inside Fliki.