Introduction
👋 Hey!
Welcome to Fliki, your one-stop solution for generating captivating audio, video, and image content.
This is where you learn how to use Fliki and get answers to all your queries.
Let’s get started with Fliki by signing up or logging in.
If you still feel like there is something that we've not covered, please feel free to reach out to us via live chat or email us at support@fliki.ai, we'll do our best to address your doubts.
🎥 How to create videos and voiceovers using Fliki:
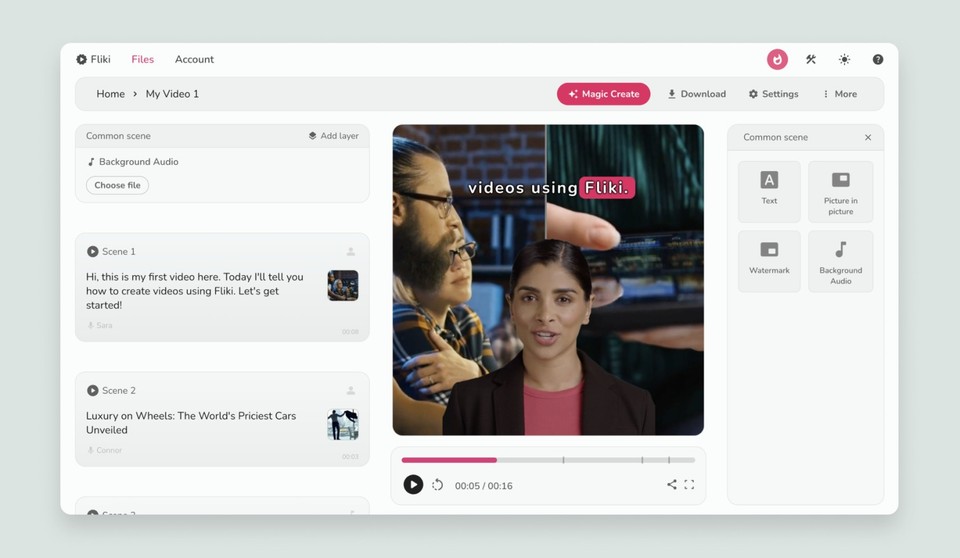
Editor
The editor is where you create and edit your videos, audio files, or images. It's like a digital storyboard where you piece together your project.
Here’s what the editor looks like:
Files and Folders
Creating a Folder
A folder is a digital container used to organize and store files. It allows users to group related files together for easier management and navigation. Users can create folders to categorize their files based on projects, topics, or other criteria that suit their needs. To create a folder, follow the steps:
Navigate to the Files page.
Click on the "New folder" option in the top right corner.
Enter the folder name and click "Submit."
Creating a File
Fliki's files serve as projects where users can create and edit their content. There are three main types of files available, namely video, audio and design files.
To create a video file, jump to the video file section.
To create an audio file, jump to the audio-only file section.
To create a design file, jump to the design file section.
Searching a File
To search files by name on the Files page in Fliki, follow the steps:
Access the Files page.
Click on the search option in the top right corner and type your search query.
Renaming a File
To rename a file in Fliki, follow these steps:
Locate the file you wish to rename on the Files page.
Click on the three dots located to the extreme right of the file.
Select the "Rename" option.
Enter the new name for the file in the provided field.
Click "Save" to confirm the new name.
Moving a File
To move a file in Fliki, follow these steps:
Navigate to the Files page and locate the file you want to move.
Click on the three dots located to the extreme right of the file. If you want to move multiple files at once, then simply hover over a file or folder, check the box that appears, next, check other files that you want to move.
Select the "Move" option.
Choose the destination folder where you want to move the file.
Click "Move Here" to confirm the move.
Duplicating a File
To duplicate a file in Fliki, follow these steps:
Go to the Files page and find the file you want to duplicate.
Click on the three dots located to the extreme right of the file.
Select the "Duplicate" option.
The file will be duplicated immediately.
Deleting a File
To delete a file in Fliki, follow these steps:
Access the Files page and locate the file you wish to delete.
Click on the three dots located to the extreme right of the file. If you want to delete multiple files at once, then simply hover over a file or folder, check the box that appears, next, check other files that you want to delete.
Select the "Delete" option.
Confirm the deletion by selecting "Delete" in the confirmation prompt.
Restoring a Deleted File
To restore a deleted file in Fliki, follow these steps:
Go to the Fliki Files page and click "Trash" or visit Trash.
Locate your recently deleted files stored in the Trash.
Click on the three dots to the extreme right of the file you wish to restore.
Select the "Restore" option.
Confirm the restoration by selecting "Restore" in the confirmation prompt.
Note: Files in the Trash will be permanently deleted after 30 days.
Scenes
A Scene refers to a sequence or segment within a Fliki file. When creating a video/audio in Fliki, users often organize their content into different scenes to structure the narrative or flow of the content. Think of them like chapters in a book. They're arranged in a list from top to bottom, making it easy to see the order of your project.
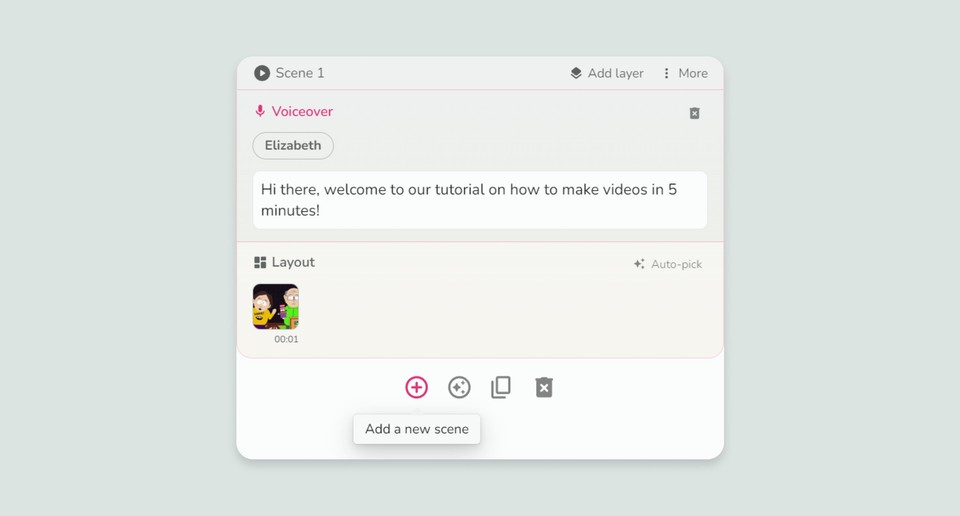
Adding a scene
You can add scenes to your Fliki file and create a sequence you desire. Follow these steps to add a scene:
Click on the + symbol right below the first scene to create a new one.
You can also add scene(s) between 2 or more scenes via the same process.
Deleting a scene
You can delete or remove a scene you do not need in your sequence. Follow these steps to delete a scene:
Take your cursor on the scene you wish to remove.
Click on the Delete icon right under the scene.
Moving a scene
You can move the scenes in files to rearrange and reorder the flow of your script. To move a scene, follow the steps:
Take your cursor on the scene you wish to move.
Hold the drag handle (⋮⋮ icon) and drag up or down to move your scene up or down, respectively.
Note: The drag handle (⋮⋮ icon) is only visible on the collapsed scene.
Duplicating a scene
You can create a duplicate copy of your scene and make further changes as you desire. To duplicate your scene, follow these steps:
Take your cursor to the scene you wish to duplicate.
Click on the Duplicate this scene button to replicate your scene.
A duplicate scene will be created right below the original one.
Duplicating or copying a layer
You can duplicate or copy your layer to another scene and make further changes as you desire. To duplicate or copy your scene, follow these steps:
Click on the copy or duplicate icon inside the layer you want to copy or duplicate.
Select duplicate layer to duplicate the layer in the same scene or copy layer to copy the layer to another scene.
If you’ve selected copy layer, then go to the new scene where you want to paste the layer.
Click on More, then select the option that says Paste [layer type] layer.
Setting custom duration
You can set a custom duration for a particular scene as well. Here’s how you can do it:
Select the scene you wish to shorten or lengthen.
Click on ‘⋮’ (More) and select Custom duration.
A popup will then appear, asking for the duration you wish to set.
Enter the duration (in seconds) and click OK.
To reset the duration, enter 0 in the duration popup and click OK.
Copy/pasting a scene
Here’s how you can copy and paste scenes across different files in Fliki:
Select the scene you wish to copy.
Click on ‘⋮’ (More) and select Copy Scene.
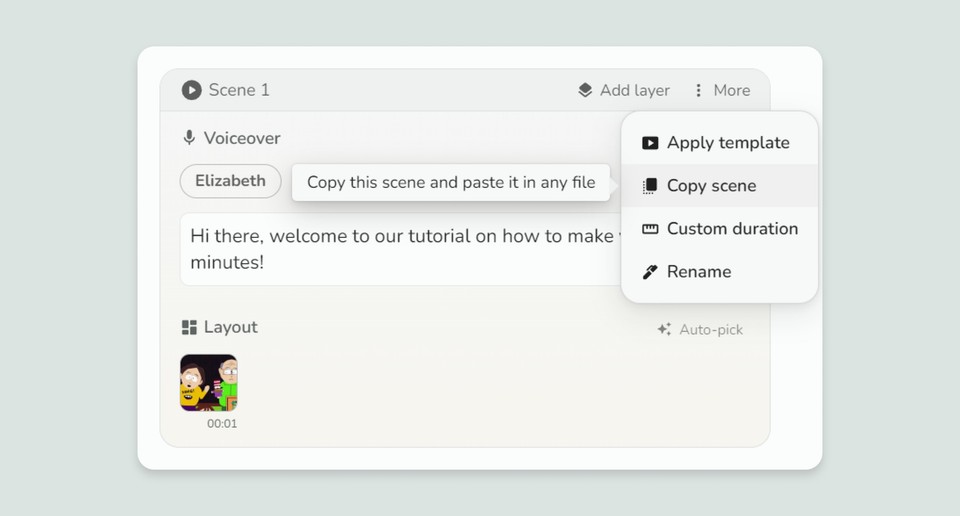
Go to the ‘+’ icon and select Paste Scene. Please note that the Paste Scene option only gets activated when you’ve copied a scene from a file. If you haven’t, then clicking ‘+’ will simply create a new blank scene.
A scene copied from a video can be pasted to an audio-only file, but it’ll only carry over the voiceover aspect of the scene.
Renaming a scene
You can give names to different scenes in your sequence. To rename a scene, follow these steps:
Select the scene you wish to rename.
Click on ‘⋮’ (More) and select Rename.
A Rename popup will appear asking for the new name.
Enter the new name and click Save.
Scene transition effects
Scene transition effects allow you to add seamless and stylish transitions between scenes, enhancing the viewing experience.
Customization options for Scene transition effects
Type: Choose the scene transition effect to match your video's mood and style. Following are the scene transition effects available in Fliki: Blur, Clock, Fade, Flip, Slide, Wipe, Zoom
Duration: Control the length of the transition. Adjust the duration to make transitions quick and snappy or slow and smooth.
Easing: Apply various easing options to smoothen the transition effect. Easing effects help to create natural and visually appealing transitions by controlling the speed of the transition over time.
Sound Effects: Enhance your transitions with sound effects to make them more engaging. Add sounds like click, bell, boom, pop, or whoosh to complement the visual effect and elevate your sound design game.
To add a new transition effect to a scene, follow these steps:
Select a scene: Select a scene. Next, in the right customization panel, choose your desired effect from the type dropdown under the transition section.
Customize settings: Select the duration, easing effect, and sound effect that best suits your scene transition.
Preview: Click the play icon in the mini-player to preview the scene transition effect.
Apply to all scenes: You can click ‘Apply to all scenes‘ to apply the same transition effect to all the scenes.
Common Scene
A common scene contains layers that persist throughout the entirety of the audio or video file. These layers typically include watermarks, text, and background music.
Adding text
You can add a piece of text to your file that’ll be visible throughout the video. It is available for video and design-based files. Here’s how you can add a text to your common scene:
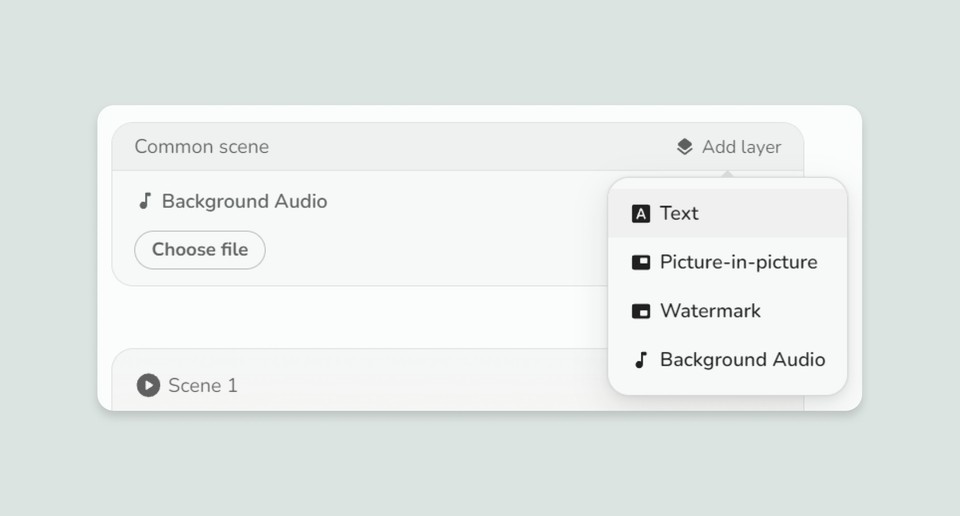
Go to the Common Scene section of your file’s sequence and click on Add layer.
Select Text from a list of options.
Type the text you want in the text box.
Your text will appear in the top-center position of your video.
You can change the position, font style, size, text color, background color, shadow color, and even give an animation to the text through the customization section on the right side of your screen.
You can also apply the changes to all the scenes.
Adding Watermark
Adding a watermark brings a sense of authenticity to your creation, be it a brand logo or a symbol you like, you can add a watermark to your files using Fliki. Here’s how:
Go to the Common Scene section of your file’s sequence and click on Add layer.
From the list of options, select Watermark.
Click the watermark media icon to open the media selection window.
Select the image you wish to choose as your watermark.
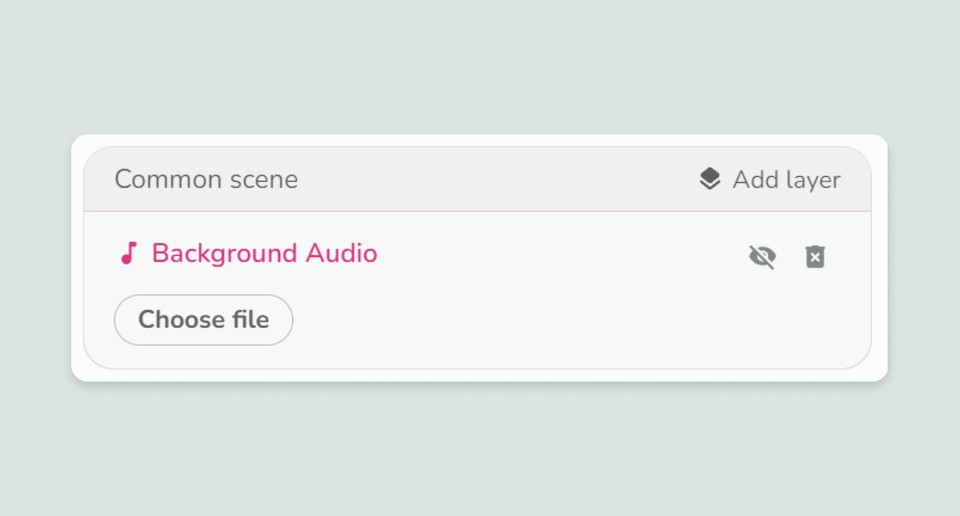
Adding Background Audio
Background audio sets the tone for your file. Here’s how you can set the background audio for your common scene:
When creating an Audio-only, or Video file, your common scene will already be equipped with a background audio layer.
Click on the Choose file button in the Background Audio layer.
You’ll then be presented with an audio library consisting of stock audio options, custom audio options, and favorites.
Click ‘🔉’ icon to get a preview of the audio clip.
Once satisfied, click the audio clip to select it.
Layers and Customization Panel
A layer in Fliki refers to a section within a scene where you can add text, pictures, videos, audio clips and even avatar videos to your layer. You can also customize layers through the customization panel on the right side of the screen.
Note: There is a maximum limit of 15 layers per scene. Therefore, you can only add up to 15 layers in one particular scene.
Here’s a list of different layers with their customization options:
Voiceover
With Fliki, you can add voiceovers to your video and audio files to give them a narration. Choose from a range of voices from different languages, dialects, and styles.
Adding a Voiceover
Click the voice name under the Voiceover section in the scene. The default voice is usually Sara.
This brings up a Voice selection window.
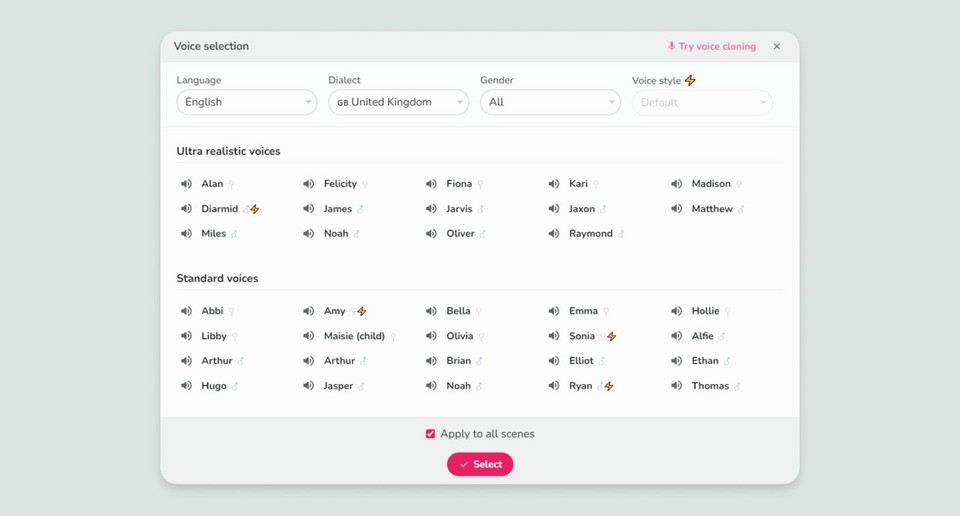
You can click on the speaker icon ‘🔉’ to play sample audio from the voice.
To select the voice for a scene click on the desired voice and then click Select at the bottom of the window.
If you want to apply the same voice to all your scenes, click on Apply this voice to all voiceovers checkbox.
Customizing AI voices
Customize AI voices based on language, dialects and styles. Here’s how you can customize an AI voice:
Language
Fliki supports 80+ languages to help you create videos that reflect your ideas in the best way possible!
🇦🇪 Arabica 🇨🇳 Chinese 🇨🇿 Czech 🇩🇰 Danish 🇳🇱 Dutch 🇺🇸 English 🇫🇮 Finnish 🇫🇷 French 🇩🇪 German 🇬🇷 Greek 🇮🇱 Hebrew 🇮🇳 Hindi 🇮🇩 Indonesian 🇮🇹 Italian 🇯🇵 Japanese 🇰🇷 Korean 🇳🇴 Norwegian 🇵🇱 Polish 🇵🇹 Portuguese 🇷🇴 Romanian 🇷🇺 Russian 🇪🇸 Spanish 🇸🇪 Swedish 🇹🇭 Thai 🇹🇷 Turkish, and many more.
Not finding your language? Reach out to us at support@fliki.ai
Selecting a language
Follow these steps to select a language for your voiceover layer:
Click on the voice name right below the Voiceover layer in the scene.
You’ll then find the Language dropdown in the Voice selection window.
Use the Language dropdown to select your desired language.
Dialect
Fliki supports more than 100 different dialects/accents to give your videos an organic and relatable voice. It also supports multiple region-language combinations like:
🇺🇸 American English 🇬🇧 British English 🇮🇳Indian English 🇲🇽 Mexican Spanish 🇪🇸 Spanish from Spain 🇺🇸 American Spanish 🇧🇷 Brazilian Portuguese 🇵🇹 Portuguese from Portugal 🇨🇦 Canadian French 🇧🇪 Belgium French 🇦🇪 Emirates Arabic 🇲🇦 Moroccan Arabic, and many more.
Not finding your dialect? Reach out to us at support@fliki.ai
Selecting a dialect
Choose a dialect for your voiceover layer from a list of dialects. To select a dialect, follow these steps:
Click the voice name right below Voiceover in the scene.
You’ll then find the Dialect dropdown in the Voice Selection window.
Use the Dialect dropdown to select a dialect based on the language you have chosen.
Voice Styles
Fliki helps you set the style of voice you need for your video and audio files. Whether you want to express Happiness, Anger, Cheerfulness, or Hope, you can select a voice style that best suits your narrative.
Note: Voices that support voice styles are indicated with a ‘⚡️’ icon.
Selecting a Voice Style
To change and select a voice style for your voiceover layer, follow these steps:
Click the voice name under the Voiceover layer in the scene.
You’ll then find the Voice style dropdown within the Voice selection window.
Select a voice with the ‘⚡️’ icon and go to the Voice style dropdown.
From the dropdown, select the style you need for your voice.
Add pause
You can add pause between words in your scene. To add a pause, select a piece of text from your scene:
Go to Pause and set the pause time (in seconds) inside the add-pause popup.
Note: Not all voices support adding pause at this point. And for those voices, this option is not visible.
Pronounce
You can hear how a word is pronounced through the Pronounce feature. Simply select the word you want to hear, and then click Pronounce to hear how it sounds.
Voice Cloning
Fliki’s Voice Cloning technology allows users to record and create a computer-generated voice that sounds just like their own. This technology is particularly useful for those who need to generate voiceovers using their own voice but do not have the time or resources to record their voice for every project. Here’s how you can clone your voice:
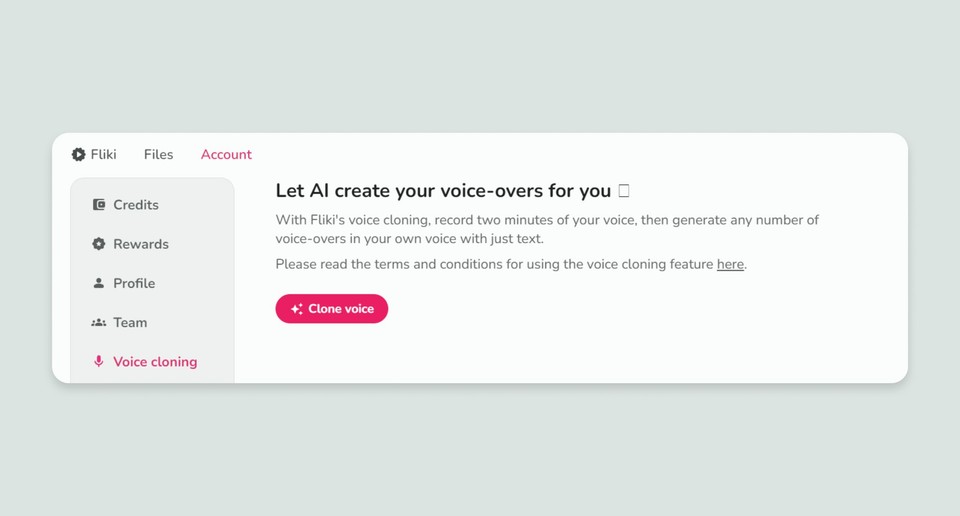
Subscribe to a paid plan and navigate to the Try Voice Cloning section in the Voice selection window.
Enter the voice name, select gender and language.
Record a consent script along with a sample script for about 2 mins.
Voice Cloning is supported in
Arabic (🇸🇦 Saudi Arabia)
Arabic (🇦🇪 UAE)
Bulgarian (🇧🇬 Bulgaria)
Chinese (Mandarin Simplified 🇨🇳)
Croatian (🇭🇷 Croatia)
Czech (🇨🇿 Czech Republic)
Danish (🇩🇰 Denmark)
Dutch (🇳🇱 Netherlands)
English (🇦🇺 Australia)
English (🇨🇦 Canada)
English (🇮🇳 India)
English (🇸🇬 Singapore)
English (🇬🇧 United Kingdom)
English (🇺🇸 United States)
Filipino (🇵🇭 Philippines)
Finnish (🇫🇮 Finland)
French (🇫🇷 France)
German (🇩🇪 Germany)
Greek (🇬🇷 Greece)
Hindi (🇮🇳 India)
Hungarian (🇭🇺 Hungary)
Indonesian (🇮🇩 Indonesia)
Italian (🇮🇹 Italy)
Japanese (🇯🇵 Japan)
Korean (🇰🇷 Korea)
Malay (🇲🇾 Malaysia)
Norwegian (🇳🇴 Norway)
Polish (🇵🇱 Poland)
Portuguese (🇧🇷 Brazil)
Portuguese (🇵🇹 Portugal)
Romanian (🇷🇴 Romania)
Russian (🇷🇺 Russia)
Slovak (🇸🇰 Slovakia)
Spanish (🇲🇽 Mexico)
Spanish (🇪🇸 Spain)
Swedish (🇸🇪 Sweden)
Tamil (🇮🇳 India)
Turkish (🇹🇷 Turkey)
Ukrainian (🇺🇦 Ukraine)
Vietnamese (🇻🇳 Vietnam)
Custom voices
With the custom voices feature, you can create unique voices tailored to your specific needs. Whether it's for character storytelling, setting a particular tone, or adding a personal touch to a project, you have full control over crafting a voice that matches your vision. Follow these steps to get started.
How to create custom voices
Navigate to voices: Locate voices in the left sidebar of your interface.
Select Custom: In the voice options menu, choose "Custom" to enable voice customization.
Click create custom voice: Select "Create custom voice" to open customization settings.
Provide details such as age, accent, tone, or personality, and quickly generate a unique voice for your project. Once created, your custom voice is ready to use in text-based voice-overs, making it easy to bring characters and narratives to life.
Note: Custom voices do not support the generation of child voices. Any attributes related to child, young, boy, or girl voices will not be functional.
Voiceover customization settings
Every piece of audio that you add to your audio or video file can be customized. Here’s how you can customize your audio clips in different scenes.
Volume - Use the volume slider to increase or decrease the volume of the audio layer.
Speed - Use the speed slider to increase or decrease the speed of the audio layer.
Subtitle - Click the Subtitle checkbox to enable subtitles. It’ll use your script from the scene to make a subtitle.
Height - Set the height. of the subtitle container. This value represents the container's relative to the video frame. If the height value is set to 100, the subtitle container will match the height of the video frame.
Width - Set the width of the subtitle container. This value represents the width of the container relative to the video frame. If the width value is set to 100, the subtitle container will match the width of the video frame.
Top - Set the top position of the subtitle container. This value represents the distance from the top of the video to the top edge of the subtitle container. For example:
If the top value is set to 0, the top edge of the subtitle container will align with the top edge of the video.
If the top value is set to 100, the top edge of the subtitle container will align with the bottom edge of the video.
Left - Set the left position of the subtitle container. This value represents the distance from the left side of the video to the left edge of the subtitle container. For example:
If the left value is set to 0, the left edge of the subtitle container will align with the left edge of the video.
If the left value is set to 100, the left edge of the subtitle container will align with the right edge of the video.
Rotate - Set the rotate value for your subtitles in degrees. This value represents the degree of tilt for the subtitle layer with respect to the horizontal axis.
Text Align: Set the horizontal alignment of the text within the subtitle container. The possible values are:
left: Align the text to the left edge of the subtitle container.
center: Center the text within the subtitle container.
right: Align the text to the right edge of the subtitle container.
Vertical Alignment: Set the vertical alignment of the text within the subtitle container. The possible values are:
top: Align the text to the top edge of the subtitle container.
middle: Center the text vertically within the subtitle container.
bottom: Align the text to the bottom edge of the subtitle container.
Font - Choose a font for your subtitles from a list of fonts available.
Font Size - Choose a subtitle font size that suits your presentation style.
Font Weight - Choose a subtitle font weight that suits your presentation style.
Text color - Choose a subtitle text color by either entering a Hashcode or manually selecting the shade.
Background color - Choose a background color for your subtitle layer either by entering the hashcode or manually selecting the shade.
Display - Choose how you want to display your subtitles from a list of options: word, phrase, sequence, or full.
Effects - Customize your subtitles with bubble, fill, stroke, text color, background, and underline effects, which help create visually engaging and stylistically unique video captions.
Audio fade - Enable or disable audio fade for the voiceover layer. When checked, this option will gradually increase the volume at the beginning and decrease the volume at the end of the voiceover, creating a smooth fade-in and fade-out effect.
Animation - Add animation to the text layer; select an animation from the Animation dropdown.
Audio visualization - Click the Audio visualization to add a visualization overlay to your file.
Timing - Enable or disable the timing adjustment for the voiceover layer. When checked, this option allows the user to set the start and end times of the voiceover within the scene using a range slider.
For example, if the scene length is 10 seconds, the range slider will span from 0 to 10 seconds. The user can drag the slider handles to set the desired start and end points for the voiceover.
If the user sets the slider to start at the 3rd second and end at the 7th second, the voiceover will play from the 3rd second to the 7th second of the scene.
Apply to all scenes - Click on Apply to all scenes to apply a change across all scenes.
Media
You can change the media in your video and design files through simple steps:
Select the scene to change its media.
Select the media item (video clip or image) within the scene.
On the right side of the screen, you can customize the media options.
You can also let AI auto-pick media for you by clicking the Auto pick media button.
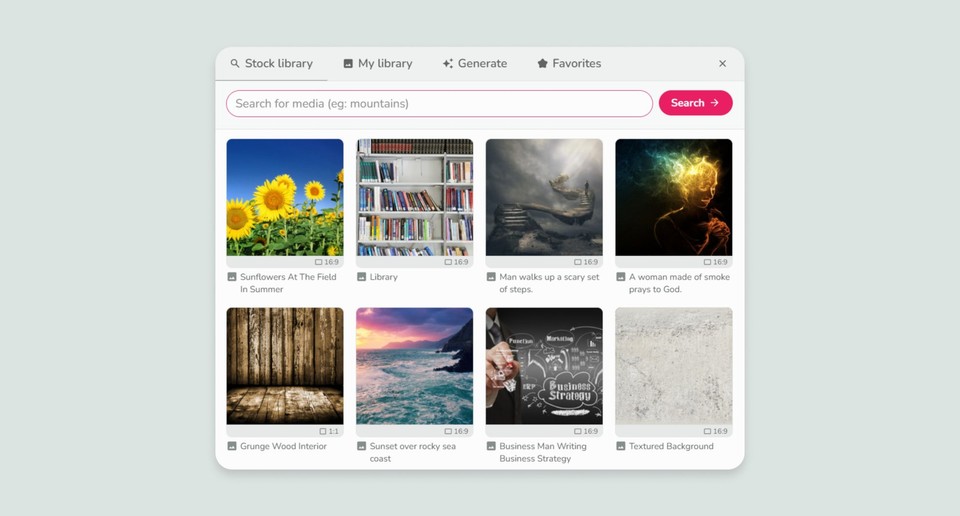
Stock Media
Stock media represents the standard set of pictures and videos that can be added to a scene. These are royalty free, simple pieces of media that are easily accessible to all users. Here’s how you can add stock media to your scene:
Select the media element in the media layer of your scene.
A library window will appear with options for Stock library, My library, Generate and Favorites. Select Stock library.
A list of media will appear. Please note that you can change the type of media you need by choosing between Video, Image, and GIF.
You can also look up specific media by typing it in the search bar and clicking Search.
Custom Media
Custom media refers to the media that you can upload from your system to Fliki. Here’s how you can access custom media:
Select the media element in the media layer of your scene.
A library window will appear with options for Stock library, My library, Generate, and Favorites. Select My library.
Click on Choose files to select media from your local device. You can select a maximum of five files of upto 250 MB each in one instance.
Once uploaded, your custom media files will appear in "My Library" alongside your other uploaded media.
AI Media
AI media refers to the type of media that you can generate using Fliki’s Generate option. You can generate a video clip or an image using this feature. Here’s how you can add AI media to your file:
Select a scene with a media layer.
Click on the media icon within the media layer.
A library window will appear with options for Stock library, My library, Generate and Favorites. Select Generate.
Choose between AI image and AI video clip.
Enter your prompt in the Instructions box.
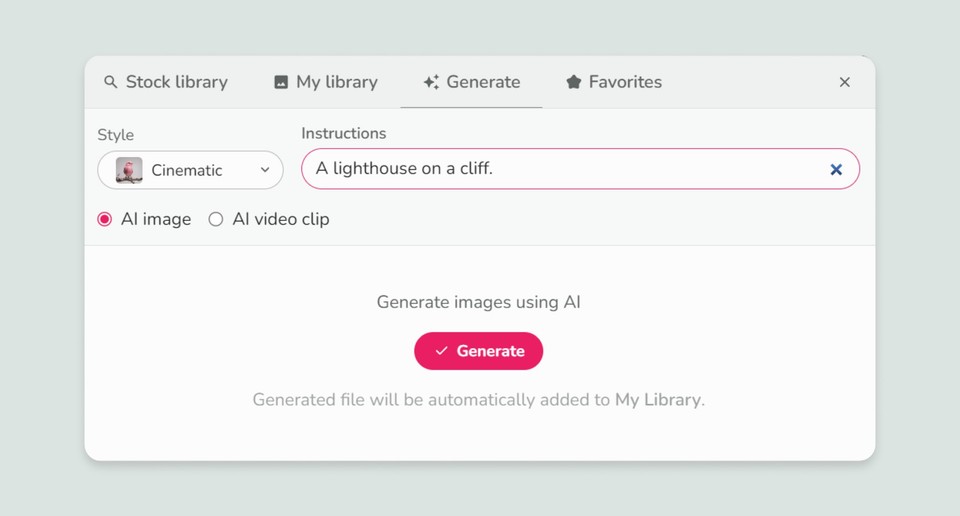
Select a style for your AI-generated media by choosing one from the drop-down menu and hit Generate.
You can also use the Auto generate feature to generate a piece of media through AI based on the context of your sequence.
B-rolls
Enhance your scenes by adding multiple media elements that play sequentially, creating a rich, engaging experience. Follow the given steps to add B-rolls in Fliki:
Highlight the text in the voiceover layer where you want to add the B-Roll and select 'B-roll'.
A new media layer will be added that only shows when the selected text is spoken.
You can fine-tune the media timing by selecting the media layer, checking the ‘Timing’ checkbox in the right customization panel and dragging the ‘Scene Time‘ handles.
The media duration can also be visualized with a Gantt chart in the media layer, showing exactly how long each media element will appear.
Media customization settings
Height and Width: Adjust the height and width of the media within the range of 0 to 100. You can also graphically edit the media's size via the preview window.
Top and Left: Set the position of the media by specifying the top and left coordinates. You can also drag the media to adjust its position directly on the preview window.
Rotate: Rotate the media to achieve the desired orientation.
Fit - Choose among Cover and Contain options for your media.
Position media - Adjust the position of the media within the media frame. This option is helpful to adjust the positioning of stock videos, especially in different aspect ratios like 9:16.
Border radius - Control the corner roundness of the selected media layer.
Opacity: Control the transparency of the media layer.
Volume - Use the volume slider to increase or decrease the volume of the media layer.
Border -Controls the thickness of the border of the media layer.
Animation: Add animation effects to the media layer by selecting an animation from the dropdown menu.
Effects: Enable or disable effects for the media layer. When checked, this option allows the user to add various effects to the media layer, such as pan, zoom, rotate, and blur. Each effect has further customizable settings:
Change Direction:
Pan: For the pan effect, the user can choose from directions such as from left, from top-left, from top, from top-right, from right, from bottom-right, from bottom, and from bottom-left.
Zoom: For the zoom effect, the options are zooming in or out.
Rotate: For the rotate effect, the user can select either clockwise or anti-clockwise rotation.
Blur: For the blur effect, the user can choose to blur in or out.
Change Timing: Allows the user to set the start and end times of the effect within the scene using a range slider.
Show/Hide Effect: Used to show or hide the effect.
Delete: Delete the effect.
Note: The user can add multiple effects to a media layer, customizing each effect individually.
Timing - Enable or disable the timing adjustment for the media layer. When checked, it shows two range sliders:
Scene Time - This option allows the user to set the start and end times of the media within the scene using a range slider.
For example, if the scene length is 10 seconds, the range slider will span from 0 to 10 seconds. The user can drag the slider handles to set the desired start and end points for the media.
If the user sets the slider to start at the 3rd second and end at the 7th second, the media will play from the 3rd second to the 7th second of the scene.
Trim Media - The trim media range slider can be used to trim the media to the desired portion.
For example, if the media length is 30 seconds and the user wants to use the segment from the 5th second to the 9th second, they can use the trim media range slider to select this portion.
Auto-pick media - The Auto-pick media selects a contextual media based on the script of your scene.
Avatar
Fliki brings AI-generated characters to life as narrators. You can choose from a variety of avatars to give voice to your scenes, adding depth and personality to your videos. Here’s how you can add an avatar to your video file:
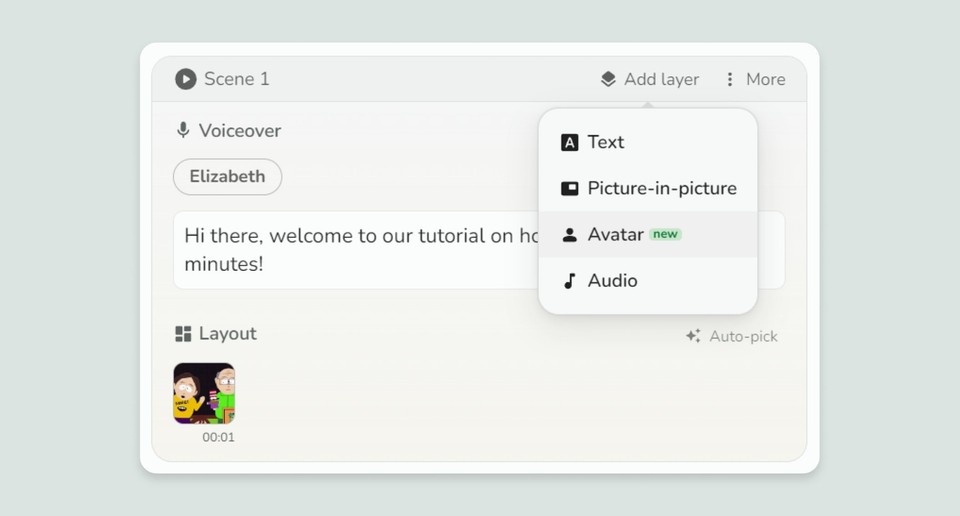
Click on a scene to add an avatar.
Go to Add layer and select Avatar.
You can add either a stock, AI-generated or a custom Avatar.
Stock avatar
A stock avatar is the one that is readily available in the avatar library. Here’s how you can add one:
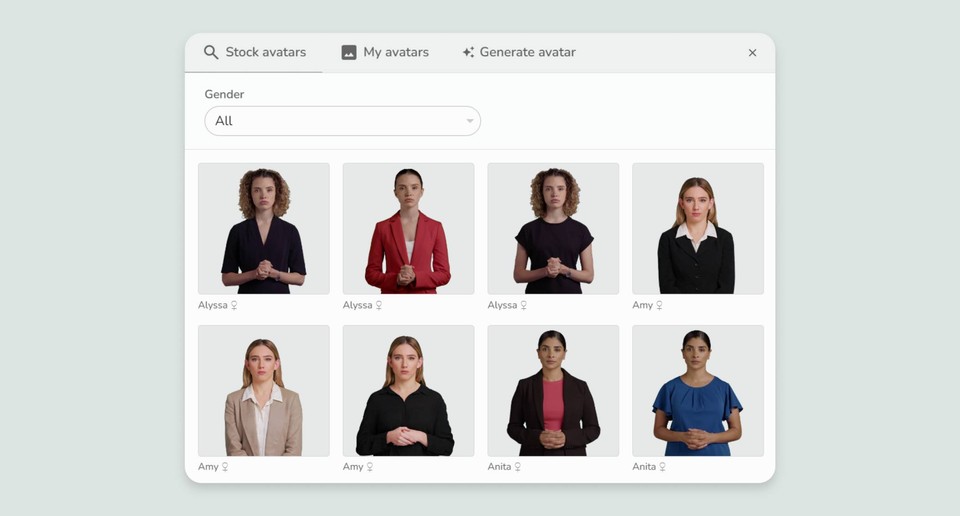
Click on a scene to add an avatar.
Go to Add layer and select Avatar.
An avatar layer will be added to your scene.
Click on the avatar to access the avatar selection window.
Choose Stock avatars to display a list of readily available avatars.
Select the gender of your avatar by clicking and choosing a gender from the Gender dropdown.
Hold your cursor over the avatar to get a preview of how it’ll look.
Once satisfied, click on the avatar.
My avatar
Fliki allows you to add your own custom avatar to your video. Here’s how you can add one:
Click on a scene to add an avatar.
Go to Add layer and select Avatar.
An avatar layer will be added to your scene.
Click on the avatar to access the avatar selection window.
Choose My avatars followed by Choose file.
Select an avatar from your system.
Generate avatar
Fliki gives you the ability to generate avatars as well. Here’s how you can add one:
Click on a scene to add an avatar.
Go to Add layer and select Avatar.
An avatar layer will be added to your scene.
Click on the avatar to access the avatar selection window.
Choose Generate avatar followed by Choose file.
Enter your prompt in the Instructions box.
You can also choose the style of your avatar from the Style dropdown.
Once satisfied, click Create.
Avatar customization settings
You can further customize your avatar and its appearance on your video. Just access the customization section on the right side of your screen. Here’s how:
Height and Width: Adjust the height and width of the avatar within the range of 0 to 100. You can also graphically edit the avatar's size via the preview window.
Top and Left: Set the position of the avatar by specifying the top and left coordinates. You can also drag the avatar to adjust its position directly on the preview window.
Rotate: Rotate the avatar to achieve the desired orientation.
Close up - You can put a close up of your avatar on your video. Simply click the Close up checkbox to enable close up view.
Transparent - You can remove the solid background from your avatar via this feature. Click on the Transparent checkbox to disable the solid background. Note: If you’re using a custom avatar, then this option won’t show as custom avatars don’t support transparency as of now (even if you use a transparent photo).
Background color - Select a solid background color for your avatar through this feature. Click on the color bar to access the color popup. Select your desired color. Or enter a hashcode to your required color.
Animation - Select from a list of animations that suit your avatar’s presentation in the video. Click on the Animation popup to display a list of animations. Choose the one that suits you best.
Generate avatar video - You can generate an avatar video through Fliki’s AI. Click on the Generate avatar video. A prompt will appear asking you to confirm whether you want to create an avatar video or not. Read the prompt carefully and click Generate.
Effect
Add visual effects like damaged film, fire sparks, bokeh particles, confetti, and more to give your videos a unique look and make your scenes stand out. Here’s how to add an effect layer to a scene:
Select the scene where you want to add the effect layer.
Click on Add layer and choose Effect from the list.
An effect layer will appear.
Click on the effect icon to open the effect picker and choose from available effects and hit select.
Effect customization settings
Personalize the effect layer using the following options:
Height and Width: Adjust the size of the effect layer from 0 to 100. You can also modify the size directly by dragging the effect's handles in the preview window.
Top and Left: Control the position of the effect by specifying the top and left coordinates or by dragging it into place in the preview window.
Rotate: Rotate the effect to achieve the desired angle. You can also use the rotation handle in the preview window to adjust it graphically.
Border Radius: Modify the border radius to round the corners of the effect layer, if applicable. This setting is especially useful for effects contained within square or rectangular shapes.
Opacity: Adjust the transparency of the effect to achieve the right balance for your scene.
Animation: Apply animation effects to the effect layer by selecting an animation from the dropdown menu. This helps bring more dynamic movement to your effects in the scene.
Timing: Control when the effect layer appears and disappears in the scene by enabling the timing option. The range slider allows you to set the start and end times within the scene’s duration.
For instance, if the scene is 10 seconds long, you can set the effect to begin at the 3rd second and end at the 7th second by adjusting the slider, making the effect visible only within that time frame.
Text
You can add a text layer to your scenes in Fliki as well. Here’s how you can do so:
Select the scene to add the text layer.
Click on Add layer and choose Text from the list.
A text layer will appear with an empty text box.
Start writing your text in the text box.
Text customization settings
Customize your text layer over the following aspects, you will find these customization options for the text layer in the customization panel on the right:
Position - Set the position of your text layer by choosing a position on the grid.
Position manually - You can set a custom position for the text by dragging it within the preview window.
Font - Choose from a list of fonts available.
Size - Choose a font size that suits your presentation style.
Text color - Choose a text color by either entering a Hashcode or manually selecting the shade.
Background color - Choose a background color for your text layer either by entering the hashcode or manually selecting the shade.
Shadow color - Choose a shadow color by either entering a Hashcode or manually selecting the shade.
Animation in - Add animation to the text layer, select an animation from the Animation dropdown.
Apply to all scenes - Click on Apply to all scenes to apply a change across all scenes.
Shape
Add shapes like squares, rectangles, circles, and ellipses to enhance the visual appeal of your videos. Here’s how to add a shape layer to a scene:
Select the scene to add the shape layer.
Click on Add layer and choose Shape from the list.
A shape layer will appear.
Shape customization settings
Customize the shape layer according to your preferences using the following options:
Height and Width: Adjust the height and width of the shape within the range of 0 to 100. You can also graphically edit the shape's size via the preview window.
Top and Left: Set the position of the shape by specifying the top and left coordinates. You can also drag the shape to adjust its position directly on the preview window.
Rotate: Rotate the shape to achieve the desired orientation. You can also use the rotation handle in the preview window to graphically rotate the shape.
Opacity: Control the transparency of the shape layer.
Shape: Choose from available shapes such as rectangle and circle.
Background Color: Select a background color for the shape layer by entering the hashcode or manually selecting the shade.
Animation: Add animation effects to the shape layer by selecting an animation from the dropdown menu.
Audio
You can add audio clips to your video and audio files through Fliki. Here’s how you can add an audio clip:
Select the scene to add the audio layer.
Click on Add layer and choose Audio from the list.
An audio layer will appear in your scene.
Click on Choose file in the audio layer to access the audio library.
Choose an audio clip from Stock library, My library, or generate the audio clip via the Generate tab.
Click the ‘🔉’ to get a preview of the audio file.
Once satisfied, click the audio clip to add to your scene.
AI-generated sound effects
To generate a sound effect in Fliki, follow the given steps:
Click on Add layer beside the scene’s name, then select Audio. An audio layer will be added.
Click on Choose file to open the audio library.
Switch to the generate tab and describe the sound you want.
Select the duration of the audio and hit generate to create your custom sound effect instantly.
Note: You can also click Auto-generate to automatically generate sound effects based on the context of your scene.
Audio customization settings
Customize your audio overlay over the following aspects, you will find these options in the customization panel on the right:
Volume - Use the volume slider to increase or decrease the volume of the audio layer.
Speed - Use the speed slider to increase or decrease the speed of the audio layer.
Subtitle - Click the Subtitle checkbox to enable subtitles. It’ll use your script from the scene to make a subtitle.
Audio visualization - Click the Audio visualization to add a visualization overlay to your file.
Apply to all scenes - Click on Apply to all scenes to apply a change across all scenes.
Layer Options
The following layer options are common for all files in Fliki.
Hide
Select the layer you want to hide.
Click the hide icon right beside the delete layer button.
Your layer will be hidden from the final preview. Its effects will be muted.
Delete
Select the layer you want to delete.
Click the delete icon right beside the hide icon in the layer.
Preview Window
The preview window in Fliki is a media player with a list of features to help you get a better look at your file:
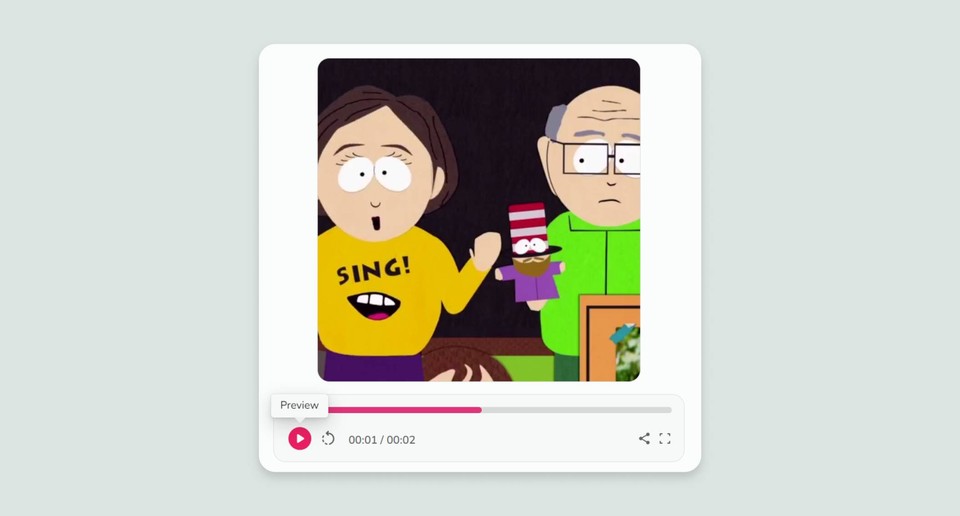
Preview - Get a preview of your audio or video file with the preview button. You can play and pause your audio and video files through this button.
Reset - Reset the play sequence back to 0 with this button.
Share video preview - Share a preview version of your video with your friends or team members. Click the share icon and copy the link from the Share Preview popup. Share the pass code with the people you want to show the preview.
Preview in fullscreen - Get a full screen preview of the video file that you’ve created.
Other Settings
Here’s a list of additional settings that can help you make better video and audio files with Fliki:
Pronunciation Map
Fliki provides a pronunciation map/dictionary, at every script level. You can add custom pronunciation mapping to various names and acronyms in your script.
Click the ‘⋮’ (more) icon and select Pronunciation map.
Enter the original word or acronym in the Original box and the replacement inside the Replace with box.
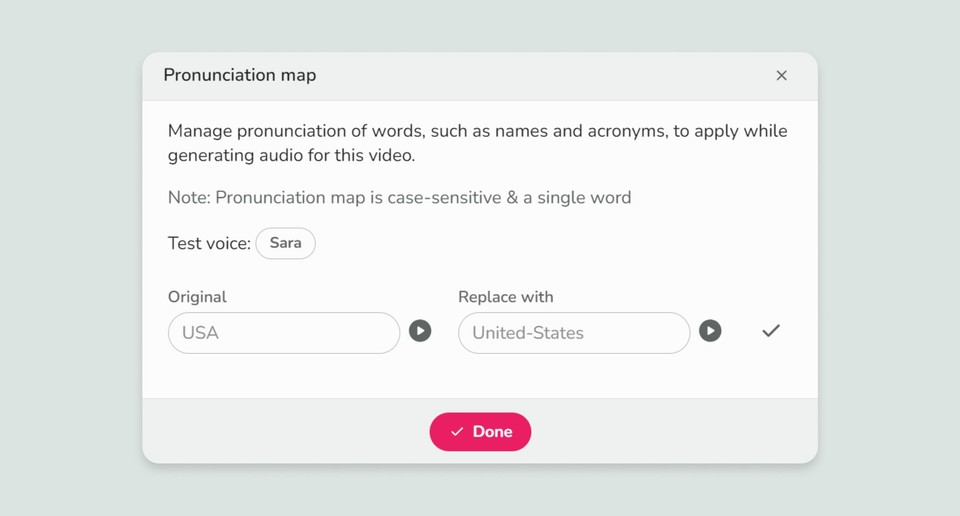
Click the play button right next to the Original and Replace with sections to hear the pronunciations. Once satisfied, click the tick-mark button.
You can also choose a test voice to get a preview of the changes.
Once satisfied with the result, click Done.
Translate
You can translate your script with Fliki in 3 simple steps:
Click the ‘⋮’ (more) icon and select Translate.
Select the Language and the Dialect from their respective dropdowns.
Click Submit.
Editor Layout
You can change the layout of the editor through the Editor Layout feature.
Click the ⋮ (more) icon and select Editor Layout.
Move the Scenes, the Player, or the Customization section left or right of each other.
Once done, click Update.
File History
Fliki’s File History feature allows you to create backup versions of your projects, enabling you to restore them to an earlier state whenever needed. This feature ensures that you never lose your progress and can always revert to a previous version with ease.
How to create a file backup version in Fliki
Click the ‘⋮’ (More) icon in the project toolbar.
Select History from the dropdown menu.
Click Create Backup – the system will save your project at that exact state.
Now, your project has a backup version that you can restore at any time.
How to restore a file backup version
If you’ve made changes and decide to revert to a previous state:
Click the ‘⋮’ (More) icon and select "History."
Find the backup version you want to restore.
Click the Restore icon next to that backup.
In the confirmation box, select Restore.
Note: This action will override your current playback contents. Ensure you’re selecting the correct backup before proceeding.
How to delete a backup version
If you want to remove an old backup version:
Click the ‘⋮’ (More) icon and select History.
Locate the backup you wish to delete.
Click the Bin (Delete) icon next to the backup version.
This will permanently remove the selected backup.
Undo & Redo
Fliki allows you to quickly reverse or redo actions, ensuring a seamless editing experience.
How to Undo an Action
If you make a change and want to revert it:
Click the Undo icon below the preview window.
Alternatively, use the shortcut Ctrl/Cmd + Z for quick access.
How to Redo an Action
If you undo something and decide to bring it back:
Click the Redo icon next to the Undo button.
Alternatively, use the shortcut Ctrl/Cmd + Y to redo the action instantly.
These options help you experiment with edits confidently, knowing you can always go back or forward as needed.
Video
Fliki helps you create creative videos with layers of text, images, audio clips and much more. It is simple yet powerful. Here’s how it works:
Creating an Empty Video File

Follow the steps to learn how to create an empty video file in Fliki:
On the editor window, select Empty option under Video section.
Enter the file name and then choose the desired aspect ratio.
Next, choose the language and dialect from the respective dropdowns.
Once done, click Submit.
Video Types
Fliki helps you create videos from scripts, ideas, blogs, and even products via simple prompts. Here’s how you can create a video through Fliki:
Creating a Video through Idea
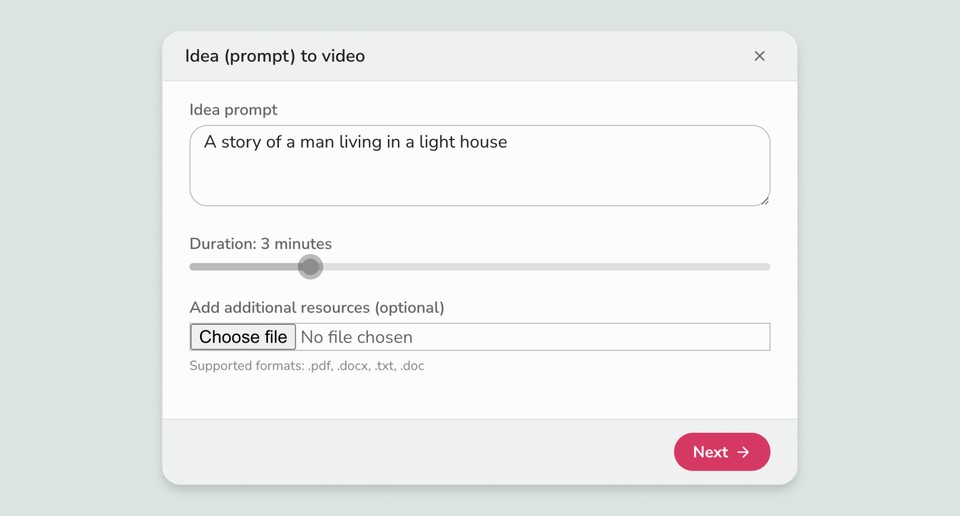
Create a video by putting your ideas in words, Fliki will take your idea as input and come up with a video that fits the description well. Here’s how you can create a video through an idea:
On the editor window, select Idea(prompt) under video section to access the idea window.
Type your idea prompt in the Idea prompt box.
Set the duration of the video through the duration slider.
Choose among Stock media, AI Media, AI Avatar, Sound Effects, Headings, and Stickers for your video.
Once done, click Submit.
Creating a Video through Script
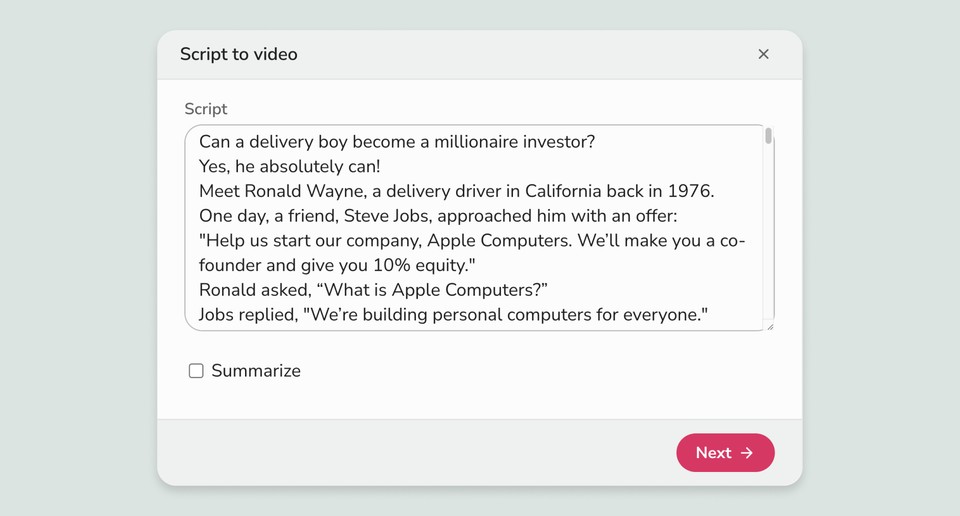
Create a video based on a script of your choice. Fliki will take your script as input and create a video along the same lines. Here’s how you can create a video through a script:
On the editor window, select Script under video section to access the script window.
Type your script in the Scriptbox.
Set the duration of the video through the duration slider.
Choose among Stock media, AI Media, AI Avatar, Sound Effects, and Headings for your video.
Once done, click Submit.
Note:
Fliki will automatically break your script into different scenes based on new line breaks. Therefore, we recommend editing your script accordingly (Writing a single paragraph will create only one scene)
If you choose to enable the Summarize checkbox, a video will be generated with summarized script (with rephrased statements). If you want the video to have your original script, we recommend disabling the Summarize checkbox.
Creating a Video through URL
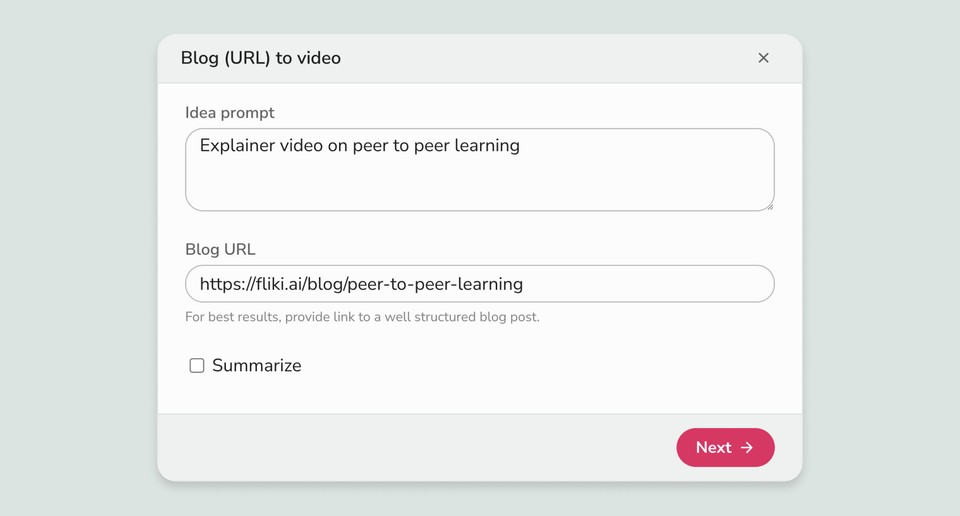
You can turn the contents of your URL to video with Fliki. Here’s how you can create a video through a URL:
On the editor window, select URL under video section to access the blog window.
Paste the URL in the URL section.
Click the summarize checkbox to create a summarized video of your blog. You can still change the duration using the duration slider though.
Set the duration of the video through the duration slider.
Choose between Stock media, AI Media, AI Avatar, Sound Effects, Headings, and Stickers for your video.
Once done, click Submit.
Creating a Video through PPT
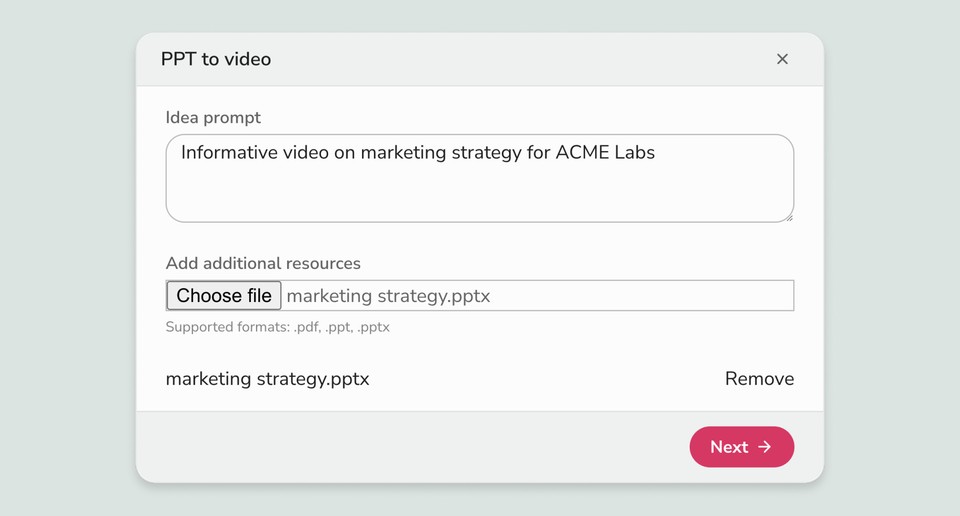
Transform your presentations into attractive videos with Fliki. Here’s how you can create a video through a presentation:
On the editor window, select PPT under video section to access the PPT window.
Choose and upload a PPT file from your system to Fliki.
You can also add an AI avatar using the AI Avatar button.
Note: The maximum file upload size limit for a PPT file is 100 MB.
Creating a Video through Raw Clips
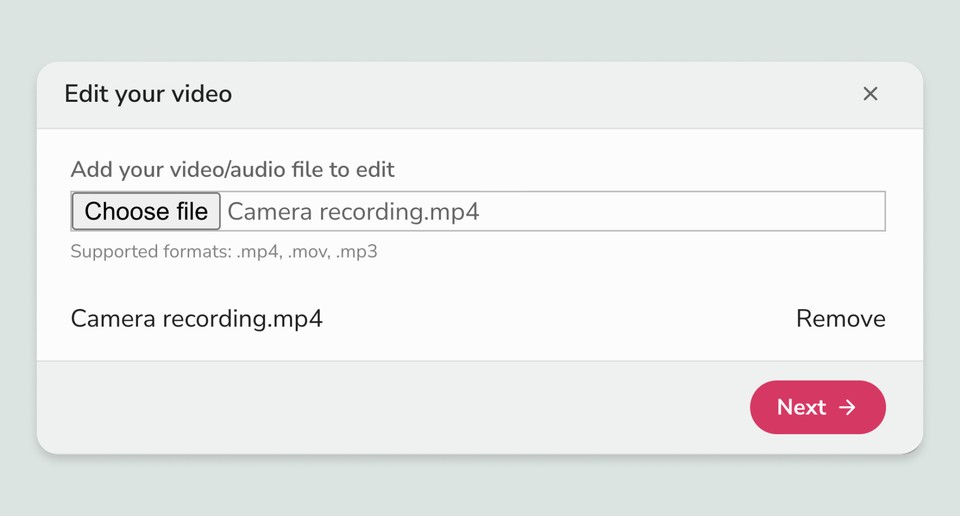
You can edit and enhance your raw media files into a polished video output with auto-captions and b-rolls. Here’s how you can create a video through a raw .mp3, .mp4 or .mov file:
On the editor window, select Edit under the video section to access the edit workflow.
Click Choose File and upload your raw clip (Supported formats: .mp4, .mov, .mp3, max size 250MB), then click Next.
Select the desired aspect ratio, language and dialect.
Select customizations like AI media or stock media, and check B-roll under More if you want B-rolls.
Finally, click Submit.
Creating a Video through In-built Recorder
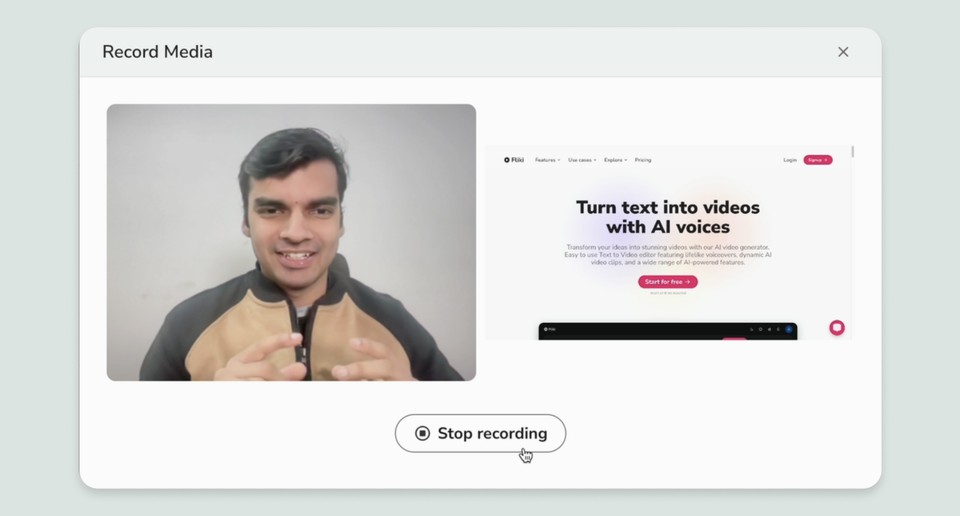
With this method, you can create professional tutorial videos just by recording yourself, your screen, or your voice for a more personalized touch. Here’s how you can create a video through recordings:
On the editor window, select Record under the video section to access the record workflow.
Check Camera (to record yourself with voice), Microphone (to only record your voice), or Screen (to record your screen).
Next, select Start Recording to start recording.
Click Stop Recording to stop the recording, then rename the recorded file if you wish. Next, hit Upload.
Next, select the desired aspect ratio, language and dialect.
Finally, click Submit.
Templates
Create on-brand videos with Fliki Templates. Templates help you start videos with predefined layouts and animations. Browse through a list of available templates and choose the one that suits your business. Set brand colors, brand font, and logo to seamlessly reflect your unique brand identity.
Here’s how you can use a template to create a video:
Switch to the Templates tab in Fliki.
Select a template of your choice from the template selection menu. You can also get an audio-visual preview of the template by keeping your cursor over the template.
Write the name of the file, select the language and dialect and hit submit.
Editing the File
Add voices, layers, avatars, text, and other elements to your videos. You can perform edits to the following aspects:
Changing voiceover - Select a scene and click on the voice name in the voiceover layer and choose from any of the 2000+ voices in 80+ different languages. You can also customize the voiceover layer from the customization panel on the right. Click here to learn more.
Changing background audio - Choose a background audio for the Common scene of your video. Click Choose file and select an audio from the background audio library. You can mark favorites and add your own audio clips as well.
Add layers to your video - Add different layers containing media elements like Text, Picture-in-Picture, Avatar and Audio. Click here to learn more.
Customize your layers - Customize layers via the customization section on the right side of the editor.
Preview - Hit preview to see how your video looks and sounds in the preview window.
File Settings
Gap between scenes - Set gaps between the scenes by tweaking their values (in seconds). Click the Gap between the scenes box to enter the value.
Aspect ratio - Choose between Square, Portrait, and Landscape aspect ratios for your video.
Background color - Set a default background color for your scenes.
Download Options
Once happy with the results from preview, you can click on Download, then Start export to render and download your video. You have the following download options available:
Resolution - Export your videos in a range of resolutions, namely:
1080p
720p
360p
Format - Export your videos in a range of formats, namely:
MP4
MOV
Once set, click Start export.
Audio
Fliki helps you create audio files from text inputs. They can be ideas, scripts, or even a blog.
Creating an Empty Audio file
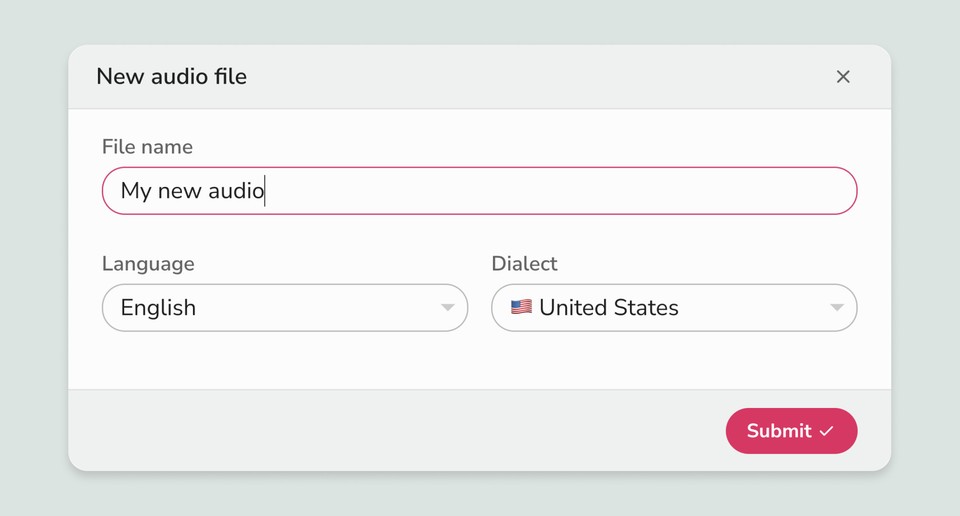
Follow the steps to learn how to create an empty audio file in Fliki:
On the editor window, select Empty option under Audio section.
Enter the file name.
Next, choose the language and dialect from the respective dropdowns.
Once done, click Submit.
You’ll then be presented with the editor, a place where you can create your own scenes and play around with different voices.
To select a common background audio file, click on Choose file right below Background Audio layer within Common scene.
To write a scene, click on the first scene and start typing your script.
You can create multiple scenes by clicking the ‘+’ icon.
To listen to your script, click the play button in the media player.
Audio Types
Fliki also helps you generate your own audio file using AI, through prompts.
Creating audio through Idea
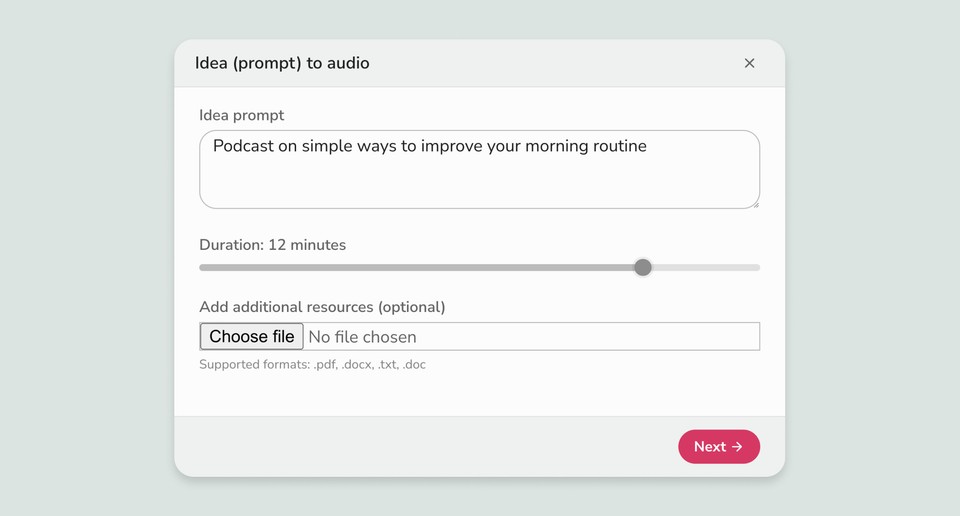
Transform your ideas into an audio file through Fliki Idea to video feature. To create an audio file from your idea, follow these steps:
On the Editor, select Idea(prompt) under Audio section.
Next, start writing down your idea.
Select the duration of the audio file via Maximum duration slider, the default duration is set to 1 minute.
By default you’ll find the Sound Effects button turned on. It’ll auto-pick sound effects based on the prompt you give.
Once done, click Submit.
Creating audio through Script
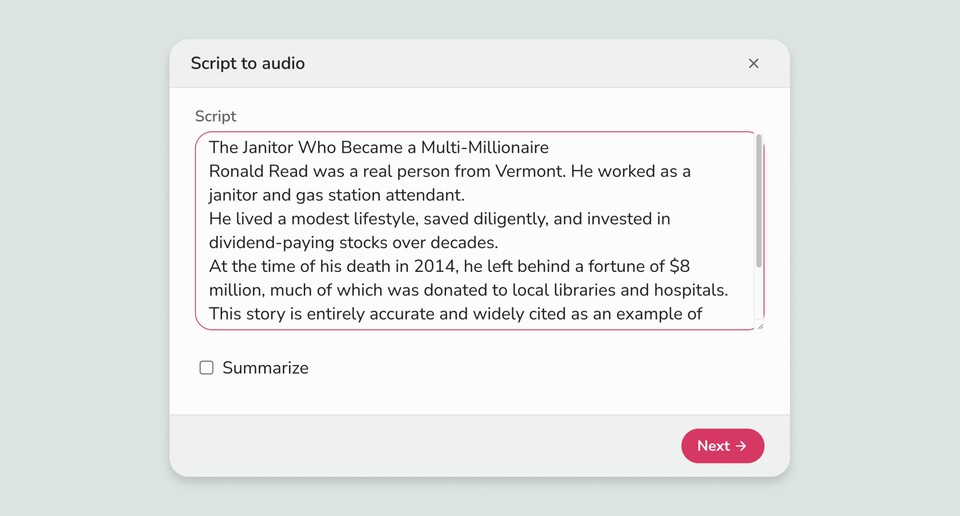
Transform your script into an audio file with Fliki. You can create audiobooks, narration for YouTube channels, and much more with this feature. Fliki will take your script as input and create an audio file based on a few additional inputs/choices.
On the Editor, select Script under Audio section.
Click on the Script box and start writing your script.
Check the summarize option if you want to summarize the script. Select the duration of the audio file via the Maximum duration slider, its default duration is set to 1 minute.
Enable/disable the Sound effects button as per your requirement. It’ll auto-pick sound effects based on the script in each scene.
Once done, click Submit.
Note:
Fliki will automatically break your script into different scenes based on new line breaks. Therefore, we recommend editing your script accordingly (Writing a single paragraph will create only one scene)
If you choose to enable the Summarize checkbox, a video will be generated with summarized script (with rephrased statements). If you want the video to have your original script, we recommend disabling the Summarize checkbox.
Creating audio through Blog
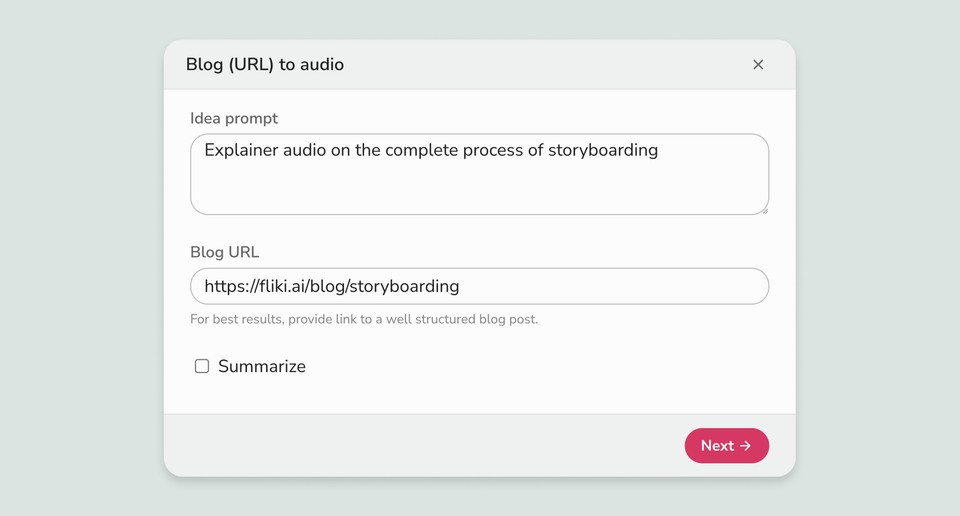
Transform your blog into an audio file through Fliki. Follow these steps to convert your blog into an audio file:
On the Editor, select Blog under Audio section.
Paste the blog’s URL in the Blog URL box, ensure that the link isn’t broken.
Select Summarize if you want to create a short audio clip of your blog. You can set the duration through the slider.
By default you’ll find the Sound Effects button turned on. It’ll auto-pick sound effects based on the prompt you give.
Editing the File
Choose among different voices, add scenes, and experiment with your audio files. You can perform edits to the following aspects:
Changing voiceover - Select a scene and click on the voice name in the voiceover layer and choose from any of the 2000+ voices in 80+ different languages. You can also customize the voiceover layer from the customization panel on the right. Click here to learn more.
Changing background audio - Choose a background audio for the Common scene of your audio. Click Choose file and select an audio from the background audio library. You can mark favorites and add your own audio clips as well.
Preview - Hit preview to hear how your audio sounds.
File Settings
Gap between scenes - Set gaps between the scenes by tweaking their values (in seconds). Click the Gap between the scenes box to enter the value.
Download Options
Once happy with the results from preview, you can click on Download, then Start export to download your audio. You have the following download options available:
Format - Export your audio files in a range of formats, namely:
MP3
WAV
Once set, click Start export.
Design
You can create designs using Fliki and use them for your business, social media channels, etc.
Creating an Empty Design file
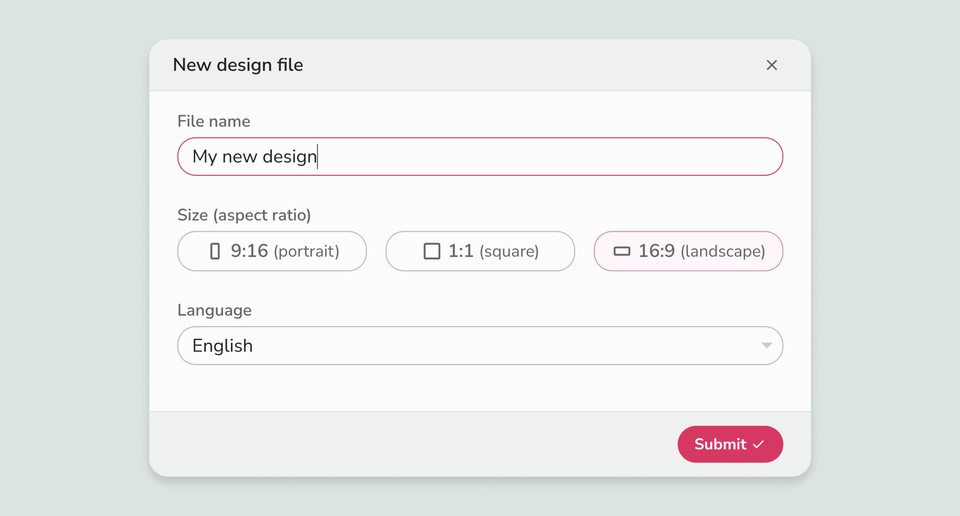
Follow the steps to learn how to create an empty design (image) file in Fliki:
On the editor window, select Empty option under Design section.
Enter the file name and then choose the desired aspect ratio.
Next, choose the language and dialect from the respective dropdowns.
Once done, click Submit.
Design Types
Fliki also helps you generate your own design file using AI, through prompts.
Creating YouTube thumbnail through Topic
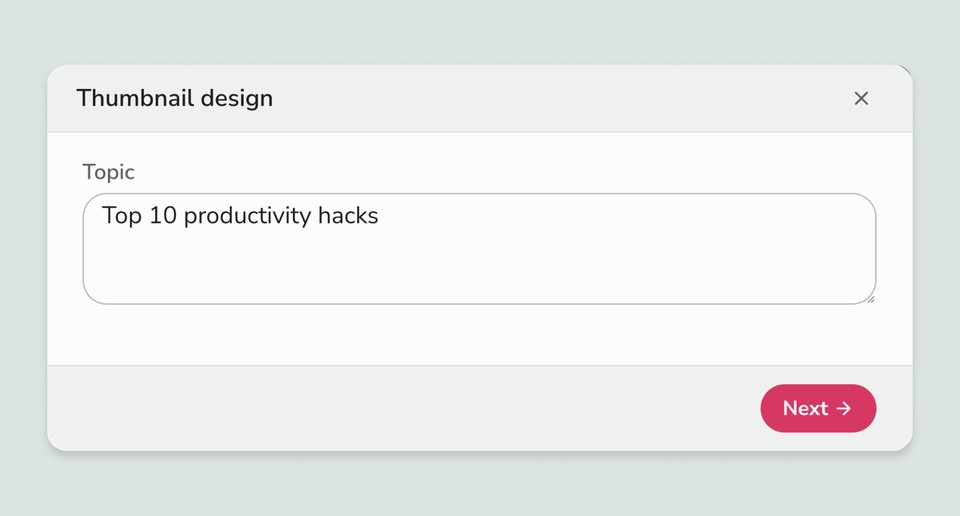
Transform your video topics into compelling YouTube thumbnails using Fliki. To create a YouTube thumbnail from your video topic, follow these steps:
On the Editor, select Thumbnail under Design section.
Click on the topic box and write your video topic or title.
Choose between Stock Media and AI Media for your YouTube thumbnail.
Once done, click Submit.
By following these steps, you can effortlessly create an engaging YouTube thumbnail that aligns with your video topic.
Creating Social Post Through Idea
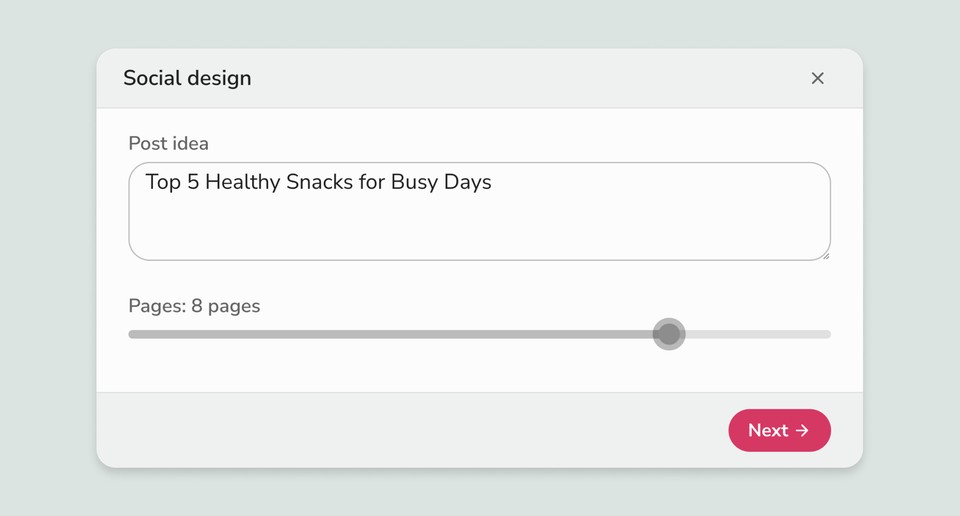
Transform your ideas into engaging social media posts using Fliki. To create a social post from your idea, follow these steps:
On the Editor, select Social under Design section.
Once done, click on the post idea box and write your idea for the social post.
Set the maximum pages of the social post through the maximum pages slider.
Choose between Stock Media and AI Media for your social post.
Once done, click Submit.
By following these steps, you can effortlessly create captivating social media posts that bring your ideas to life.
Creating Presentations Through Idea
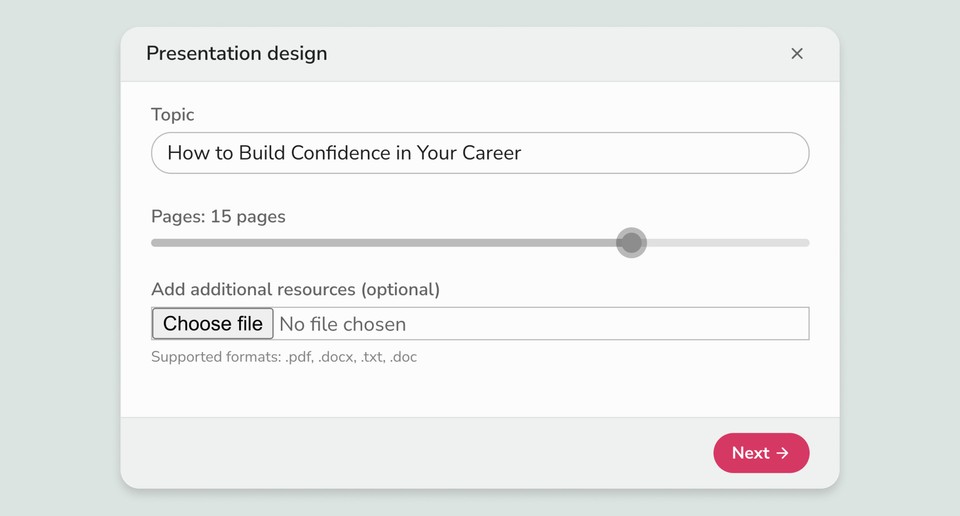
Transform your ideas into professional presentations using Fliki. To create a presentation from your idea, follow these steps:
On the Editor, select Presentation under Design section..
Once done, click on the idea box and start writing down your idea for the presentation.
Set the maximum number of slides for the presentation through the maximum page slider.
Choose between Stock Media and AI Media for your presentation slides.
Once done, click Submit.
By following these steps, you can effortlessly create polished presentations that effectively convey your ideas.
Editing the File
Add watermarks, scenes, customize media and do a lot more to your design files. You can perform edits to the following aspects:
Select your media - Click the common scene to expand. Choose among Text, Picture-in-Picture, and Watermark to add in the common layer. Click here to know more.
Manage the scene - Click a scene to expand. Choose among Text and Picture-in-Picture to add to your scene.
Customize media - Click a scene to expand and then click the media layer. Customize media placements and additions through the customization section on the right side of the screen.
Preview - Take a look at the existing design through the preview window.
File Settings
Aspect ratio - Select between Square, Portrait and Landscape options.
Download Options
Format - Export your design files in a range of formats, namely:
JPG
PNG
WEBP
PDF
Once set, click Start export.
Account and Subscription
Get all the information you need on handling your Fliki account and subscription.
Credits
Credits are charged whenever you generate audio or export a video.
Credits are updated based on your billing cycle i.e. one month after the date you sign up. The monthly quota resets every month and the credits cannot be carried over or accumulated to the next month’s quota. Learn more about how credits are calculated in Fliki.
If you find any discrepancy in the quota it’s usually since every change of scene reconverts the entire paragraphs and all the words will be recounted in your quota, to avoid this we recommend keeping the scene/ paragraphs smaller in length.
To learn more about credit charges per feature, kindly visit this page.
Manage and update subscription
Paid subscription members can change and update billing details.
You can access it from Account → Credits → Manage Subscription and you will be able to update your company name, VAT and other details.
We use Stripe for processing payments and do not store your card details.
To compare the plans and learn more, you can check out the pricing page.
Email notifications
You can manage Fliki mail notifications by enabling or disabling them, click here to manage email notifications.
Branding
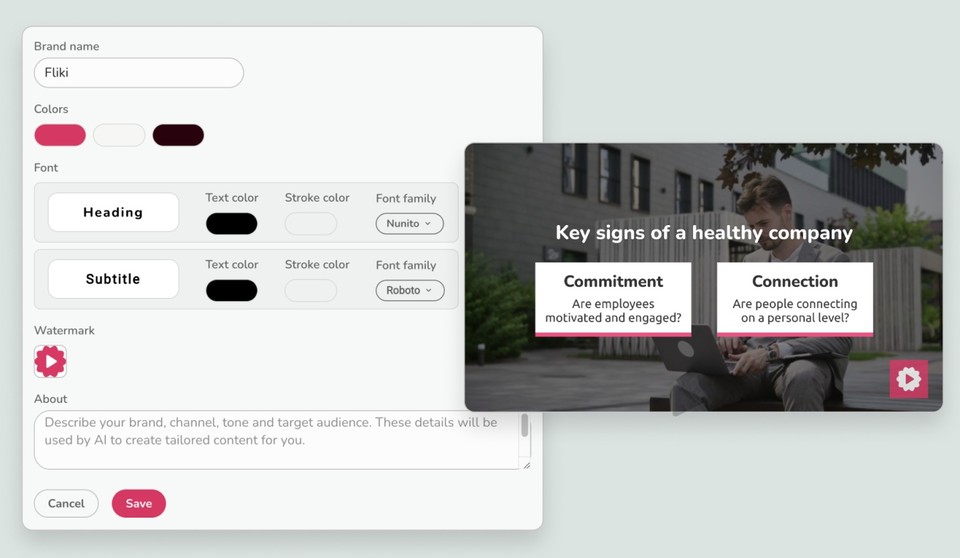
The Branding feature allows you to define your brand’s fonts, colors, watermark and brand details, etc which can be applied to your video projects effortlessly during Fliki workflows. This ensures that all your video content aligns with your brand identity, maintaining consistency and professionalism.
Key elements of Branding
Brand Colors: Choose your brand’s primary and secondary colors to be used consistently across your videos.
Brand Fonts: Select fonts that match your brand’s style for text elements in your videos.
Watermark: Upload a watermark image, such as your brand’s logo, to protect and promote your content.
About: Specify your brand’s tone and voice to ensure content aligns with your brand’s personality. Next, outline your target audience to help Fliki generate content that resonates with your viewers.
Note: You can create profiles for multiple brands, each with unique settings for colors, fonts, watermarks, and guidelines.
How to Use Branding Customizations
Create and Set Up Your Brand Kit
Navigate to the brand kits in your Fliki account.
Set up your brand by defining custom colors and fonts and uploading a watermark.
Define your brand guidelines, including tone, voice, and target audience.
Apply Branding During Video Creation Workflow
When creating a new video, select the desired brand among other customizations.
The selected brand’s settings will be automatically applied to the new video, ensuring consistency and alignment with your brand identity.
Team
Fliki offers team/company plans for easy management of subscription.
When you create a new team, you are added as the team administrator. You can add team members who will inherit your plan.
Your card is automatically charged when you add a new member. Each new seat follows same pricing and payment cycle as active on admin account.
Credits will be shared across all the team members.
Get more details on pricing page.
Team Collaboration
Fliki’s Team Collaboration feature allows multiple editors to work together on projects in real-time, eliminating the hassle of file sharing and version conflicts. Now, teams can brainstorm, edit, and finalize projects seamlessly from anywhere.
How It Works
1. Create a Team & Add Colleagues
When you create a team, you automatically become the team administrator.
Add colleagues to your team, and they will inherit your plan and shared credits.
2. Enable Collaboration on a File
You can enable collaboration in three different ways:
Option 1:
Open any file.
Click More (⋮) → Select Collaboration.
Choose Team → Click Save.
Option 2:
Navigate to the Files page.
Find the file you want to collaborate on.
Click the More (⋮) icon on the right.
Select Collaboration → Choose Team → Click Save.
Option 3 (Team Folder):
When you create a team, a Team Folder is automatically added to your Files section.
Any files created in the Team Folder are instantly available for collaboration.
Simply open the Team Folder and click + New File to start a collaborative project.
This feature is perfect for fast-paced teams that need to stay in sync, share ideas instantly, and streamline their workflow. No more lost edits—just smooth, efficient teamwork.
Rewards and Referrals
Earn free credits by spreading a word about Fliki! Get started by heading to the rewards and referrals section of the Account.
Copyright claims
How to solve YouTube Content ID Claims
Please head over to your profile and enter your Youtube channel ID and hit Save. It should take a few hours to reflect and remove the claim from your video.
How to solve TikTok, Facebook Content ID Claims
In these cases, you will need to dispute the charge and claim the content is licensed through Storyblocks.