Introduction
Are you ready to discover how to add effects to videos in a way that feels fun, personal, and completely doable—even if you’re brand-new to video editing? Gather around because in this guide, I’m going to walk you through an easy-to-follow workflow using Fliki, an online tool that makes adding visual flair to your videos feel like pure magic. Let’s dive in!
Why Video Effects Matter
Before we jump straight into Fliki’s workflow, let’s talk about why these video effects matter so much. You might be creating a short Instagram reel, an explainer on YouTube, or even a corporate training video. In all these scenarios, adding carefully chosen effects can:
1. Keep Your Audience Engaged
Visual enhancements—like overlays, transitions, and AI-generated backgrounds—provide little bursts of excitement that hook your audience’s attention.
2. Set the Mood and Theme
Cinematic filters or stylized effects (such as an “anime” look) can convey a specific vibe or narrative, making your video memorable and share-worthy.
3. Demonstrate Professionalism
A consistent style and polished visuals suggest you’ve put thought into the content. Plus, it signals to viewers that you care about quality, which helps build trust and credibility.
4. Simplify Complex Messages
B-roll footage, text overlays, and animations can help explain tricky concepts. Rather than purely telling, you’re using visuals to show, making the content more digestible.
Whether you’re a social media influencer, an aspiring filmmaker, or someone who just loves telling stories, learning how to add effects to videos can elevate your content from good to downright captivating.
How to Add Effects to Videos
Let’s first lay out what Fliki is all about. Simply put, Fliki is an online video editor that automates many parts of the editing process. Instead of juggling complicated software installations or dealing with a steep learning curve, Fliki combines simplicity with powerful features like AI video generator, auto-subtitles, and intuitive layering for your video effects.
Here’s how you can get started with Fliki:
Step 1: Using Edit Workflow
1. Select “Edit” Workflow
Once logged in, navigate to the video section in Fliki’s dashboard. You’ll see an “edit” option—this is your gateway to uploading your footage.
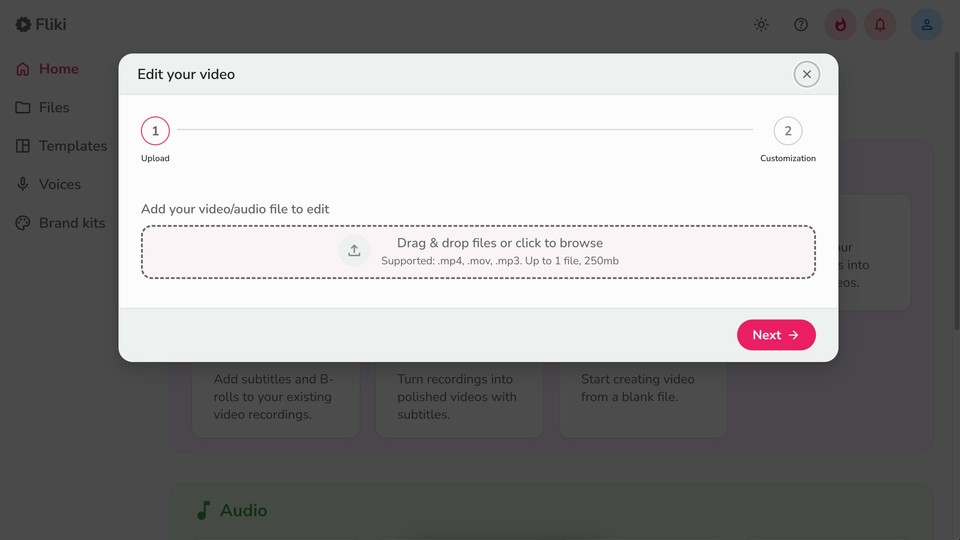
2. Upload Your Raw Recording

In this step, you’ll simply select the raw video file you want to transform. Whether it’s footage from your phone, a screen recording, or a professional camera shoot, Fliki can handle it. Finally, hit next.
Step 2: Choosing the Right Aspect Ratio
Now, it’ll ask for your desired aspect ratio right out of the gate. This might seem minor, but trust me, selecting the correct aspect ratio is essential for making your content look professional and platform-ready.
-
Landscape (16:9): Ideal for YouTube, Facebook, or any widescreen format.
-
Portrait (9:16): Perfect for vertical videos like Instagram Reels, TikTok, and YouTube Shorts.
-
Square (1:1): Commonly used for Facebook and Instagram feed posts, providing a balanced view on mobile and desktop feeds.
For instance, if you’re primarily targeting smartphone users on TikTok or Reels, you’ll want a vertical 9:16 setup. If you’re going for YouTube’s standard, stick to 16:9. Think about where your audience hangs out most, and choose accordingly.
Step 3: Selecting Your Language and Dialect
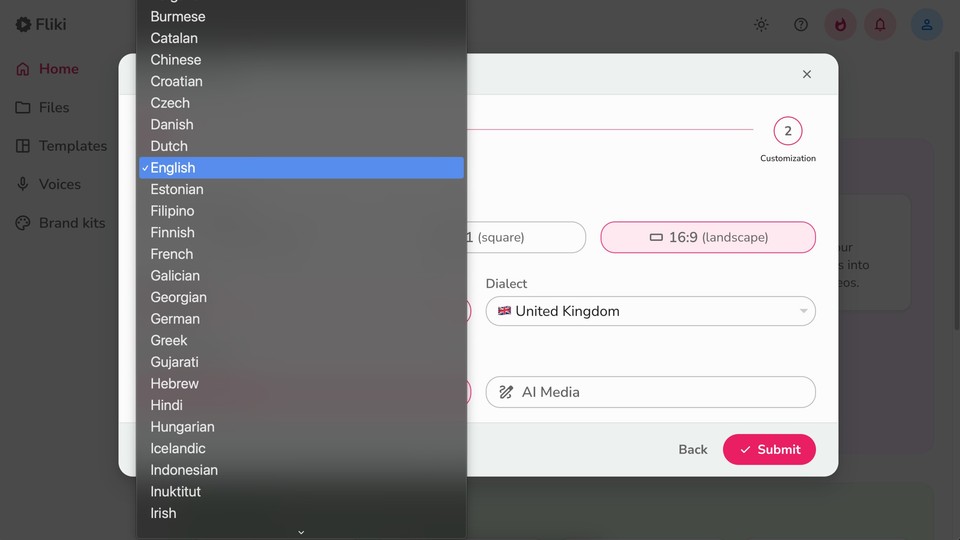
Fliki shines when it comes to versatility in languages and dialects. This is particularly helpful if you’re planning to:
-
Cater to a multilingual audience.
-
Add auto-subtitles in a specific dialect or accent.
-
Experiment with voice-overs in languages you don’t personally speak.
You’ll find over 80 languages to pick from. Each option has variations and dialects, so if you’re speaking Spanish from Mexico versus Spanish from Spain, Fliki can detect nuances to ensure the auto-subtitles are accurate.
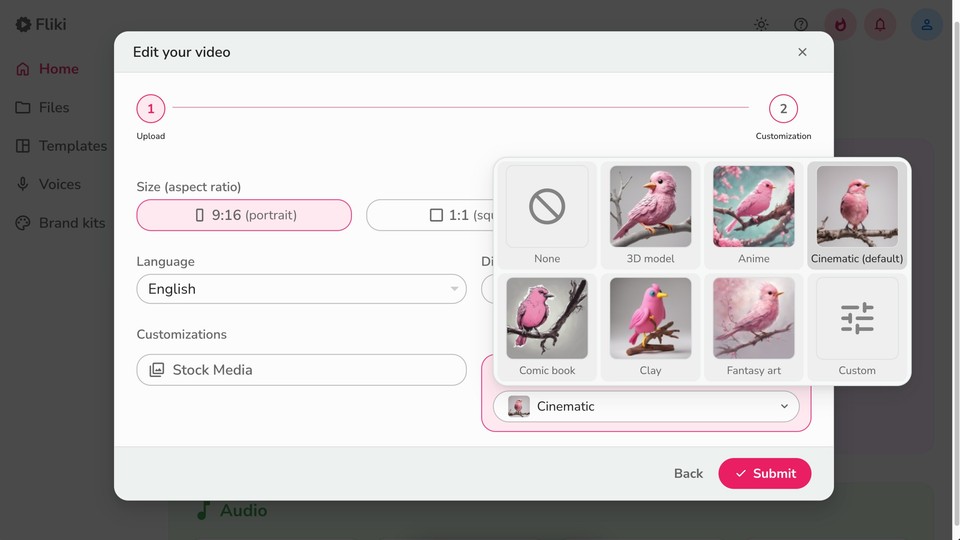
Step 4: Choosing Between Stock Media and AI Media
Next up, it’s decision time! Fliki gives you two main options for adding b-roll footage or supplementary visuals:
-
Stock Media:
-
These are professionally shot videos and images you can use to enrich your main footage.
-
Choose this if you need real-life clips or stills to complement your narrative.
-
-
AI Media:
-
Fancy something a bit more unique? Fliki can generate entirely new visuals based on your prompts.
-
You can select from styles like 3D Model, Anime, Cinematic, or Comic Book. There’s also the freedom to specify a custom style if you’re after something super specific.
-
If you’re adding an illustration to help your viewers understand a concept or you simply want that cool “comic book” vibe in the background, the AI media option is a game-changer. Just remember that each style sets the tone for your video, so choose what aligns with your project’s theme.
Step 5: Fliki’s Auto-Sync Magic
Before we move to the main event—how to add special effects to videos—let’s talk about Fliki’s burned-in subtitle capabilities. Once you submit your choices (aspect ratio, language, and media), Fliki goes to work syncing your video’s audio with auto-subtitles and layering the b-roll or AI visuals accordingly.
This is the part that often leaves people in awe:
-
You don’t have to painstakingly place each piece of media on the timeline.
-
You don’t have to type out subtitles by hand.
-
You don’t have to guess the best times for a cutaway or background clip.
Fliki’s AI does a first pass, suggesting where these elements should go. Of course, you can make final tweaks, ensuring the outcome matches your personal style and storytelling goals.
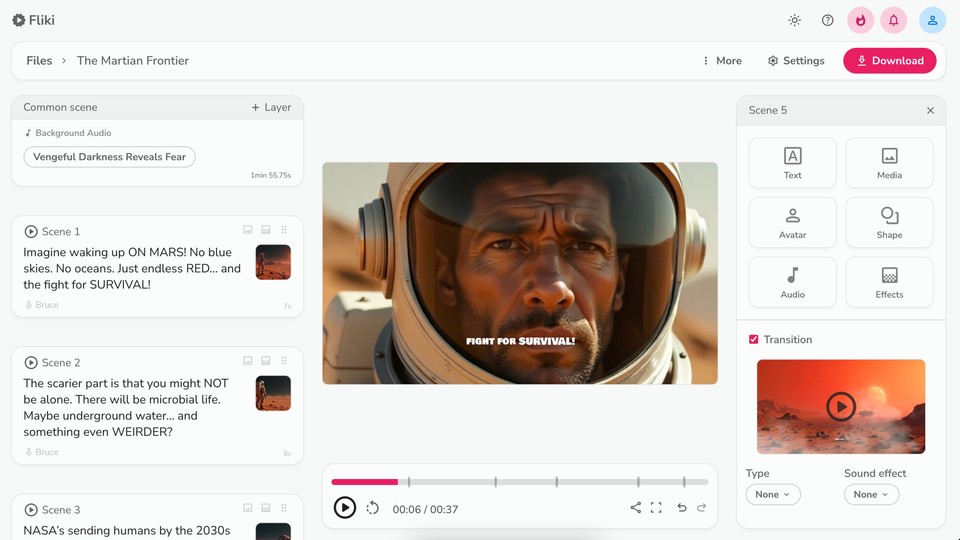
Step 6: Adding Effects to Your Video
Finally, let’s talk about the reason you’re really here: how to add effects to videos using Fliki! Video effects are more than just fancy overlays; they can elevate the entire viewing experience. Here’s how you can start sprinkling that cinematic magic:
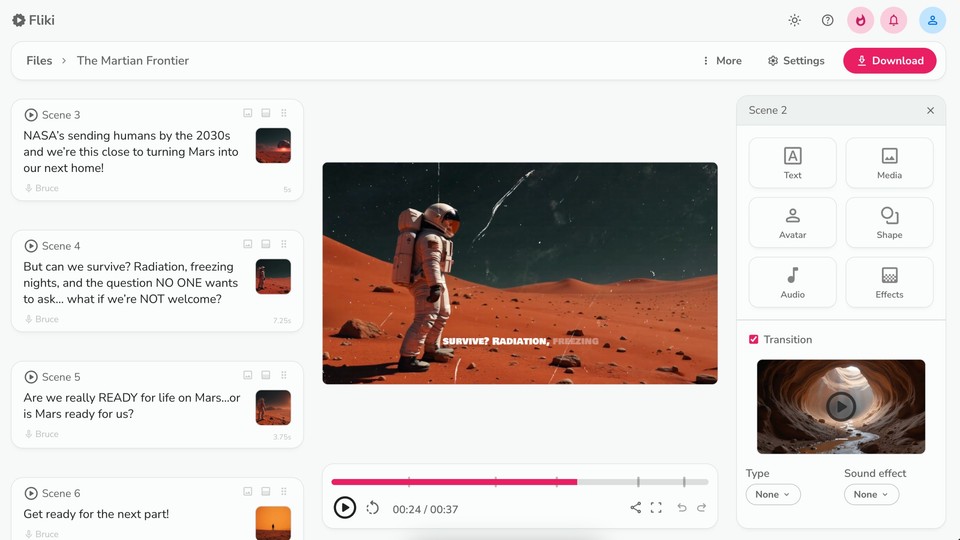
1. Locate the Scene You Want to Enhance
Fliki breaks down your video into scenes for easy navigation. Identify which scene would benefit most from an effect—perhaps a scene with text overlays, a highlight reel, or a crucial explanation.
2. Click Add Layer
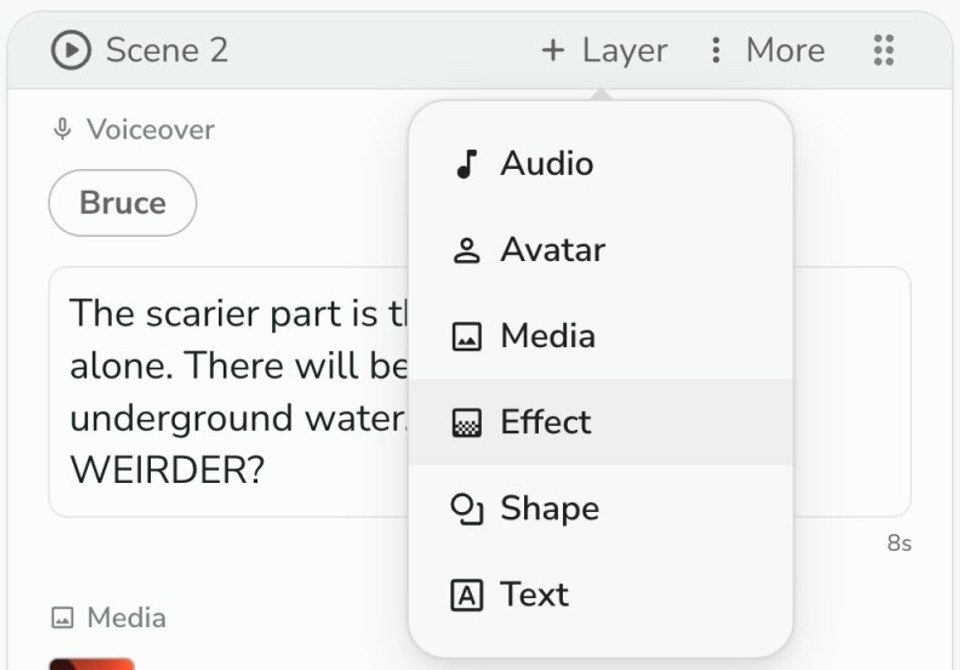
Within the chosen scene, you’ll see an option to “Add Layer.” This is your gateway to introducing new visual components.
3. Select “Effect”
A menu will pop up with various choices (text, image, effect, audio, etc.). Choose “Effect” to access the Effect Picker.
4. Browse the Effect Picker
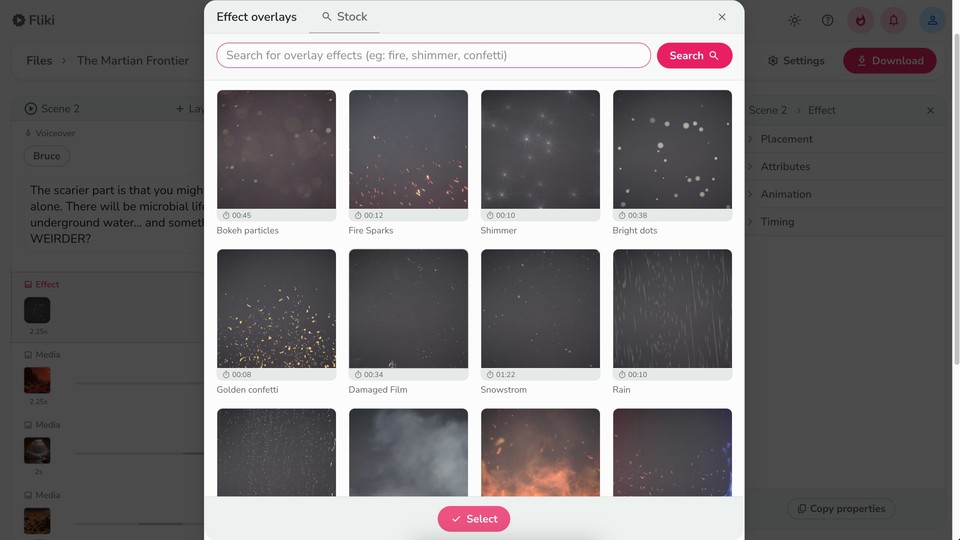
Hover your cursor over an effect to watch a quick preview.
Double-click an effect to apply it to your scene.
5. Stack Multiple Effects (Optional)
Need more than one effect for a single scene? You can absolutely layer effects by repeating the above steps (Add Layer > Effect). Maybe you want a dreamy haze plus a subtle glitch effect—stack them up!
By now, you’ll have a new effect in your scene, ready to mesmerize your viewers. Let’s keep refining!
Step 7: Fine-Tuning the Timing and Layer Settings
One of the most crucial steps in making your video look professional is aligning the effect’s timing. You don’t want confetti raining down too early or a lens flare overshadowing the text you’re trying to highlight. Thankfully, Fliki offers an intuitive way to handle this:
1. Select the Layer
Click on the effect layer in your timeline. This highlights it, letting you customize that specific layer.
2. Check the “Timing” Box
On the right-hand customization panel, you’ll see a “Timing” checkbox. Make sure it’s selected. If it’s not, the effect might last the entire scene.
3. Set the Scene Time Range
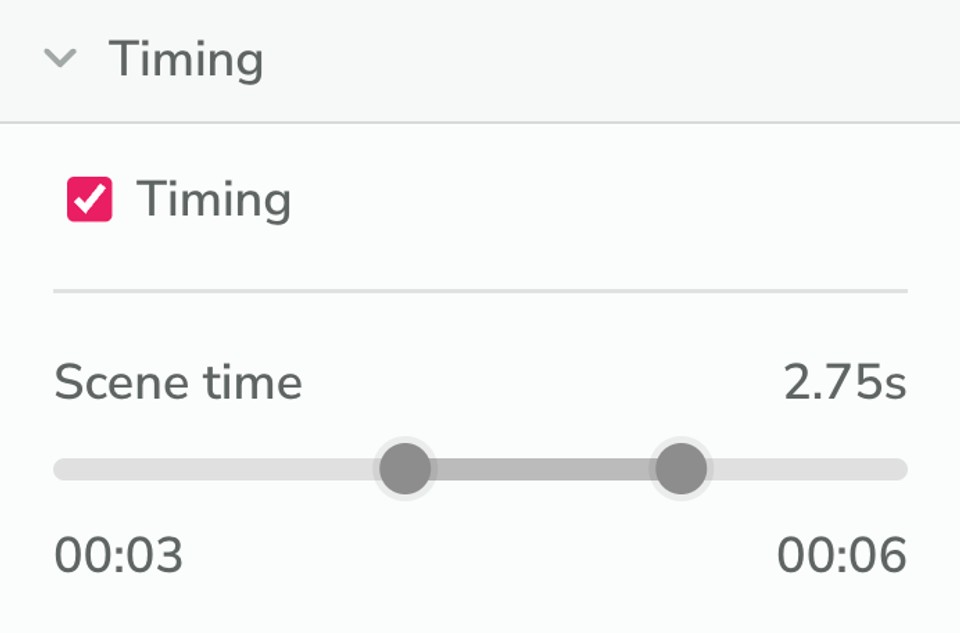
Let’s say your scene is 10 seconds long. You can use the range slider to dictate when the effect appears and disappears. If you only want it to show from the 3-second mark to the 7-second mark, just slide those handles accordingly.
This is super handy if you’re linking the visual effect to a specific audio cue, like a drumroll or a voice-over announcing something exciting.
4. Adjust Layer Properties (Optional)
-
Opacity: Control how intense or subtle the effect appears.
-
Duration: Ensure the effect doesn’t linger on screen longer than intended.
The beauty of these video editing tips is that you can test them out quickly: if an effect doesn’t feel right or it’s distracting, simply tweak its timing or remove it altogether.
Step 8: Previewing and Tweaking
You know that exhilaration you feel when everything starts to come together? That’s what this step is all about. Hit the Preview button in Fliki to see how your video looks with its newly added effects, b-roll footage, and subtitles.
-
Take Notes: Do certain effects overlap oddly? Is a scene too busy? Make a mental (or written) checklist of what changes might be needed.
-
Refine: Go back into each layer’s settings to adjust timing, swap out an effect, or remove an effect that feels out of place.
If you’re new to video editing, don’t be surprised if you spend a bit of time in this preview-tweak loop. It’s part of the creative process!
Step 9: Exporting and Sharing
Once you’re totally satisfied with how your video turned out, it’s time to share it with the world. Under Fliki’s main menu, locate the Export or Download option. Some important details to consider:
1. Resolution and Format
Decide on the resolution that best suits your needs: 720p for quick social media posts, 1080p for professional-quality uploads.
2. File Type
MP4 is the most commonly accepted format across social media platforms and video players. If you’re looking for a different file type like MOV, Fliki usually gives you that option.
3. Naming and Organization
Label your video files clearly, especially if you’re juggling multiple projects. A descriptive file name will save you time in the long run.
4. Share or Schedule
After exporting, you can download your video and upload it to your social channels, embed it on your website, or send it to your team for feedback. If you’re an avid content creator, consider scheduling your newly polished video for a prime posting time when your audience is most active. Here is an example video created with Fliki effects:
Pro Tips and Best Practices
Now that you know the core steps on how to add effects to videos, let’s talk about some best practices that can help you stand out:
1. Less Can Be More
While it’s tempting to sprinkle multiple flashy effects on every scene, a more minimalist approach can have a stronger impact. Only add an effect if it serves a purpose—maybe it highlights a joke, underscores a big reveal, or transitions viewers between topics seamlessly.
2. Focus on Consistency
If your video is comedic, use fun, vibrant effects consistently. If it’s more cinematic, stick to moody overlays and transitions that match your video’s tone. Consistency helps viewers stay immersed in your story.
3. Leverage Subtitles
Fliki’s auto-subtitles feature is a boon for accessibility. Make sure you proofread the generated text—sometimes AI can misinterpret certain words. Subtitles not only help viewers with hearing impairments but also capture the attention of folks scrolling through social media with their sound off.
4. Experiment with AI Media
Don’t be afraid to play around with the AI-generated b-roll or backgrounds. If you have a comedic YouTube channel, test out the Comic Book style. If your brand is cutting-edge, experiment with 3D or Cinematic looks. The possibilities are endless.
5. Mind the Audio
Visual effects are crucial, but audio can make or break your video. If your effect calls for a sound effect or music track (like a whoosh or a dramatic drumroll), consider adding that in, too. Consistency between visual and audio effects can create a truly immersive experience.
6. Plan a Clear Storyboard
Even though Fliki makes it easy to add effects and b-roll, having a rough outline or storyboard of your video can help you stay organized. Know where you want your key transitions, text overlays, and effect “big moments.”
Final Thoughts
At this point, you might be feeling both excited and a little overwhelmed. That’s normal! Learning how to add effects to videos is an art form. The good news is that text to video generators like Fliki significantly simplifies that process, whether you’re a one-person creative studio or part of a larger marketing team.
Remember, you don’t have to get it perfect on the first try. Take your time, experiment with different styles, and enjoy the ride. The more you familiarize yourself with Fliki’s features—like layering multiple effects, managing b-roll footage, or playing with AI-generated backgrounds—the more your confidence will grow.