
Introduction
Adding videos to PowerPoint slides is a surefire way to captivate your audience, emphasize key points, and create a more memorable session. They help you illustrate complex concepts in a clearer way, keep your viewers alert, and spark conversation even after you’ve left the room.
In this blog post, I’m going to share with you how to embed a video in PowerPoint—and we’ll cover both PC and Mac. I’ll also guide you on how to embed YouTube videos, troubleshoot issues, and keep your file size in check. Ready? Let’s jump in!
Why Embedding a Video in PowerPoint Matters
Before we dive into the technical how-tos, it’s important to understand why embedding videos in your PowerPoint presentation can make all the difference.
Enhanced Engagement: A well-placed video can recapture wandering attention spans and break the monotony of text-heavy slides. Think of it as a mini commercial—no one wants to read slabs of text all the time!
Better Retention: Research has shown that visuals significantly improve information recall. So, if you have critical data, testimonials, or demos, a short video clip can help etch those points in your audience’s memory.
Professional Touch: Embedding videos seamlessly into PowerPoint portrays a level of tech-savvy professionalism. It says, “I took that extra step to make this presentation more meaningful for you.”
Now that we’re all on the same page about why it’s worth it, let’s get into the step-by-step process.
How to Embed a Video in PowerPoint from Your Computer
1. Preparing Your Video File
First things first: decide which video you’re going to embed. Maybe it’s a product demo, a video testimonial, a highlight reel, or even just a comedic relief clip. Whatever you pick, save it on your device in a PowerPoint-supported file format—MP4 (with H.264 video and AAC audio) is the safest option. Other supported formats include M4V, MOV, ASF, AVI, MPG, MPEG, or WMV.
💡 Pro Tip: Keep the video in the same folder as your presentation. That way, if you ever move your presentation to another computer or external drive, you’re less likely to break any file paths.
2. Embedding the Video (Windows)
Open Your Presentation: Launch Microsoft PowerPoint on a Windows computer and open either a new or existing presentation.
Select the Slide: Click on the powerpoint slide where you want to place your video.
Go to “Insert”: Find the Insert tab at the top menu.
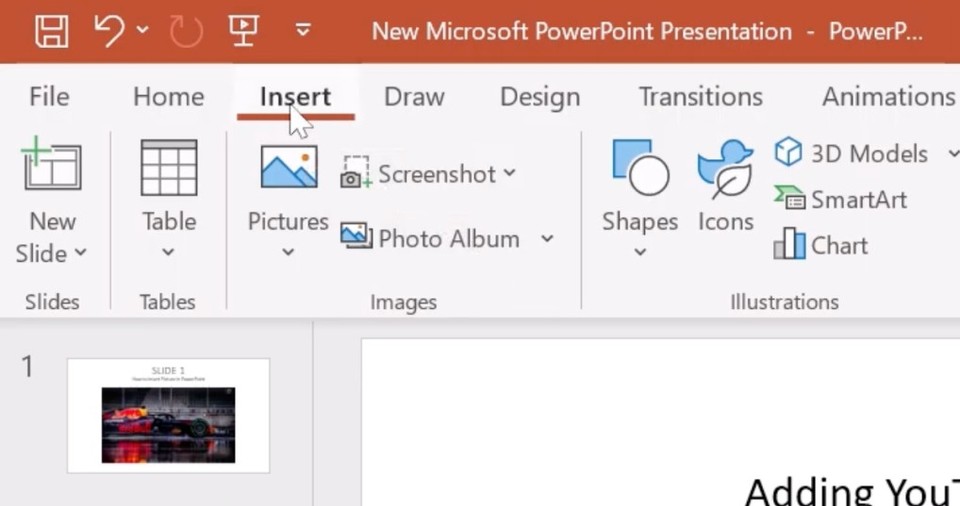
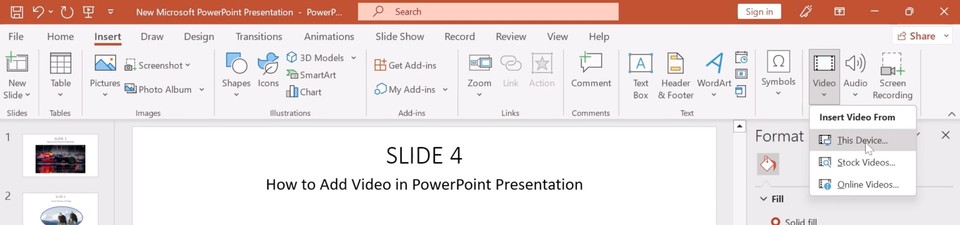
Click “Video” > “This Device”: A drop-down menu will appear, giving you the option to embed from your device or from an online source. Choose This Device if your video is stored locally.
Resize and Format: Once inserted, you can drag the corners of the embedded video to resize it to fit your layout. Under the Video Format tab (or Format / Options in some PowerPoint versions), you can customize borders, add effects, and more.
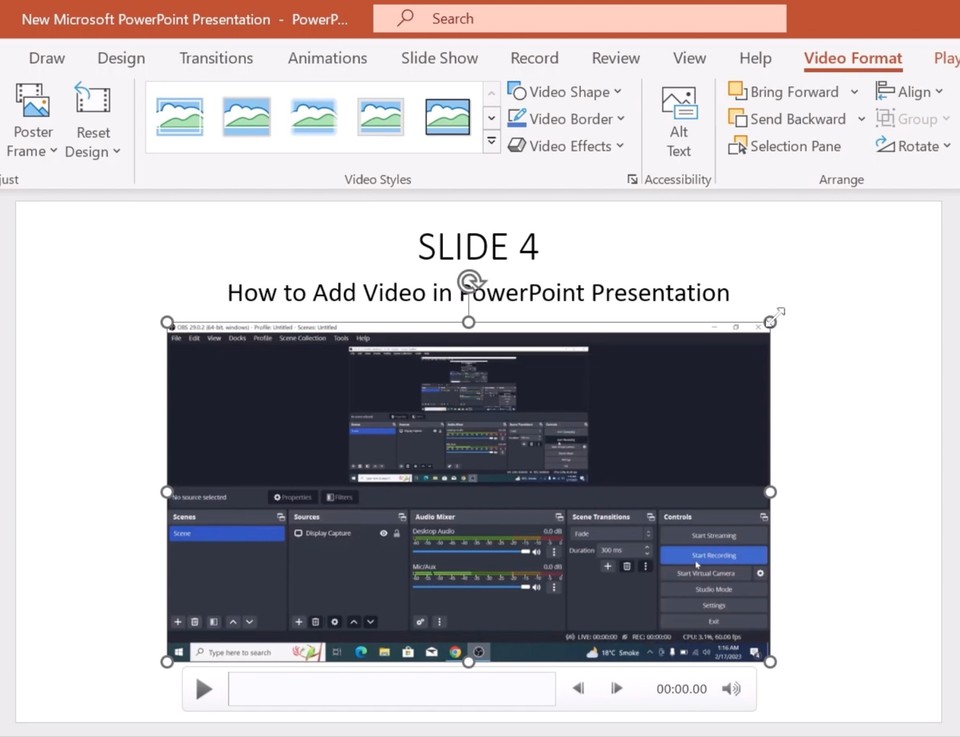
Playback Settings: Navigate to the Playback tab to trim your video, add fade-in/fade-out effects, or choose whether it plays Automatically, In Click Sequence, or When Clicked On.
3. Embedding the Video (Mac)
Launch PowerPoint: Open your PowerPoint on a Mac.
Pick Your Slide: Choose the slide where your video belongs.
Insert > Video > From File: Under the Insert tab, select Video, then From File. A dialog box will pop up.
Choose Your Video File: Browse your folders, select the video, and hit Insert.
Link or Embed: If you want to embed directly, simply insert it. If you prefer to link (to reduce file size), select Show Options > Link to file before inserting.
Video Format & Playback: Click the Video Format tab or Playback tab to access trimming, volume settings, fade-ins, or looping options.
How to Embed a Video in PowerPoint from YouTube
Let’s say you found the perfect clip on YouTube—an informative tutorial, a snippet of a speech, or a mind-blowing demonstration. Embedding it directly in your slides saves you from having to switch out of PowerPoint mid-presentation (which can be awkward!).
1. Copy the YouTube Link or Embed Code
Head over to YouTube, find your video, and click Share. From there, you can either Copy link or Copy embed code.
2. Insert it into PowerPoint (Windows)
Go to Insert > Video > Online Video: Select this option to embed any web-based video.
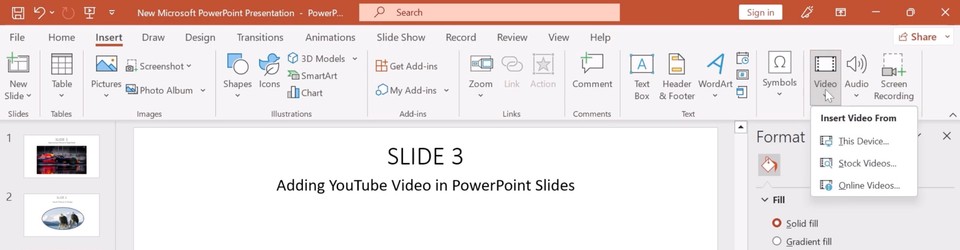
Paste Your YouTube Link or Embed Code: A pop-up will appear asking for the link or code.
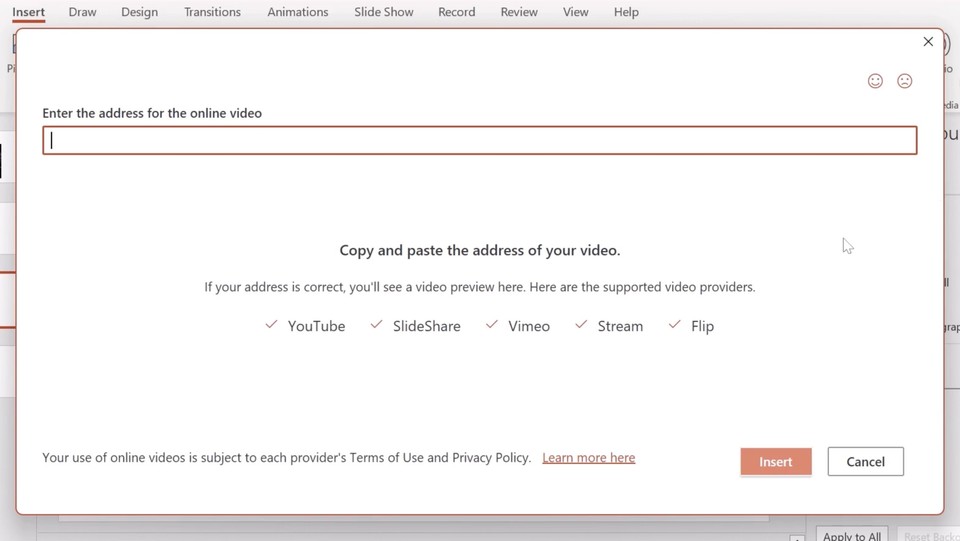
Click Insert: You should see a preview of your YouTube video. Once confirmed, hit Insert.
Resize & Format: Just like before, you can adjust the video’s placement and formatting options.
3. Insert it into PowerPoint (Mac)
Go to Insert > Video > Online Film: This is where you’ll paste your YouTube link.
Paste the Link or Embed Code: That same pop-up will appear, prompting you for the URL or embed code.
Confirm & Insert: PowerPoint will fetch the preview. Click Insert to place it in your slide.
Note: When embedding from YouTube, you’re effectively streaming the video. This means you’ll need an internet connection during your presentation for smooth playback.
How to Insert a Video File Link in PowerPoint
If you’re worried about ballooning your PowerPoint file size (some videos can be huge!), consider inserting a hyperlink to the video instead. This method “links” out to an online source or a local file rather than embedding the entire media within the presentation.
Take a Screenshot: Grab a still image from the video you want to link to. This will serve as the “play button” on your slide.
On Windows, use the Snipping Tool or press PrtScn + Windows Logo.
On Mac, press SHIFT + COMMAND + 4 to select a specific area.
Insert the Image: Go to Insert > Pictures and find your screenshot. Place it on the slide.
Hyperlink the Image:
Right-click the image, choose Link (or Hyperlink).
Paste the video’s URL in the address field.
Now, clicking on the image during your slideshow will launch the video in a web browser or local media player.
This is great for saving space, but do note you’ll need to keep the video file accessible on the same computer or ensure internet access if it’s hosted online.
Troubleshooting: Why Won’t My Video Play?
Now, here’s a scenario I’ve encountered more than once. You confidently embed your video, only to find it won’t play when the spotlight is on you. Let’s walk through possible culprits and solutions:
Unsupported File Format: Make sure your video is in Microsoft PowerPoint's compatible format (MP4 with H.264 and AAC is a good rule of thumb).
Codec Issues: Even if it’s an MP4, you might lack the proper codec on your computer. Installing a codec pack (like K-Lite for Windows) can often resolve this.
Broken Links: If you chose to link your video rather than embed it, double-check that the file path hasn’t changed, or the online link isn’t broken.
File Size Overload: Huge video files might cause performance issues. Use the File > Info > Compress Media option in PowerPoint to reduce video file size.
Hide While Not Playing Setting: Sometimes, your video might be configured to remain hidden until playback starts. Go to the Playback tab and uncheck “Hide While Not Playing.”
Pro Tips for Video Playback in PowerPoint
Practice Slide Timings: If you’ve set your video to play automatically or in sequence with other animations, test your slideshow beforehand.
Optimize for Live vs. Recorded Presentations: If you’re doing a live talk, embedding might be best. If you’re sharing the slide deck digitally, linking could save file size.
Consider Adding Captions: This can be a lifesaver for people who are hard of hearing or if you’re presenting in a large, noisy space.
My Favorite Tricks for Making Your Slides Pop
Use Designer (PowerPoint 365): The Designer tool can help you quickly format your slide around the video, suggesting layouts that look professional.
Add a “Fade In” and “Fade Out”: Smooth transitions can make your video feel more integrated with the rest of your slide rather than abruptly popping in and out.
Experiment with Shapes and Borders: Under Video Format, you can change the shape of your video or add a drop-shadow for extra visual appeal.
Don’t Overdo It: One or two short videos can be highly effective. But too many videos can overwhelm or distract from your main points.
Creating Powerful AI-Driven Presentations and Videos with Fliki
Now that we’ve tackled how to embed a video in PowerPoint, let’s talk about actually creating those videos in the first place. If you’re not a professional videographer or simply don’t have the time (like me, juggling a busy schedule), tools like Fliki can be a game-changer.
1. AI-Powered Video Creation
Fliki offers an easy way to create presentations with AI, meaning you can outline your content, choose from a range of professional video templates, and let the AI assist with design elements. No more spending hours trying to perfect color schemes or transitions. It even offers AI avatars, so if you want a virtual spokesperson in your video without stepping in front of the camera yourself, Fliki has you covered.
2. AI Voiceovers and Voice Cloning
Maybe you’ve been told you have a radio voice—maybe not. Either way, Fliki’s text-to-speech capabilities can produce natural-sounding voiceovers. Their voice cloning feature is especially intriguing; it allows you to clone your own voice to maintain consistency across different presentations. Imagine never having to record your voice again yet still sounding like “you” in every video! Checkout the sample of Fliki’s studio voice:
3. Turning Your Presentations into Videos
The beauty of Fliki doesn’t stop at creating new videos. You can actually convert entire PowerPoint presentations into engaging videos, complete with AI voiceovers or AI avatars. If you’ve ever needed to send someone a walk-through presentation but couldn’t be there in person, this feature is pure gold. Your clients or team members can watch a dynamic, voice-narrated version of your slide deck anytime.
4. Seamless Integration with PowerPoint
Once your video is done, embed it directly into PowerPoint, just like we discussed. This synergy means you can build presentations that are ultra-modern and immersive without the usual headaches of switching between multiple software tools.
Conclusion: You’ve Got This!
Embedding a video in PowerPoint used to feel like scaling a mountain in business shoes—awkward and prone to stumbles. But trust me, once you understand the basic steps and best practices, it becomes second nature. Videos can breathe life into your slides, keep your audience on the edge of their seats, and really drive your points home.
Here’s a quick recap:
Select the Right Video File: Make sure it’s in a PowerPoint-friendly format (MP4 with H.264/AAC is the safest).
Insert vs. Link: Embedding keeps everything in one place, linking keeps file size smaller—pick whichever method suits your presentation’s needs.
YouTube Embeds: Great for easily sharing online videos, but remember you’ll need an internet connection when presenting.
Troubleshoot: Know what to do if your video doesn’t play (check formats, codecs, file paths, and playback settings).
Create with Fliki: If you want to level up your presentation game with AI-driven video creation, voiceovers, or avatars, Fliki can transform your project into something truly memorable.
With all these insights at your disposal, I’m confident your next PowerPoint presentation will be nothing short of spectacular. Whether you’re in a boardroom, a classroom, or a virtual meeting space, embedding a concise, targeted, and compelling video can make all the difference.
Now go forth, experiment, and have fun! After all, a presentation is your stage—add a little flair, and your audience will be clapping in no time. Good luck, and here’s to knocking your next presentation out of the park!