Introduction
Looking to transform a static photo into a talking, animated avatar? You're in the right place. This guide will walk you through creating a professional talking photo avatar in just a few simple steps.
Whether you need it for presentations, marketing videos, or online courses, creating a talking avatar is surprisingly straightforward. Let's get started.
What You'll Need
Before we begin, make sure you have:
A clear portrait photo - Front-facing, well-lit, with the subject looking directly at the camera
Fliki premium subscription - The custom AI avatar feature requires a premium plan
10-15 minutes - That's all it takes to create your first talking avatar
How to Create Talking Avatar from Photo
Step 1: Prepare Your Photo
The quality of your final avatar depends heavily on your source photo. Here's what makes a good avatar photo:
Photo Requirements:
Clear, high-resolution image (minimum 1080p recommended)
Subject facing directly toward the camera
Good lighting with minimal shadows on the face
Plain or simple background
Single person in frame
Neutral or professional expression
Avoid:
Group photos with multiple people
Side profiles or angled shots
Low-light or grainy images
Busy or distracting backgrounds
Sunglasses or face obstructions
Step 2: Subscribe to Fliki Premium
To access the custom avatar feature, you'll need a Fliki premium plan. This unlocks advanced AI avatar capabilities that make your photos truly come to life.
Once subscribed, you'll have access to Fliki custom avatars.
Step 3: Select Your Workflow
Navigate to Fliki's text-to-video section
Choose any video workflow that fits your project
Follow the on-screen instructions until you reach the customization step
Step 4: Upload Your Photo
Click the avatar icon
Switch to the "Custom" tab
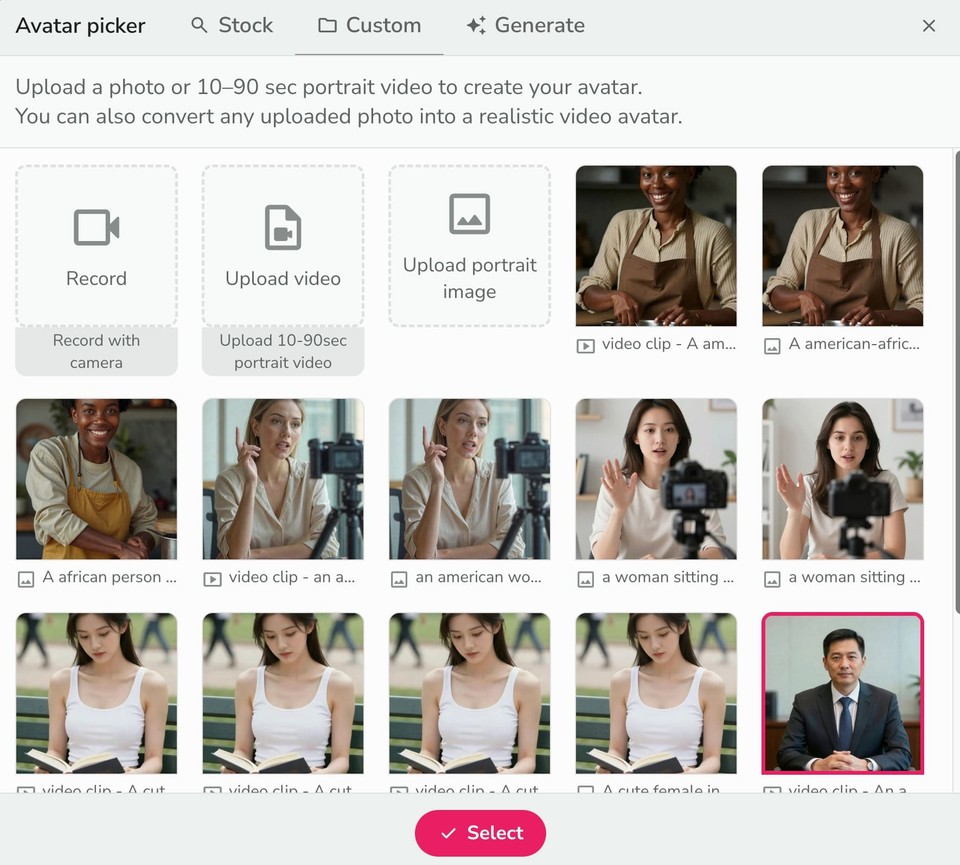
Click "Upload portrait image"
Select your prepared photo
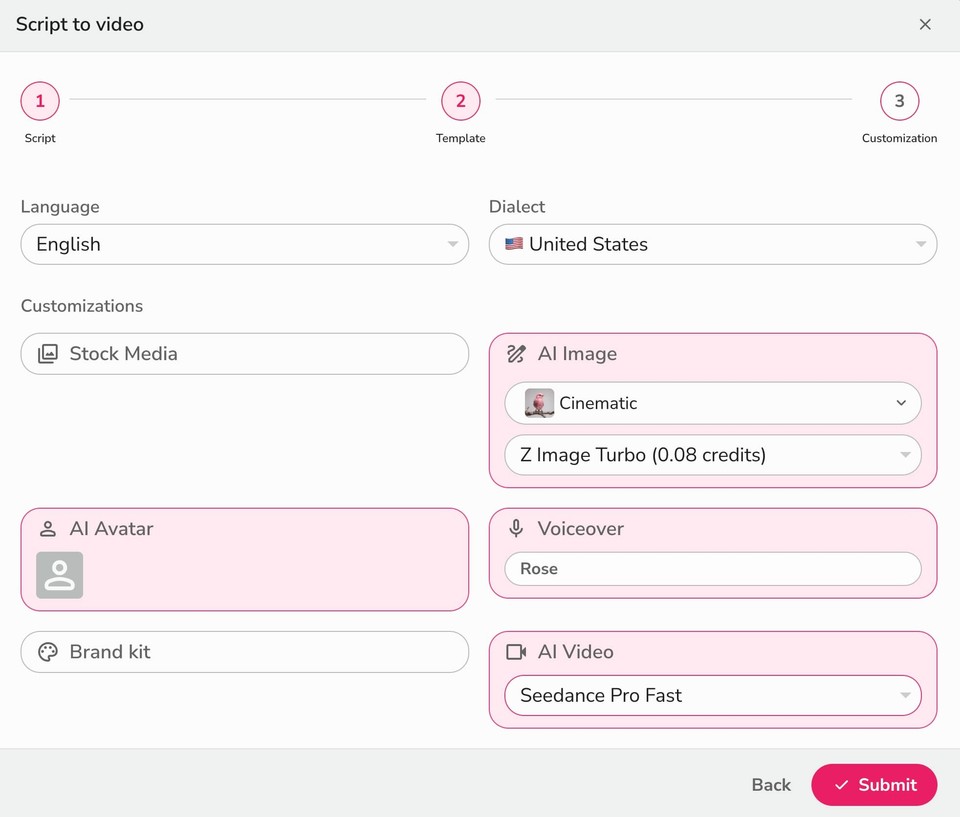
Step 5: Configure Voice and Other Settings
Select your preferred voice from Fliki's AI voice library, you can also clone your own voice.
Select your media type and AI models (if applicable)
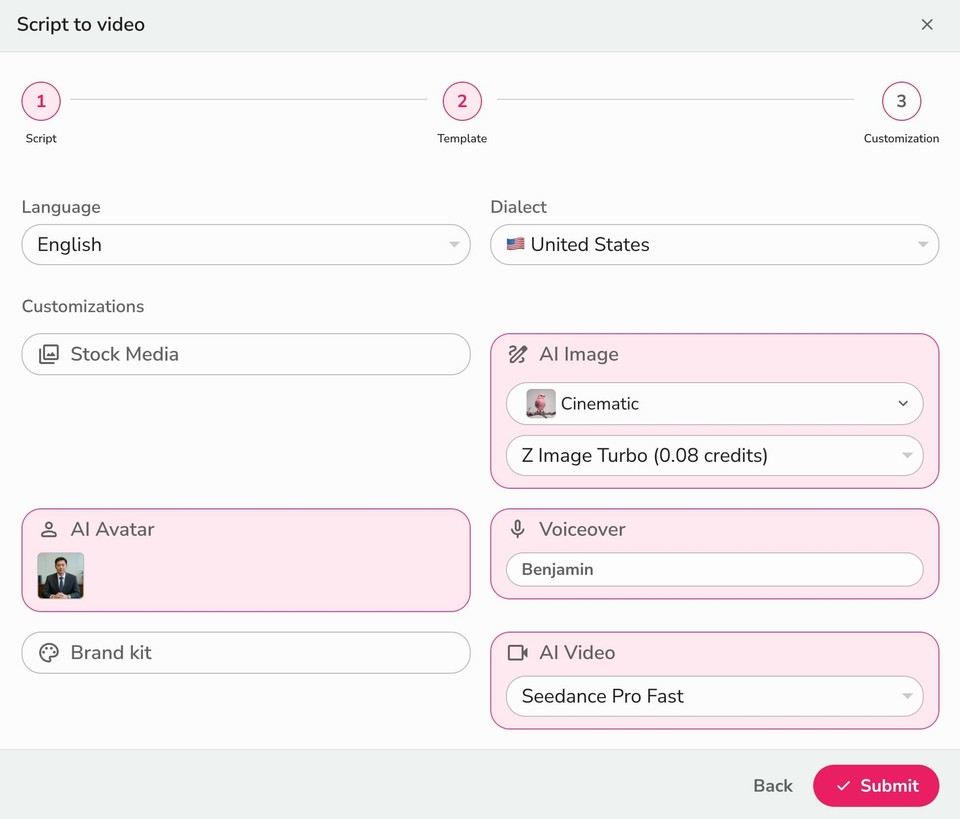
Click "Submit"
Your video will be generated with all your selected preferences.
Working on a single video instead of a full project?
Head to the Fliki Playground → Video → Video Avatar Lip-sync → P-Video Avatar to create a talking avatar directly without setting up a workflow.
Step 6: Customize Your Avatar
Once you’re inside the editor, you can click on the avatar in the preview window and it’s respective customization settings would show on the right side. You can now:
Adjust position and size
Fine-tune animation settings
Control timing and transitions
Step 7: Generate the Talking Avatar
Now for the final step - making your avatar actually speak.
Preview First:
Review your scene to check the voiceover and script
Make any necessary adjustments to timing or text
Generate Lip-Sync:
Click "Generate lip-sync" at the top of the video preview, OR
Click "Generate avatar video" in the customization panel
Confirm the generation prompt
Your static photo will transform into a talking, lip-synced avatar that matches your voiceover perfectly.
Batch Generation Tip: Working with multiple scenes? Click Settings icon > "Generate all avatar videos" at the bottom of the customization panel on the right to process all avatar layers at once.
Advanced Tips for Better Results
Want to take your talking avatars to the next level? Here are some insider tips:
Voice Selection Matters
The voice you choose dramatically affects your avatar's impact. Consider:
Match voice tone to visual appearance
Choose appropriate accent for your audience
Test multiple voices to find the best fit
Use voice cloning for authentic personal touch
Lighting and Quality
Always use the highest quality settings available
Well-lit photos produce more realistic animations
Consistent lighting across scenes maintains visual continuity
Reuse Your Assets
Save successful avatar video clips for future projects
Build a library of different expressions and styles
Create variations for different content needs
Troubleshooting Common Issues
Avatar looks unnatural:
Try a different source photo with better lighting
Simplify your animation prompt
Adjust the duration - sometimes shorter is better
Lip-sync is off:
Ensure your script matches the voiceover exactly
Regenerate with adjusted settings
Check that audio quality is clear
Video quality is poor:
Always select 1080p or higher resolution
Use higher quality source photos
Adjust model settings for better output
Common Use Cases for Talking Avatars
The quality of avatars has improved dramatically in recent months, making it increasingly difficult to tell what’s real and what’s AI-generated. Don’t take our word for it - watch the video below and see if you can guess whether it’s real or AI.
Now, that the quality is amazing, the applications are endless:
Business & Marketing
Create personalized video content at scale
Build AI assistant avatars for customer service
Develop consistent brand spokesperson videos
Education & Training
Produce training videos using AI without camera time
Create course content with consistent presenters
Build interactive learning materials
Content Creation
Generate social media content quickly
Create multilingual videos using the translator feature
Develop video series with custom avatars
Taking It Further
Once you're comfortable with basic talking avatars, explore these advanced features:
Create multilingual content with the same avatar
Combine avatars with other video elements
Build complete video series with consistent branding
Experiment with different animation styles
For more detailed tutorials, check out Fliki's AI Avatar masterclass.
Conclusion
Creating a talking avatar from a photo is no longer a complex, expensive process. With the right tools and this step-by-step guide, you can transform any portrait into a professional video avatar in under 15 minutes.
The key is starting with a quality photo, following the process carefully, and experimenting with different settings to find what works best for your needs.
Ready to create your first talking avatar? Upload your photo to Fliki and follow these steps. You'll be amazed at how quickly a static image can come to life.