Introduction
Music is the fastest way to give a video a mood. The right track turns a flat clip into something that feels intentional, and the wrong one, or the wrong license, gets your video muted, claimed, or demonetized before anyone hears it.
Adding the music itself is easy on almost every tool. The part that trips people up is picking music you are actually allowed to use, because dropping your favorite chart song onto a YouTube upload is the single most common way creators get burned. So this guide does both jobs. First the exact steps to add music on the tools you already have, iPhone, CapCut, YouTube, Canva, iMovie, Premiere, and the web. Then the copyright reality in plain English, and the fastest way to get music that will never trigger a claim. I work on content at Fliki and deal with this constantly, so let's make it simple.
If the song is the star, you can make a full music video from the track itself.
One thing to know before you start
Here is the trap in a sentence: the song you want to use is almost certainly owned by someone, and platforms like YouTube scan for it automatically. Adding it takes ten seconds; the claim takes about the same. We will cover exactly how to stay safe further down, but keep it in the back of your mind as you pick a track. For a personal video that never leaves your phone, use whatever you like. For anything you post publicly, and especially anything monetized, the music's license matters as much as the music.
With that flagged, here is how to actually add it.
How to add music to a video on iPhone
This is the most-searched version, and it comes with a catch most people discover the hard way: the native Photos app editor cannot add your own music to a regular video. Its editing tools cover trim, crop, filters, and adjustments, but there is no "add audio" control on a normal clip. Photos only lets you set music on auto-generated Memories montages, not on an arbitrary video you shot.
To add your own music to a normal video on iPhone, use one of Apple's free apps:
Clips: tap the Music button, then choose Soundtracks (Apple's tracks auto-fit the length) or My Music to use a song from your library, and drag the waveform to set where it starts.
iMovie for iOS: tap the plus button, choose Audio, then Soundtracks, My Music, or a file from iCloud Drive, and tap Add Audio. Background music shows up green and loops to fit.
One limitation to know: songs from Apple Music streaming are DRM-protected and cannot be added; you can only use tracks you actually own or downloaded, and iTunes purchases require you to be the rights holder. Apple documents both in the iMovie for iOS guide.
How to add music in CapCut
CapCut is the go-to for short-form, and adding audio is quick. On mobile, tap Audio, then Sounds for the library, Import for your own MP3, or Extracted to pull audio from another clip. On desktop, open the Audio panel, import from your device (MP3, WAV, M4A, AAC), and click the plus to drop it on the timeline. To pull the audio off an existing clip, tap the clip and choose Detach on mobile, or right-click and Extract audio on desktop.
The important caveat is licensing. Per CapCut's Materials License Agreement, standard library sounds are licensed for "personal entertainment and non-commercial purposes," and CapCut's separate "Commercial Sounds" may only be used inside CapCut, TikTok, and TikTok for Business. In other words, most CapCut library music is not cleared to publish on YouTube, on a client project, or in an ad. Great for a personal TikTok, risky everywhere else.
How to add music to a video on YouTube
If the video is already on YouTube, you have a genuinely safe, free option built in: the Audio Library. In YouTube Studio, open Audio Library (under the left menu), browse the Music and Sound effects tabs, and download tracks. These are copyright-safe and will not be Content ID claimed; most need no attribution, though a subset licensed under Creative Commons asks you to credit the artist in the description (YouTube Help).
To add a track to a video you have already uploaded, go to Content, open the video, choose Editor, then Audio, find a track, and add it, dragging to set the start point. Note two limits: you have to do this on a computer (the mobile app can no longer change audio), and as of June 2025 you cannot undo audio changes with the Revert to original feature, so save carefully.
And if you already got hit with a claim, YouTube gives you repair tools under the claimed video: Trim out segment, Replace song (swap in an Audio Library track), or Erase song, which can now mute just the offending song while keeping your voiceover (YouTube Help).
How to add music in Canva, iMovie, and Premiere Pro
Canva: open the Elements or Audio tab for Canva's library, or Uploads for your own file, and drag it onto the timeline. Trim with the handles, set levels with the volume icon, and use the Fade slider to ease it in and out.
iMovie on Mac: open the Audio media browser and drag from Music (your macOS library), Sound Effects (Apple's built-in soundtracks), or drag your own AAC, MP3, WAV, or AIFF files straight from Finder. The same DRM rule applies: streaming-only tracks you do not own will not work.
Adobe Premiere Pro: import the audio file, drag it to an audio track on the project timeline, then use the Essential Sound panel to duck it under dialogue. Tag your music clips as Music and your voice clips as Dialogue, open the Ducking section, set the amount and fade, and click Generate Keyframes (Adobe Help). Ducking is the single biggest upgrade to how professional your mix sounds, more on that below.
What about browser tools and VLC?
Web tools like Clideo, Kapwing, and Veed all follow the same pattern: upload your video, upload or pick a track, adjust timing and volume, and export. They are handy when you do not want to install anything, but nearly all of them stamp a watermark on free-plan exports and remove it only on a paid tier, so check that before you rely on one.
One quick myth to kill: VLC cannot add background music to a saved video. It can play an external audio file alongside a video during playback, but it does not mix and save music under your clip; its Convert feature tends to replace the audio track entirely. For actually adding music, you need a real editor.
The copyright reality (read this before you publish)
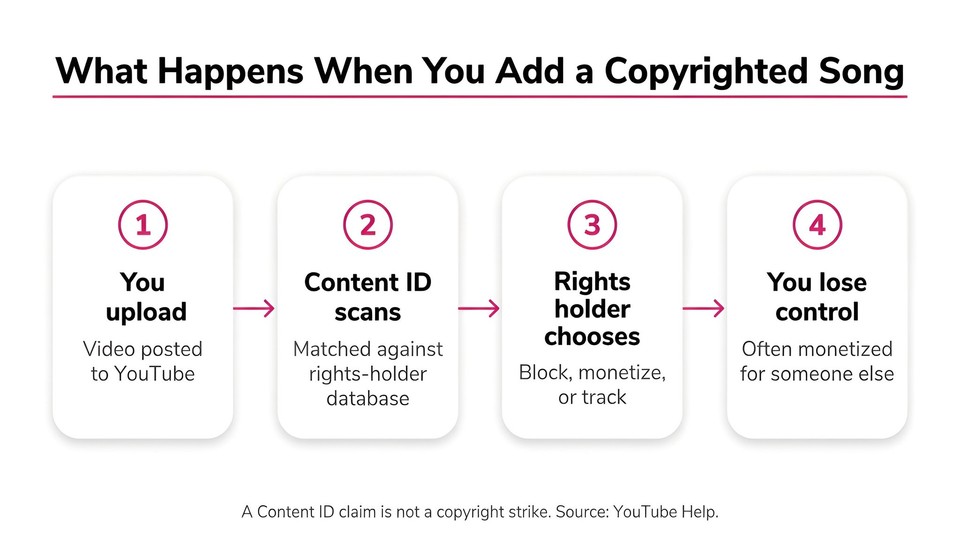
This is the part that decides whether your video survives. Here is how it actually works.
When you upload to YouTube, your video is automatically scanned by Content ID, YouTube's system that matches it against its database of audio and video submitted by rights holders. On a match, the rights holder, not you, chooses what happens: block the video, monetize it by running ads and taking the revenue, or track its stats. Monetize is the most common outcome for a music match, which means your video can stay up while someone else collects the money. A Content ID claim is not a copyright strike, but it is still not what you want.
Why does this happen even if you "bought" the song on iTunes? Because buying a song to listen to is not the same as licensing it for a video. Using a commercial track in a video legally requires two licenses: a sync license from the publisher (the composition) and a master license from the label (the specific recording). The ASCAP guidance spells this out, and notes fees are negotiated case by case. For a hit song this is expensive and slow, which is why almost no independent creator does it.
So the practical answer is to use music that is already cleared. You have good options:
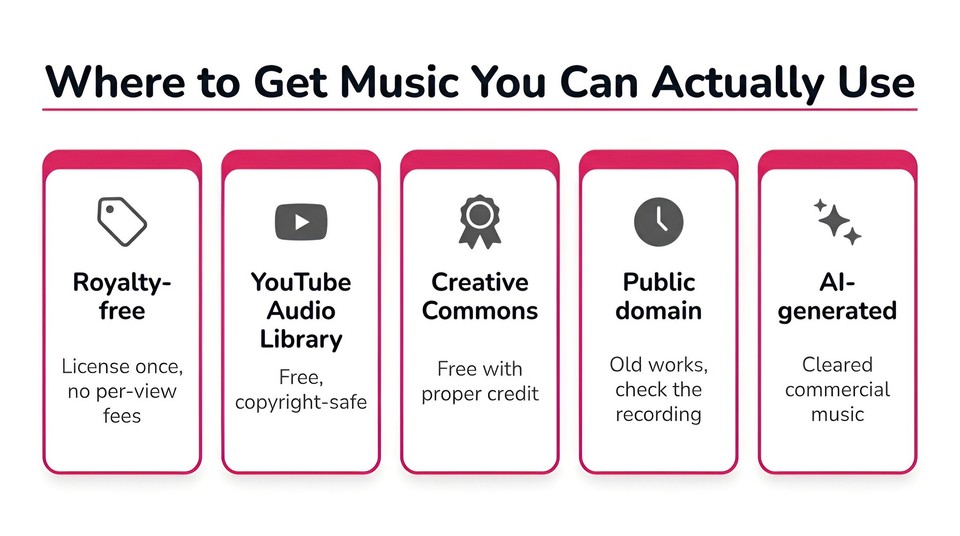
Royalty-free / production music. "Royalty-free" means free of ongoing per-view royalties, not free of charge; you clear the license once. Always read what the specific license permits, especially commercial use.
The YouTube Audio Library, which is free and copyright-safe, as covered above.
Creative Commons tracks, which you can use, including commercially for CC BY, as long as you attribute the creator properly. Watch the license variants: NC means non-commercial only, ND means no edits.
AI-generated or royalty-free music from a tool, which is the fastest modern fix, covered next.
And a warning on platform music stickers: the Instagram "Music" sticker and TikTok's sounds are licensed only for use inside that app, for personal, non-commercial posts. Business and brand accounts get a much smaller "commercial music library," and you cannot lift those tracks and reuse them elsewhere. Great inside the app, off-limits outside it.
The bar rises the moment money is involved. Monetized YouTube videos, ads, and client work are commercial use, and they need music that is explicitly cleared for commercial use. When in doubt, assume you need a commercial license.
The copyright-safe fast path: add music in Fliki
Everything above is why I default to generating or pulling cleared music right where I edit, instead of hunting for a track and hoping it survives. In Fliki, that lives in one place. You bring your footage into the Edit video workflow, and the editor gives you three copyright-safe ways to add music plus the controls to balance it.
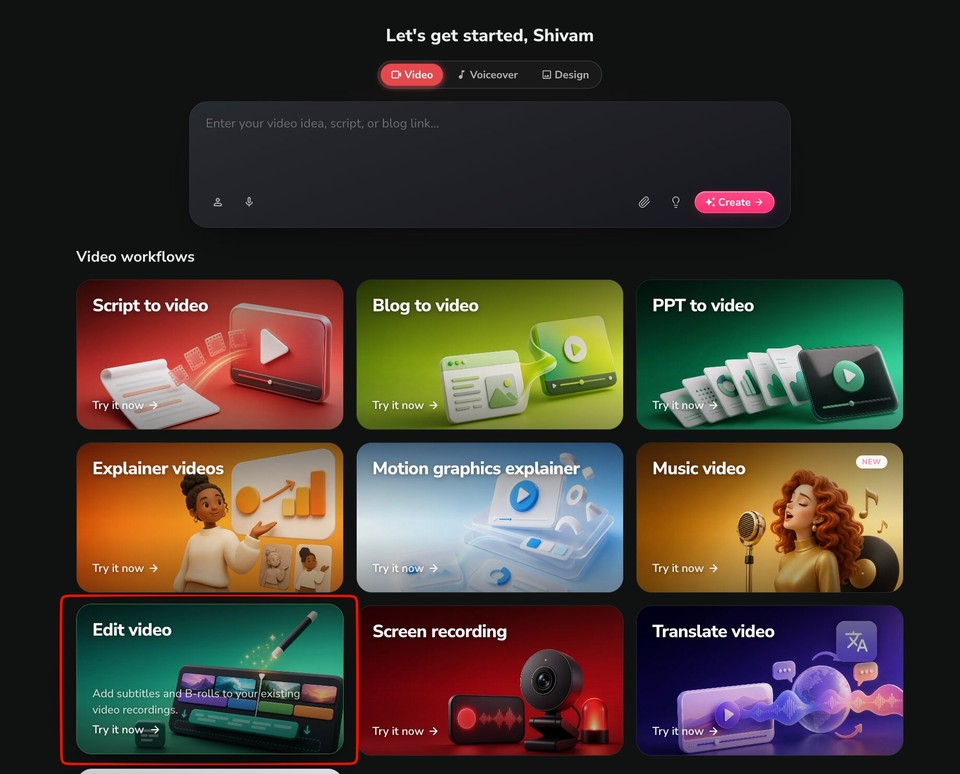
Step 1: Upload your footage. Choose the Edit video workflow and drop in your clip or clips (video or audio, up to ten files). You can keep the original audio as recorded or re-voice it; for adding music you will keep your original audio and layer music underneath.
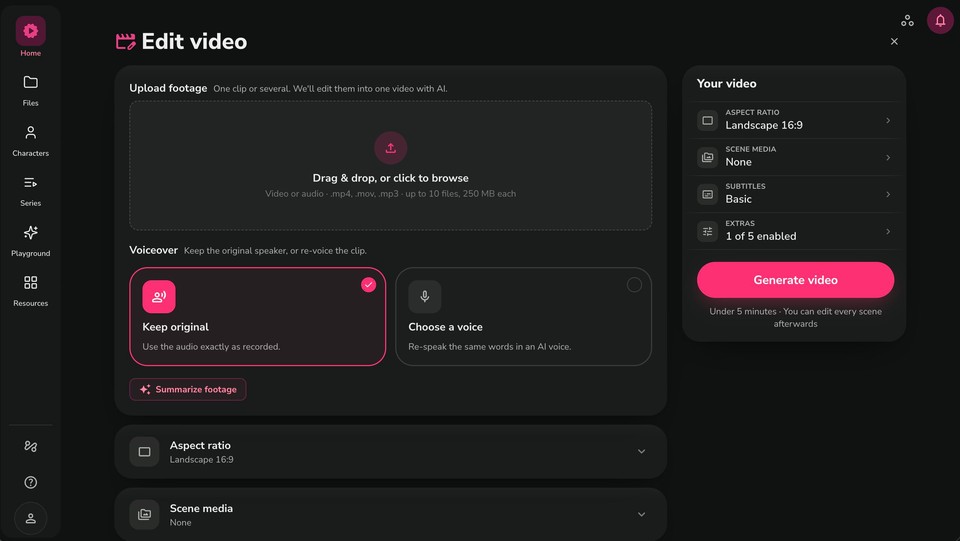
Step 2: Add a background layer. After the video is generated, You can click Add layer, then Common, then Background music, to drop a track under the whole video. Fliki's AI music generator produces royalty-free tracks that ship with a commercial license on paid plans, so there is no rights holder to file a Content ID claim, which is the whole point.
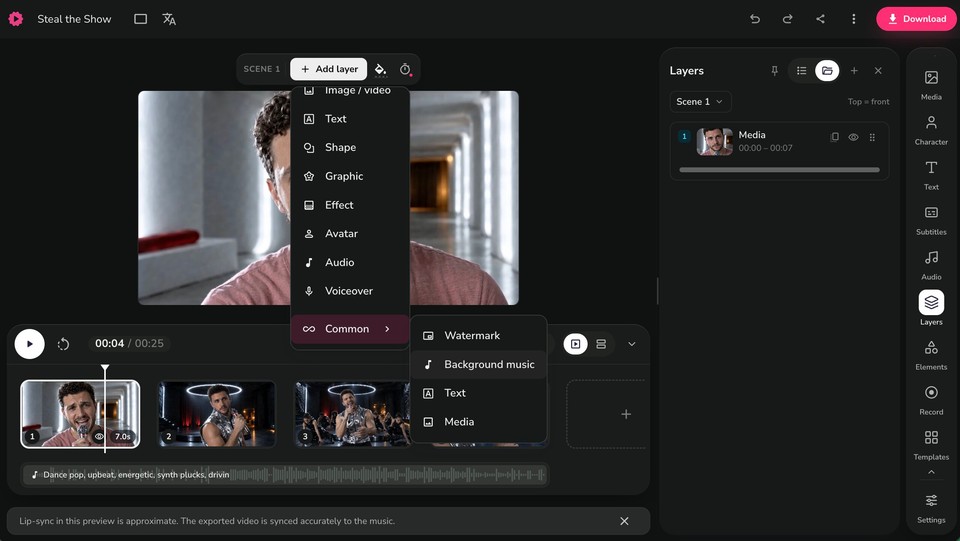
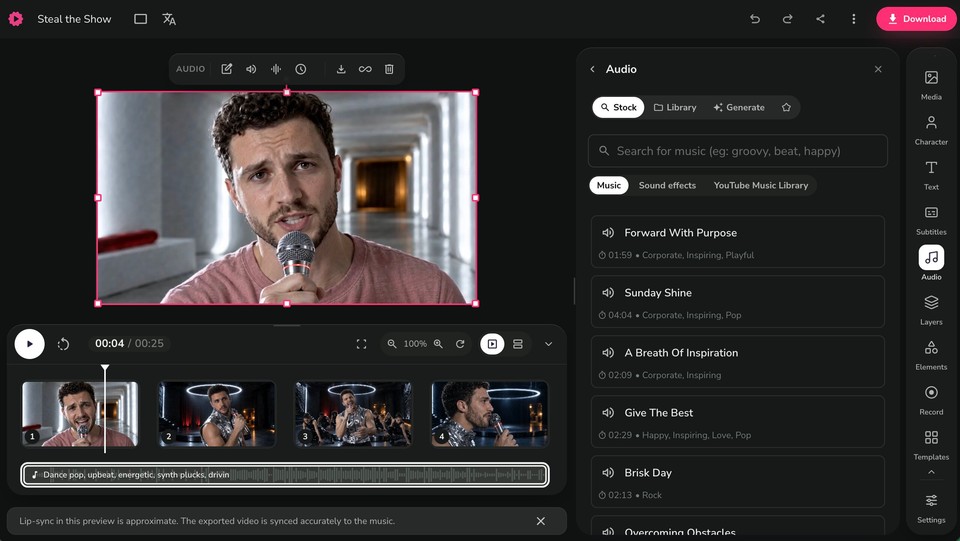
Step 3: Open the Audio panel and pick your source. In the editor, open Audio and you get three tabs: Stock to search a licensed production-music library by mood and genre (Corporate, Inspiring, Pop, and so on), Library to use your own uploaded file, and Generate to create an original AI track from a prompt. There are separate Music, Sound effects, and YouTube Music Library sections, so you can grab a track that is safe for exactly where the video is going. If your footage is a screen recording or talking-head clip, the same Edit video workflow handles it.
Step 4: Balance and export. Set the music volume so it sits under any voiceover (Fliki auto-ducks music beneath narration so dialogue stays clear), add fades, trim or loop it to length in the editor, and export. Because the music is cleared for commercial use, the same video is safe to monetize on YouTube, run as an ad, or hand to a client.
The reason this is my default is not that adding a track is hard anywhere else, it is that this removes the copyright gamble entirely. The music is licensed the moment you use it. If you also need captions on the same video, that lives in the same editor; we wrote a separate guide on adding subtitles to a video that pairs well with this one.
How to add music well: the mix matters
Getting the track in is step one. Getting it to sound good is what separates a polished video from an amateur one, and it mostly comes down to volume and transitions.
The most important rule is that music should sit well below any speech. The clearest standard here is the accessibility guideline WCAG 1.4.7, which says background sound should be at least 20 decibels below foreground speech, roughly four times quieter. In practice, editors keep background music somewhere around 18 to 25 dB under dialogue and duck it down further whenever someone is talking. If your tool offers audio ducking (automatic lowering of music under speech), use it; it is the fastest way to a clean mix.
A few more habits that make a real difference: fade the music in and out rather than letting it cut in abruptly, match the tempo and mood to the footage (research on music-content congruence shows a fitting track measurably improves how people respond), and loop or trim the track to the exact length instead of letting it end mid-video. If you are mastering for a platform, most streaming and video services normalize loudness to around -14 LUFS integrated, so there is no benefit to making your mix artificially loud; balance beats volume every time.
Common mistakes to avoid
The big one is music louder than the voice, which makes narration hard to follow; fix it with ducking and the 20 dB rule above. Close behind is using a popular commercial song and getting muted, blocked, or monetized-for-someone-else by Content ID. Then there is reusing a TikTok, CapCut, or Instagram sticker sound outside that app or in a commercial project, which the license does not allow. And smaller craft errors: no fade, a track whose mood fights the footage, or forgetting that a monetized or client video needs explicitly commercial-cleared music, not just anything that sounds free.
The bottom line
Adding music to a video is a two-part job: the mechanics, which are quick on any tool, and the licensing, which is where videos actually get killed. Add the track using whichever app fits your workflow, keep it well below the voice with a fade in and out, and above all use music you are cleared to use, especially if the video is going public or making money. Sort the license out first and the rest is just taste.
If you want to skip the copyright gamble entirely, you can add royalty-free or AI-generated music to your video in Fliki and export something that is safe to publish anywhere, free to try, no credit card needed.
FAQs
The native Photos app cannot add your own music to a regular video, only to auto-generated Memories. Use Apple's free Clips or iMovie apps instead: add a clip, tap to add audio, and choose a soundtrack or a song you own. Streaming songs from Apple Music are DRM-protected and cannot be used.
Because the song is copyrighted and YouTube's Content ID system detects it automatically. The rights holder can then block, mute, or monetize your video. To avoid it, use royalty-free music, the YouTube Audio Library, or AI-generated music that is cleared for use.
Use music that is already licensed for your use: the YouTube Audio Library, properly attributed Creative Commons tracks, royalty-free production music, or an AI music generator that provides a commercial license. Avoid commercial chart songs and platform sticker sounds unless you have the specific rights.
No. Crediting the artist does not grant you a license. A commercial song still needs sync and master licenses regardless of credit. Attribution only satisfies certain free licenses, like Creative Commons CC BY, that specifically ask for it.
Keep it well under the speech. The WCAG accessibility standard recommends background audio at least 20 dB below foreground speech, and most editors duck music down whenever someone is talking. Aim for the voice to always sit clearly on top.
Generate or pull it inside your editor so the license is handled automatically. Tools like Fliki let you add royalty-free stock or AI-generated music that ships with a commercial license on paid plans, so there is nothing to get claimed when you publish or monetize.