
Introduction
Open any social feed and watch how people actually watch. Thumbs moving, sound off, half-reading captions on a phone at a bus stop. If your video has no text on screen, most of that audience never hears a word you said. They just keep scrolling.
Subtitles fix that. They also make your video accessible to people who are deaf or hard of hearing, easier to follow for non-native speakers, and more discoverable in search. The good news is that adding them has never been easier. The slightly annoying news is that "add subtitles" can mean five different things depending on where your video is going, and a lot of the advice online skips right past that.
I work on content at Fliki, and I have added subtitles to hundreds of videos across YouTube, Reels, course modules, and ads. This guide walks through every method that actually matters in 2026, from a free YouTube upload to word-by-word animated captions, plus the format and styling decisions that separate captions that help from captions nobody can read. Let's get into it.
Subtitles vs captions: the difference that decides everything
People use "subtitles" and "captions" interchangeably, and for casual social video it rarely matters. But the distinction changes which method you should use, so it is worth 30 seconds.
Subtitles assume the viewer can hear the audio but might not understand the language. They transcribe or translate the spoken dialogue and nothing else. Captions assume the viewer cannot hear at all, so on top of the dialogue they add speaker labels and non-speech sounds like "[door slams]" or "[tense music]." That is not a stylistic choice; it is the W3C's actual definition, and it is why subtitles alone do not satisfy accessibility rules for deaf and hard-of-hearing viewers.
There is a second axis that matters even more for creators: whether the text can be turned off.
Term | What it means | Turn on/off? |
|---|---|---|
Subtitles | Dialogue only, for hearing viewers | Usually toggleable |
Closed captions (CC) | Dialogue plus sounds and speaker IDs, for deaf/HoH | Toggleable |
SDH | Caption content in subtitle formatting, for streaming/OTT | Toggleable |
Open captions | Text "burned" into the video pixels | Always on, cannot be turned off |
Hold onto that last row. The single biggest decision you will make is whether your subtitles live as a separate file the platform can switch on and off, or are baked permanently into the video. We come back to it in a minute.
Why subtitles are worth the effort
The honest case for subtitles does not need inflated numbers, and the internet is full of inflated numbers. You have probably seen "viewers retain 95% of a video versus 10% of text," the "8-second attention span shorter than a goldfish," or "one minute of video equals 1.8 million words." All three are myths: the retention stat traces to a tiny marketing survey, the goldfish line came from a 2015 Microsoft report that pulled it from an unsourced statistics site, and the 1.8-million-words figure was a Forrester analyst's back-of-envelope joke. Skip all of them.
Here is what the real data says. In a 2019 study by Verizon Media and Publicis Media surveying 5,616 US adults, 69% of people said they watch video with the sound off in public places, and 80% said they are more likely to finish a video when captions are available. Strikingly, 80% of people who use captions are not deaf or hard of hearing at all; they just prefer them. Back in 2016, publishers reported to Digiday that as much as 85% of their Facebook video was being watched muted, and Facebook's own tests found captioned video ads increased view time by about 12% on average.
Subtitles help you get found, too. Discovery Digital Networks ran an A/B test and saw captioned YouTube videos earn 7.3% more views on average, because the caption text is indexable and searchable in a way spoken audio is not. So the pitch is simple: more people finish your video, more people can access it, and more people can find it. That is a strong return on a few minutes of work.
Accessibility is not optional for everyone
For a lot of creators subtitles are a nice-to-have. For some organizations they are the law. The World Health Organization estimates that over 5% of the world's population, around 415 million people, have disabling hearing loss, a number projected to keep climbing. Captions are how those viewers access your content.
If you publish on behalf of a US state or local government, the Department of Justice's 2024 ADA Title II rule now requires web and app content, including video captions, to meet the WCAG 2.1 Level AA standard. US federal agencies and their vendors fall under Section 508, which also requires captions on video with audio. TV content redistributed online is covered by the CVAA, and businesses selling into the EU face the European Accessibility Act, which began enforcement in June 2025. If any of that describes you, note that subtitles are not enough on their own; you need proper captions that include sound cues and speaker identification. Verify the current compliance deadlines for your situation, since several were adjusted after the original rules.
The one format decision to get right: sidecar file vs burned-in
Before you touch a tool, decide how the text should live in the world. There are two options and they are not interchangeable.
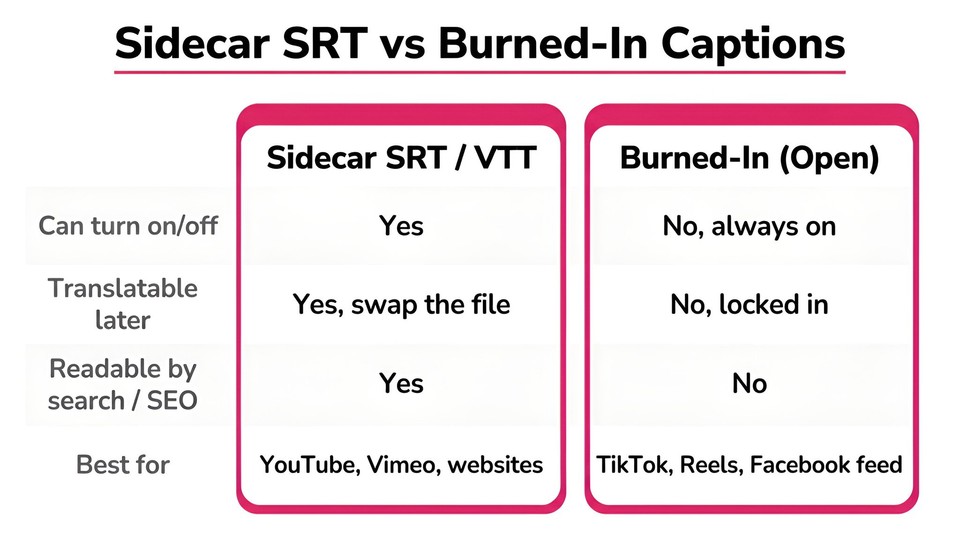
A sidecar file is a separate subtitle file, usually an .srt or .vtt, that travels alongside the video. The platform reads it and overlays the text, so viewers can turn captions on or off, switch languages, and search engines can read them. YouTube, Vimeo, LinkedIn, and Facebook all accept .srt uploads. This is the flexible, future-proof, SEO-friendly choice.
Burned-in (open) captions are painted directly into the video pixels. They always show, on every platform, no matter what, which is exactly why they dominate TikTok, Instagram Reels, and Facebook feed, where autoplay-on-mute is the norm and sidecar tracks are unreliable or stripped out. The tradeoff: they cannot be turned off, translated, or restyled later, and they are invisible to search.
The rule of thumb I use: if the video lives on YouTube, Vimeo, or a website, ship a sidecar SRT. If it lives in a short-form social feed, burn the captions in. And if it lives in both places, do both from the same source, which good tools let you do without re-editing.
A quick note on SRT versus VTT, since people ask. SRT is the simplest and most universal format; it is plain text with an index number, a timecode, and the caption line. VTT (WebVTT) is what HTML5 web players read natively and supports styling and positioning. For 90% of uploads, SRT is all you need.
Method 1: Add subtitles on YouTube (free, sidecar SRT)
If your video is already on YouTube, this is the free, no-extra-tool route, and it keeps captions selectable and searchable.
Go to YouTube Studio and open Subtitles in the left menu.
Select your video, click Add Language, and choose the language.
Under Subtitles, click Add, then choose Upload file and select With timing (an SRT already has timestamps).
Pick your .srt file and click Publish.
YouTube can also auto-generate captions for you, and it is a reasonable starting point, but manage your expectations. On clean, single-speaker audio it does well; on average real-world audio with accents, jargon, or background noise, auto-captions are often only 60 to 70% accurate, which means roughly one wrong word in three. Google's own help docs recommend reviewing them. Never publish raw auto-captions on anything that represents you professionally. If you do use them, open the caption editor and proofread every line.
Method 2: Add subtitles in CapCut (auto, burned-in for social)
For TikTok and Reels, CapCut is the common free route.
Import your clip and open the Text menu, then Auto captions.
Choose the spoken language and tap Generate. It transcribes in seconds.
Double-tap any caption to fix errors (you will have some).
Style the font, color, position, and animation, then export.
Because CapCut burns the captions into the exported file, they are guaranteed to show on any platform, which is what you want for short-form. Just keep them clear of the bottom UI, more on that below.
Method 3: Add subtitles in Canva
Canva added speech-to-text captions that are handy if you already design there.
Upload your video and open the Text panel.
Choose Captions, then Generate captions.
Pick from the style packs, edit any wrong words, and the captions download baked into the video.
It is quick and the styles are clean, though like every auto tool it needs a proofreading pass.
Method 4: Add subtitles in Adobe Premiere Pro (transcription-based)
For anyone editing in Premiere, the modern workflow is transcription-first and genuinely good.
Open Window > Text to bring up the Text panel.
Click Transcribe to run Adobe's on-device Speech to Text.
In the Captions tab, click Create captions from transcription.
Edit the text and timing, then export with captions burned in or as a sidecar SRT.
This gives you frame-accurate control and works offline, at the cost of being the most involved option on this list.
Method 5: Write an SRT file by hand
Sometimes you just need to hand-make a small subtitle file, and it helps to understand the format even when a tool writes it for you. An SRT is plain text. Each caption "cue" has four parts: an index number, a timecode line, the text, and a blank line before the next cue. The timecode uses a comma before the milliseconds.
100:00:00,000 --> 00:00:02,500Welcome to the tutorial.200:00:02,600 --> 00:00:05,000Today we'll add subtitles to a video.
Save that as myvideo.srt in plain text with UTF-8 encoding, and you can upload it to YouTube or drop it next to a video in a player like VLC. Handy for short clips or fixing a few lines. Painful for a ten-minute video, which is where automation earns its keep.
Method 6: Auto-generate subtitles with AI (the fast path, any format)
The methods above each solve one slice of the problem. What most people actually want is: point a tool at a video, get accurate captions, style them so they look good, and export whichever format the destination needs, whether that is a burned-in Reel or a sidecar SRT for YouTube. That is what an auto caption generator does, and it is the workflow I reach for most.
This is where I will show you how we built it in Fliki, since it is the tool I know best and it happens to handle the full range in one place. The starting point is the Edit video flow, where you bring in footage you already have rather than generating anything from scratch.
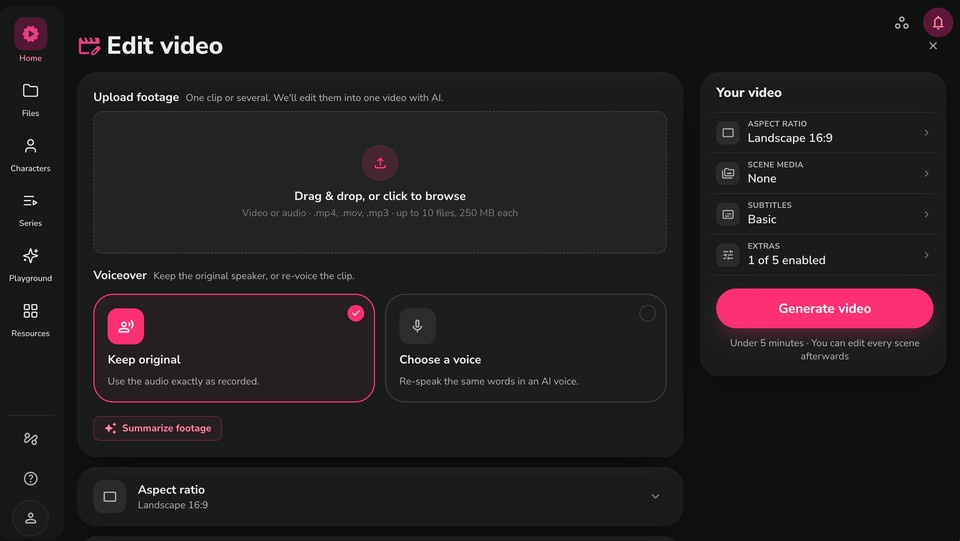
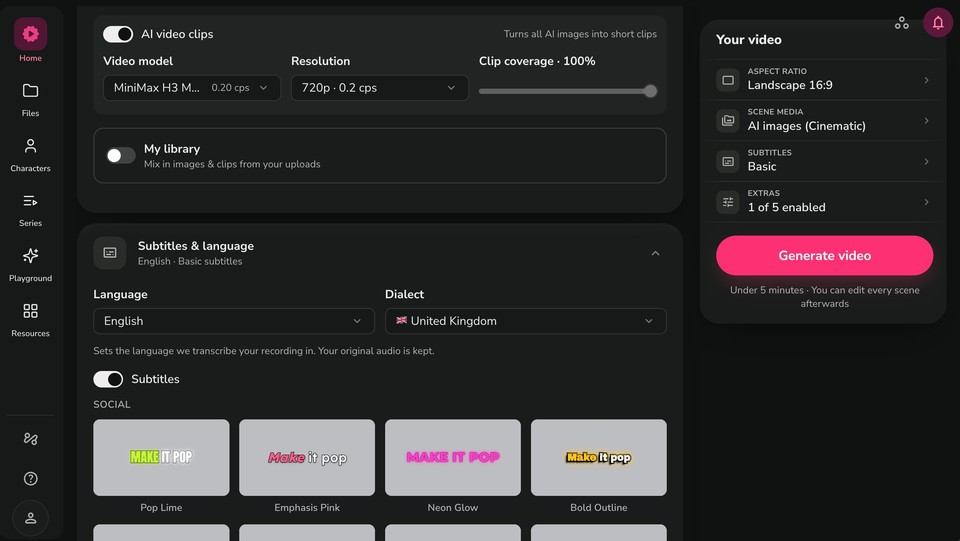
Step 1: Upload your footage. Drag in one clip or several and Fliki stitches them into a single video. Under Voiceover you choose Keep original, which uses your recorded audio exactly as-is (the option to re-voice in an AI voice is there if you ever want it, but for adding subtitles to an existing video you keep your own voice). Notice the subtitles are already set to on in the Your video panel on the right.
Step 2: Set the language and turn subtitles on. In the Subtitles & language section you pick the language and dialect Fliki should transcribe in, for example English with a United Kingdom or United States dialect, and confirm the Subtitles toggle is on. Your original audio is untouched; this just tells the engine what it is listening to. Fliki transcribes with word-level timing across 80+ languages, and on clean audio in supported languages it reaches up to about 95% accuracy, though like every speech engine that drops with heavy background noise or strong accents, so a quick review is still smart.
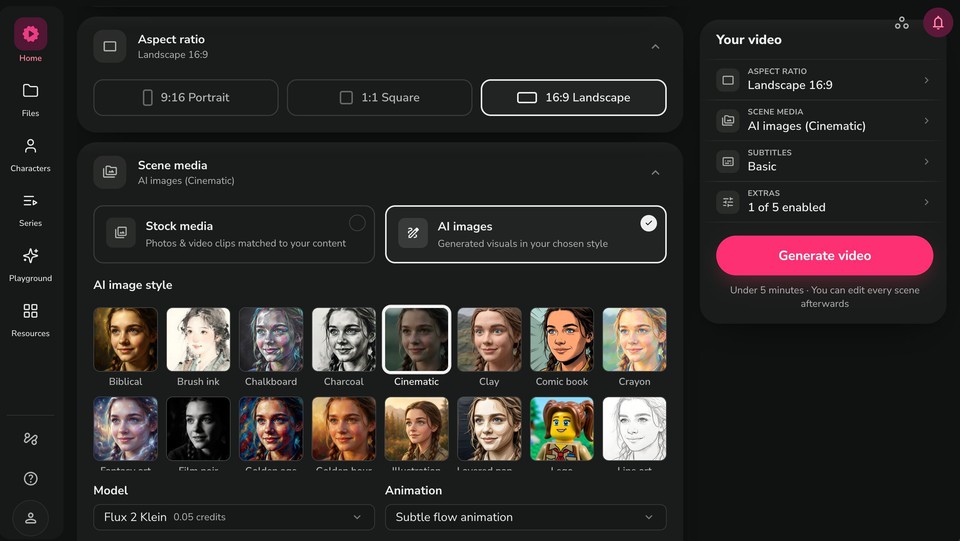
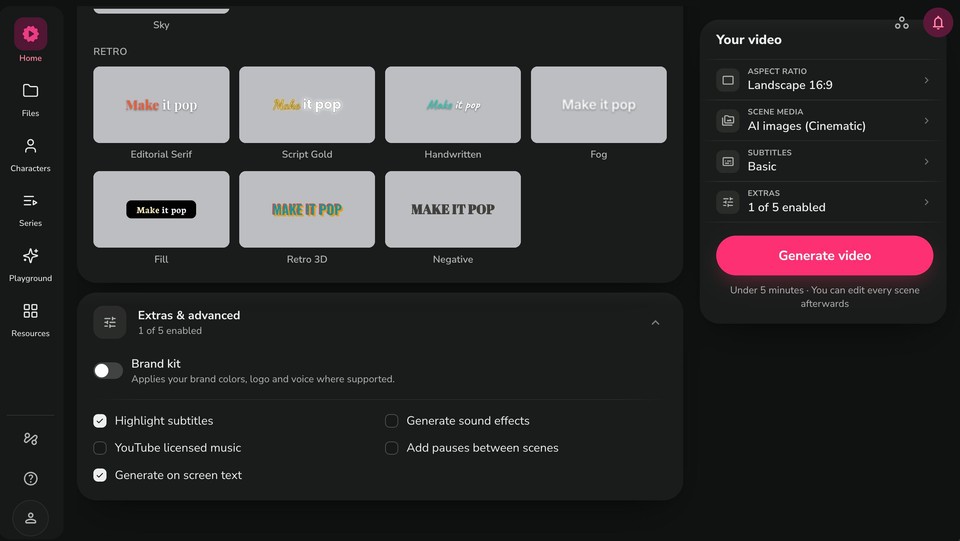
Step 3: Pick a caption style. This is where auto-captions stop looking generic. Fliki gives you preset styles built for how people actually publish: a Social set with looks like Pop Lime, Emphasis Pink, Neon Glow, and Bold Outline for the punchy word-by-word captions you see on TikTok and Reels, and a Retro set with Editorial Serif, Script Gold, Handwritten, and more. Because the captions are timed at the word level, animated styles that highlight each word as it is spoken actually stay in sync.
Step 4: Turn on Highlight subtitles and any extras. In Extras and advanced you can enable Highlight subtitles for that karaoke-style word emphasis, apply your Brand kit so fonts and colors match your channel, and toggle things like on-screen text or licensed music. If you want to fix a word, you edit the caption like text: click, retype, done.
Step 5: Generate and export. Hit Generate and you get a captioned video in a few minutes. From there you can render the captions burned in for social, download a separate SRT or VTT for YouTube and Vimeo, or both from the same project without re-rendering. If you need the video in another language, you can auto-translate the captions into 80+ languages in a click, or go further and dub the whole thing in a native-sounding voice.
You can try it free without a credit card. The reason I lean on this approach is not that it is fancier, it is that it collapses transcription, styling, format export, and translation into one pass instead of four tools. For a fuller breakdown of baking captions into the file, we wrote a separate guide on burned-in subtitles, and if you care about legibility, our roundup of the best subtitle fonts is worth a look.
How to make captions people can actually read
A captioned video with bad captions is still a bad video. The broadcast world has spent decades figuring out what makes subtitles readable, and the BBC and Netflix style guides are the closest thing to a rulebook. Here is what actually matters.
Keep it to a maximum of two lines on screen at once, and roughly 37 to 42 characters per line. Aim for a reading speed a normal person can keep up with, around 15 to 20 characters per second, or 160 to 180 words per minute; faster than that and viewers cannot finish a line before it disappears. Use high contrast, white text with an outline or a subtle shadow so it survives any background. Write in sentence case, not ALL CAPS, which is harder to read for anything longer than a short hook. And position matters more than people think on social: keep captions above the bottom strip on TikTok and Reels, where the progress bar, username, and buttons live, and never let them cover a face or key on-screen action.
Above all, proofread. Auto-transcription is a first draft, not a final one. Fix the homophones, the names, the punctuation, and the line breaks. That five-minute pass is the difference between captions that look professional and captions that make your brand look careless.
Common mistakes to avoid
The most frequent one is publishing raw auto-captions without a review, so viewers see "their" for "there" and your name spelled three different ways. Close behind is cramming too much text into a cue or flashing cues too fast to read. On social, letting captions slide under the platform UI or across someone's face is a quiet killer. And a subtle but important one: burning in captions when you should have shipped a sidecar SRT, which throws away translatability, the ability to turn them off, and your SEO. Finally, do not mistake subtitles for accessibility compliance; if you have a legal obligation, you need captions with sound cues and speaker labels, not dialogue alone.
Subtitles in more than one language
If your audience is global, you do not have to pick one language. On YouTube, Vimeo, and Facebook you can upload multiple caption files against a single video (for example an English track and a Spanish track), and viewers choose their language from the CC menu. The workflow is: get an accurate source-language SRT first, then translate it while keeping the same timecodes. AI tools can transcribe and translate into dozens of languages in one step, which is a huge time-saver, but for anything customer-facing have a fluent speaker review the result, since machine translation still misses nuance and idiom. Burned-in captions can only carry one language per file, so for true multilingual reach, selectable sidecar tracks are the better route. If you want the voice translated too, not just the text, that is where AI dubbing comes in.
The bottom line
Adding subtitles used to be a chore reserved for broadcasters. Now it is a few minutes of work that makes your video reach more people, include more people, and rank better. The method you choose comes down to one question: is this video going somewhere captions can be toggled, in which case ship a sidecar SRT, or into a muted social feed, in which case burn them in? Answer that, run a real proofreading pass, and follow the readability basics, and your captions will do their job instead of getting in the way.
If you would rather not juggle a separate transcriber, a styling tool, and an SRT exporter, an all-in-one auto caption generator handles the whole chain in one place. You can caption your next video free and see how it looks in about five minutes.
FAQs
If the video is on YouTube, upload an SRT in YouTube Studio at no cost, or use YouTube's auto-captions and proofread them. For social clips, CapCut and Canva both offer free auto-captioning. Fliki has a free forever plan for auto-generating and styling captions with no credit card required. The catch with every free auto option is accuracy, so always review the text before publishing.
Subtitles transcribe or translate the spoken dialogue and assume the viewer can hear. Captions assume the viewer cannot hear, so they also include speaker labels and non-speech sounds like music and effects. For accessibility compliance you need captions, not just subtitles.
Use a sidecar SRT for YouTube, Vimeo, and websites, so viewers can toggle and translate captions and search engines can read them. Burn captions in for TikTok, Instagram Reels, and Facebook feed, where autoplay-on-mute means baked-in text is the only reliable way to guarantee they show. When a video goes to both, export both from the same project.
It depends heavily on your audio. Clear, single-speaker audio in a supported language can hit the mid-90s in percentage accuracy with a good engine. Average real-world audio with accents, jargon, or background noise is often lower, and YouTube's auto-captions in particular average around 60 to 70%. Treat any auto-transcription as a first draft and proofread it.
The simplest route is the CapCut mobile app: import the clip, tap Text, then Auto captions, choose the language, generate, fix any errors, and export with the captions burned in. Any browser-based tool like Fliki also works from a phone if you prefer not to install an app.
Yes. Create an accurate subtitle file in the original language first, then translate it while keeping the timecodes intact. Upload multiple language files to platforms that support them, or export separate burned-in versions. AI tools can transcribe and translate in one step, but have a fluent speaker check anything important.