Introduction
An animated explainer is one of the most persuasive assets a business can own. It takes something abstract, a product, a process, an idea, and makes it click in under two minutes. The catch has always been production. A studio-made 60-second animated explainer typically costs somewhere around 8,000 dollars and takes four to eight weeks, according to Wyzowl's own cost survey. For most teams that means one explainer a year, if that.
AI has quietly removed that bottleneck. You can now go from a one-line idea to a finished, narrated, captioned animated explainer in minutes, choose the exact art style, and re-render it when your message changes. It is not magic, and I will be honest about where it still needs a human hand, but the shift is real.
In this guide I will cover what actually makes an explainer work (the part most tutorials skip), then walk through the exact process I use inside Fliki's Explainer workflow, step by step, and show you three real videos I generated with it so you can judge the quality for yourself. Let us start with the question worth asking before you make anything.
Do animated explainers actually work?
Short answer: yes, and the evidence is stronger than the usual marketing hype, as long as you ignore the fake stats floating around the internet.
Here is the real data. According to Wyzowl's 2026 State of Video Marketing survey, 96 percent of people have watched an explainer video to understand about a service or product, 63 percent say a short video is their most-preferred way to learn about a product (versus 12 percent who prefer a text article), and 85 percent say a video has convinced them to buy something. That is a survey run by a video company, so treat it as directional, but the direction is consistent and it matches how people actually behave.
For the "keep it short" rule, the best evidence is real viewing behavior, not opinion. Wistia's 2025 State of Video analysis of millions of videos found that clips under a minute hold the highest engagement, and that viewers tend to drop off around the halfway mark, so you should front-load your most important point. Vidyard's 2025 benchmarks, drawn from more than 900,000 business videos, found that videos under one minute get around 65 percent completion, falling sharply as length grows.
One myth to retire while we are here. You have probably seen the claim that "viewers retain 95 percent of a message from video versus 10 percent from text." It is not real. It traces back to a small vendor survey from the 2000s, and the company that published it now openly says it "was not a peer-reviewed neuroscience study." Do not build your case on it. The honest version, that people prefer and act on short video, is more than strong enough.
What makes a great explainer (before you open any tool)
This is the part that separates an explainer that converts from a pretty video nobody finishes. The tool matters far less than the script.
Every strong explainer follows roughly the same five-beat structure. Open with a hook in the first five seconds that names the viewer's problem or asks a sharp question, not "Hi, we're Acme Inc." Then agitate the problem a little so the viewer feels understood, present your solution and how it works, add one piece of proof, and close with a single clear call to action. This is a version of the classic Problem-Agitate-Solve formula, and it works because it earns attention before it asks for anything.
A few rules that consistently hold up:
Keep it to 60 to 90 seconds. That is the practical sweet spot for a standard explainer, and 30 to 60 seconds for social and ads. The engagement data above is why.
Write for the ear and count your words. Natural narration runs about 150 words per minute, so a 60-second script is roughly 150 words and a 30-second script about 75. If your script is longer than that, your video will be too.
One core message. Do not try to cover every feature. Pick the single idea the viewer must walk away with.
Lead with the viewer's problem, not your features. People care about their time, money, and stress, not your feature list.
Plan for sound-off. A large share of social and mobile viewing happens muted, so captions are not optional.
Get the script right and even a simple animation will outperform a gorgeous one built on a weak message. Get it wrong and no tool can save it.
The main animation styles, and when to use each
"Animated" is not one look. Choosing the right style for your content and brand is half the battle.
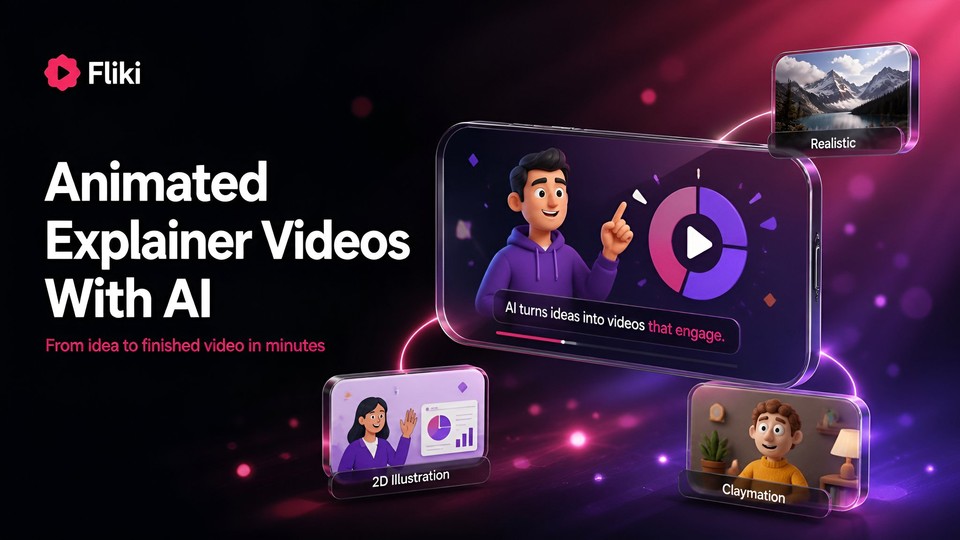
Motion graphics (animated shapes, icons, and text) is the most versatile style for software and abstract or data-heavy topics. 2D character animation carries emotion and story, which suits consumer and benefit-led narratives. Whiteboard animation is great for step-by-step teaching and is among the cheapest looks. Kinetic typography puts animated words center stage and is punchy for short, quote-driven pieces. 3D animation shines for physical or technical products but is the most expensive and slowest. Cutout and papercraft, claymation, and mixed media (blending styles) give a distinctive, characterful feel. The right choice comes down to three questions: what you are explaining, who it is for, and your budget.
The good news with AI is that switching styles is now a single click rather than a new production, which is exactly what the Fliki workflow below lets you do.
How AI changes explainer production (the honest version)
AI genuinely collapses the timeline and cost. Instead of a scriptwriter, animator, voice actor, and editor working over weeks, you describe your idea, pick a style, and get a first cut in minutes. You can iterate instantly, localize into dozens of languages, and produce far more variations than a manual pipeline ever could. Against a roughly 8,000-dollar, multi-week studio project, that is a step change.
It is not flawless, and pretending otherwise would be a disservice. Current AI video has real limitations you should plan around. Character and object consistency can drift across shots, so tools keep individual clips short. Complex motion and physics can still look slightly off. Auto-generated visuals sometimes come out generic and need a swap. And most importantly, AI-written scripts and AI-picked facts need a human review, because a model will state something confidently and wrongly. The winning approach is AI for speed and volume, a human for direction, accuracy, and taste. Keep that in mind and the rest of this is straightforward.
How to make an animated explainer with AI in Fliki, step by step
This is the workflow I actually use, and the one that produced the example videos further down. It lives at app.fliki.ai under the Explainer videos workflow. The whole thing takes under five minutes to set up, and you can edit every scene afterward.
Step 1: Open the Explainer workflow
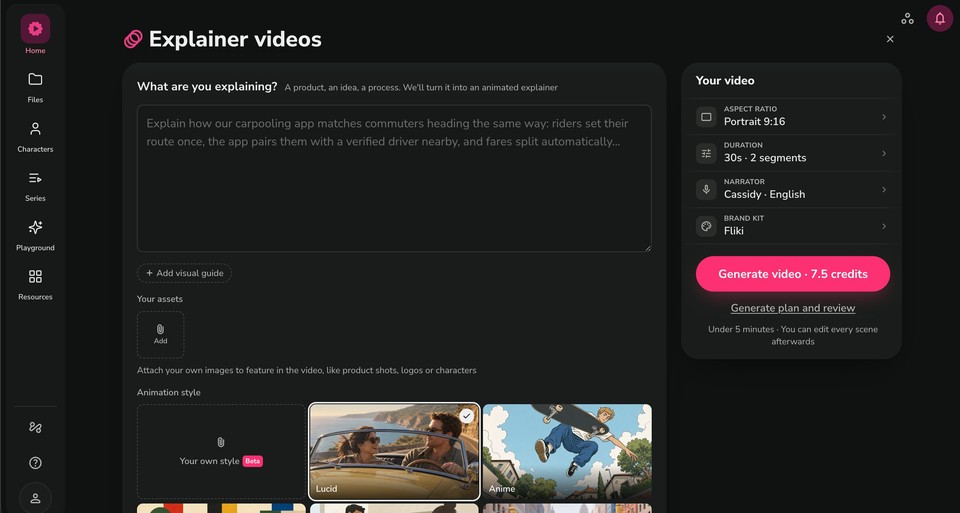
From the Fliki home screen, open the Explainer videos workflow. You land on a single setup page: your inputs on the left, a live "Your video" summary on the right that updates as you make choices.
Step 2: Describe what you are explaining
In the "What are you explaining?" box, describe your product, idea, or process in a sentence or two. This is your script brief, so apply the rules from earlier: lead with the problem. Something like "Explain how our carpooling app matches commuters heading the same way: riders set their route once, the app pairs them with a verified driver nearby, and fares split automatically" gives the AI a clear, benefit-led starting point. You can also attach your own assets (product shots, a logo, or a character reference) under Your assets so they feature in the video.
Step 3: Pick your animation style
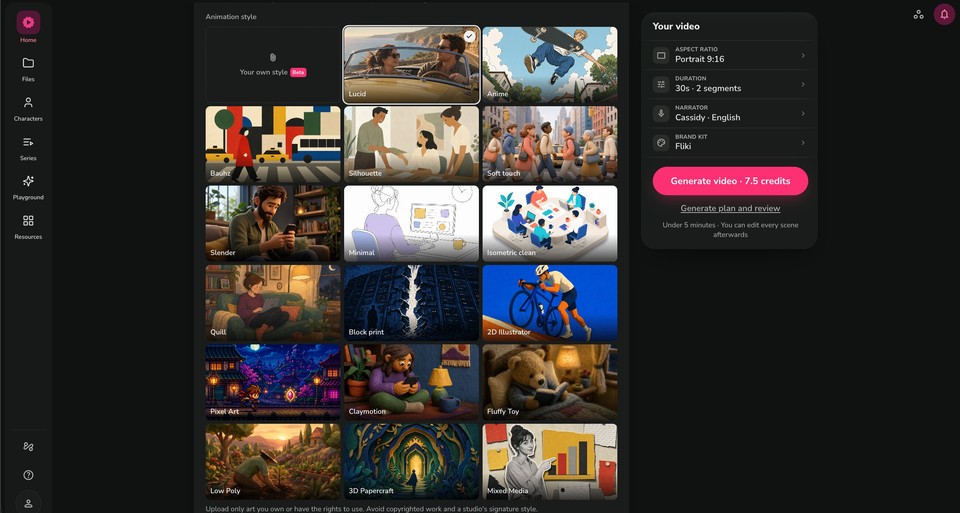
This is the fun part. Fliki offers a large grid of animation styles, and switching between them is instant. The current lineup includes photoreal and cinematic looks like Lucid, illustrated styles like Anime, Quill, Soft touch, and 2D Illustrator, plus Claymotion, Fluffy Toy, Pixel Art, Low Poly, 3D Papercraft, Isometric clean, Block print, Bauhz, Silhouette, and Mixed Media. There is also a "Your own style" option (in beta) to upload art you own so the video matches your brand. Pick the one that fits your topic and audience.
Step 4: Set duration, format, and the models
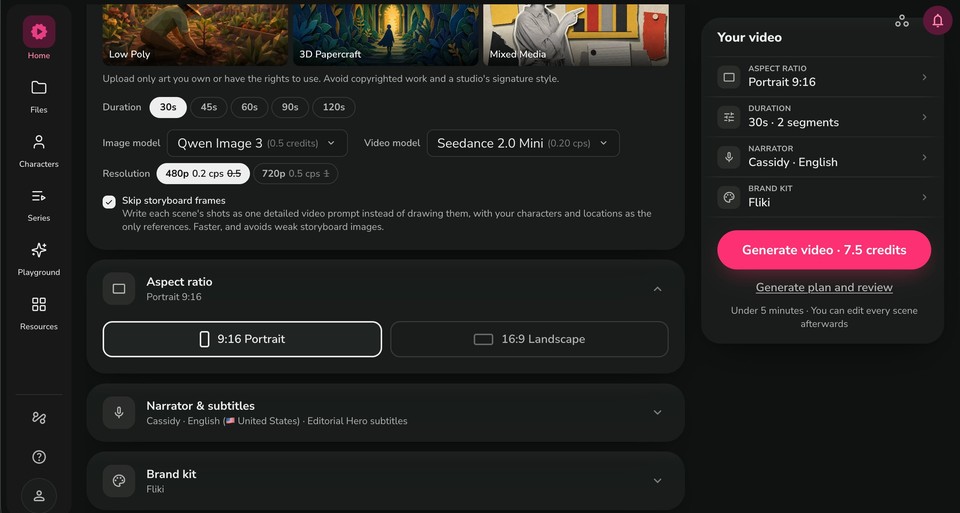
Choose your duration (30, 45, 60, 90, or 120 seconds), then your aspect ratio: 9:16 Portrait for TikTok, Reels, and Shorts, or 16:9 Landscape for YouTube, a website, or an LMS. You can also pick the image and video models (for example Qwen Image 3 for stills and Seedance 2.0 Mini for motion) and the resolution (480p or 720p), with a handy "Skip storyboard frames" option that writes each scene as one video prompt for faster, cleaner results. Fliki shows the exact credit cost up front, in my case 7.5 credits for a 30-second explainer, so there are no surprises.
Step 5: Choose the voice, subtitles, and brand kit
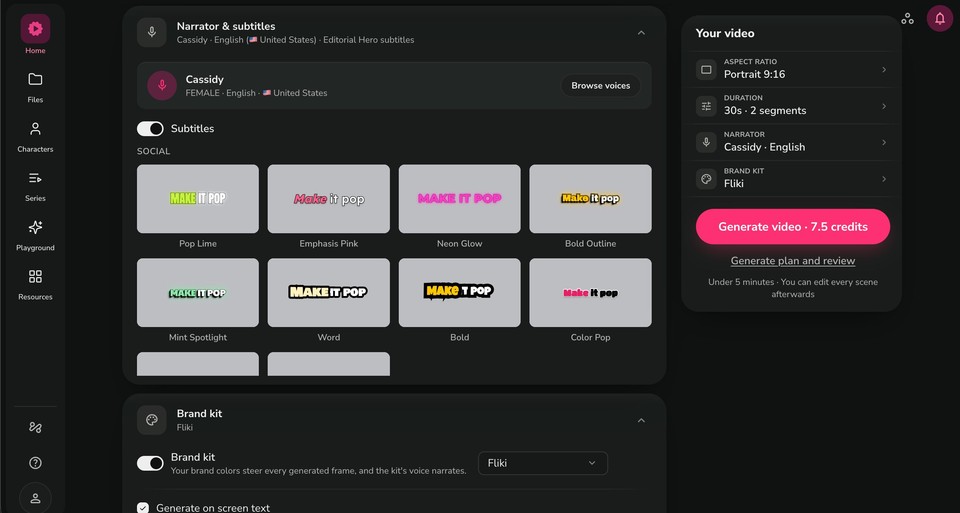
Under Narrator and subtitles, pick an AI voice (the default was Cassidy in English, and you can Browse voices for many more languages and tones, or clone your own). Turn on subtitles and pick a caption style, there is an editorial style plus punchy social styles like Pop Lime, Neon Glow, Emphasis Pink, and Bold Outline. Toggle your Brand kit to push your colors, fonts, and logo into every frame, and leave "Generate on screen text" on so key phrases appear as animated captions.
Step 6: Generate
Hit Generate video. If you want to check the plan first, use "Generate plan and review" to see and tweak the script and scene breakdown before it renders. Generation runs through clear stages and usually finishes in under five minutes. You do not need to babysit it.
Step 7: Refine in the editor
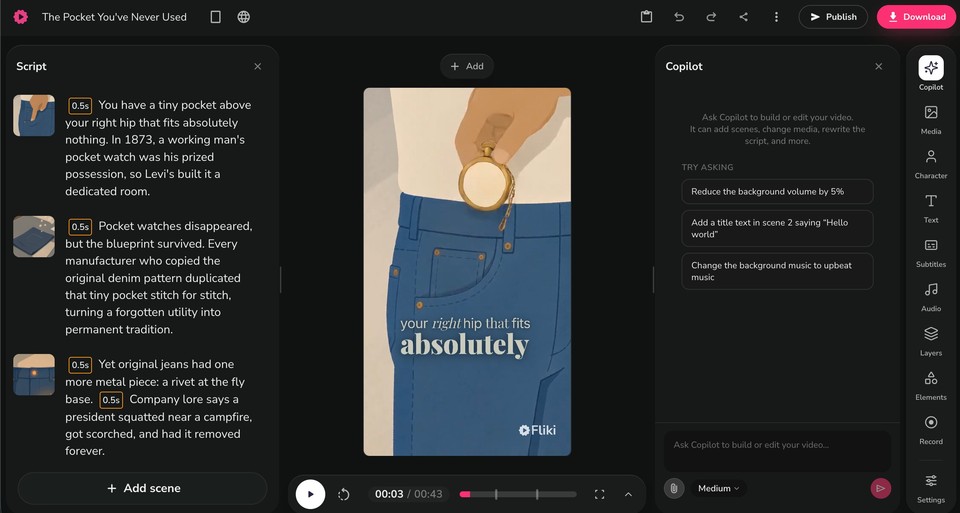
You land in a full editor with the video built out. The left panel shows your script split into scenes with precise timing. The real time-saver is Copilot, a chat panel where you can edit by asking, "reduce the background volume by 5 percent," "add a title in scene 2 saying Hello world," or "change the background music to something upbeat." A right-hand rail gives you Media, Character, Text, Subtitles, Audio, Layers, and Elements when you want manual control. Swap any weak visual, adjust a caption, regenerate a scene, then hit Publish or Download.
That is the entire loop. Duplicate the project, change the style or the script, and your next variation is minutes away.
Real examples I generated (and an honest look at the quality)
Rather than tell you it works, here are three explainers I made with this exact workflow, in three different styles, so you can see the range and the rough edges.
"The Architecture of the IKEA Trap" used the photoreal Lucid style. It is the most impressive of the three: genuinely cinematic shots of a shopper walking into a blue big-box store at golden hour, intercut with a clever stylized isometric floor-plan scene showing the winding "long natural way" path through the showroom. The photoreal-plus-diagram mix is exactly how a good explainer varies its visuals to hold attention.
"The Pocket You've Never Used" (the history of the tiny watch pocket on your jeans) used a soft, illustrated look, warm, consistent, and editorial, with elegant serif captions. It shows how well the tool holds a single art style across an entire video.
"Why Drinking Water Changes Everything" used a Mixed Media torn-paper collage style with a small presenter in the corner, a completely different, scrappier aesthetic from the other two.
The honest read: within each video the style stays cohesive and the captions and pacing look professional, which is the hard part. The rough edges are the ones I flagged earlier, an occasional visual that does not quite match the line, and scripts that are engaging but take creative liberties (one described a physiological effect in a way I would soften for anything health-related). Neither is a dealbreaker. You fix a weak visual with one click in the editor and you read the script before publishing. Notice, too, that these are story-style "edutainment" explainers; the same workflow handles a straight product explainer just as well when you give it a product-focused brief.
Tips for a better AI explainer
Nail the hook and the brief. The first line of your prompt sets the first five seconds of the video. Lead with the problem.
Keep it 60 to 90 seconds. Resist the urge to explain everything.
Match the style to your brand and topic. Photoreal for lifestyle and product, clean 2D or motion-graphic looks for SaaS and data, playful styles for consumer fun.
Always fact-check the script. Treat the AI draft as a first draft, especially for anything technical, medical, or financial.
Fix, do not settle. If one scene's visual is off, swap or regenerate it in the editor rather than accepting it.
Keep captions on. Most viewers watch muted, and captions lift completion.
End with one CTA. A missing or split call to action is the most common reason explainers fail to convert.
Fliki vs other ways to make AI explainers
There is no single best tool, so a quick honest map. Classic authoring tools like Vyond, Powtoon, and VideoScribe give you template-and-timeline control over 2D and whiteboard animation, but you assemble more by hand. Avatar tools like Synthesia are built around a talking presenter rather than a fully animated explainer. Raw generative models like Runway, Google Veo, and Sora produce stunning individual clips but leave you to script, voice, caption, and stitch everything yourself.
Fliki sits at the "idea to finished explainer" end: it writes the script, generates the animation in your chosen style, adds the voiceover, captions, and music, and hands you an editor to refine, all in one place. If you want the full picture across the category, our AI video generator page and our roundup of the best AI video generators compare the options, and our explainer video maker page covers the use case in depth. For the underlying pieces, see text to video, AI voiceover, and the subtitle generator.
The bottom line
Animated explainers earn their reputation as one of the highest-converting assets you can make, and the only thing that ever held teams back was the cost and time of animation. That barrier is gone. Write a tight, problem-led script, pick a style that fits your brand, generate, and spend your energy on the message instead of the manual animation.
If you want to make one right now, open the Explainer workflow in Fliki, describe what you are explaining, and see your first animated explainer render in a few minutes. Then change one thing and make another.