
Introduction
You spent two hours editing a Reel. The hook was sharp, the pacing was tight, the caption was perfect. Then you hit publish and watched Instagram squash it, crop your text out of frame, or soften the whole thing into a blurry mess. Sound familiar? Here is the good news: almost none of that is a content problem. It is a sizing problem, and sizing problems are fixable in about thirty seconds once you know the numbers.
This is your no-nonsense Instagram reels dimensions and size guide for 2026. We will cover the exact pixels, the aspect ratio, the safe zones, the length limits, the file specs, and the export settings that survive Instagram's compression. By the end, you will never second-guess a Reel upload again.
The quick answer: Instagram Reels size at a glance
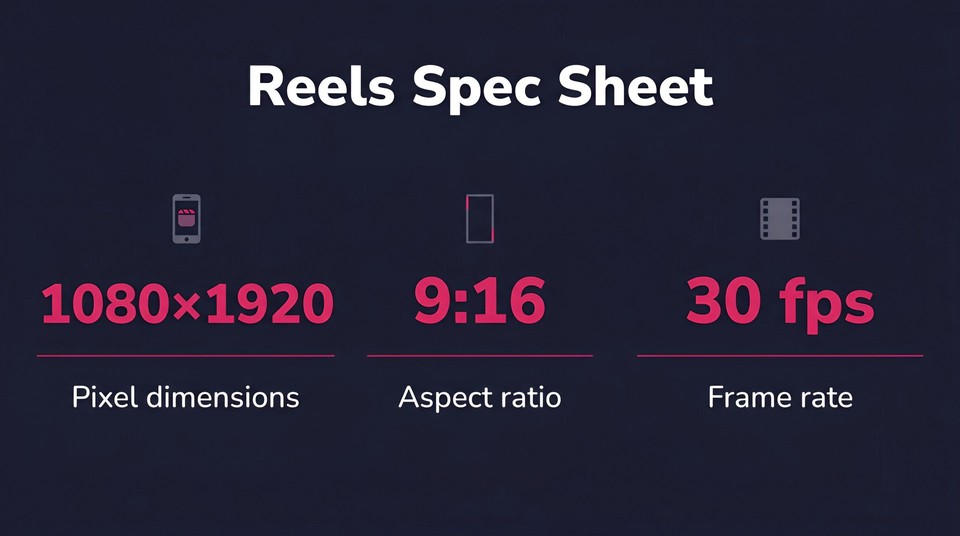
If you only remember one thing, remember this: the ideal Instagram reels size is 1080 x 1920 pixels (9:16 aspect ratio). That is full-screen vertical, the format your phone was built to play. Here is the full spec sheet for fast reference.
Specification | Recommended value |
|---|---|
Resolution | 1080 x 1920 pixels |
Aspect ratio | 9:16 (vertical) |
Reel cover photo size | 1080 x 1920 pixels (9:16) |
Maximum file size | Up to 4 GB |
Video format | MP4 (H.264) or MOV |
Frame rate | 30 fps recommended (24 to 60 fps supported) |
Minimum length | 3 seconds |
Maximum length (in-app) | 3 minutes |
Maximum length (upload) | Up to 15 minutes |
Best length for reach | 7 to 30 seconds |
Bookmark that table. Everything below explains why each number matters and how to use it to your advantage.
What are the correct Instagram Reels dimensions?
The correct Instagram Reels dimensions are 1080 pixels wide by 1920 pixels tall. This matches Instagram's native vertical resolution, which means your video fills the entire screen edge to edge with no black bars, no awkward gaps, and no forced cropping.
Why 1080 x 1920 specifically? Because it is full HD in portrait orientation. Most smartphones display at this resolution or scale to it cleanly, so your Reel arrives looking crisp on the widest range of devices. Upload something smaller, say 720 x 1280, and Instagram will stretch it to fit, which is where the softness and pixelation creep in. Upload something larger and Instagram simply compresses it back down, so you gain nothing but a heavier file.
Think of 1080 x 1920 as the sweet spot. It is large enough to look sharp and small enough to upload fast and compress gracefully.
Understanding the 9:16 aspect ratio
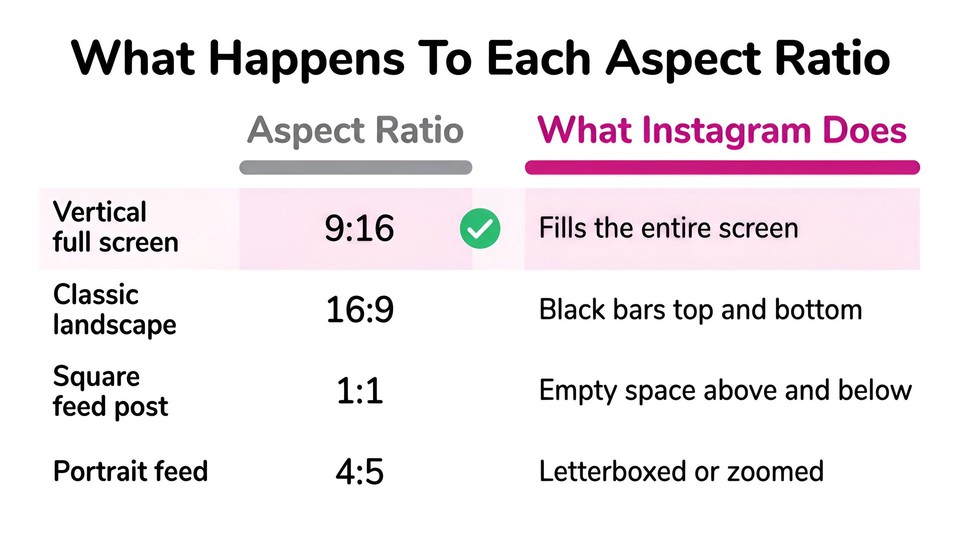
Aspect ratio is just the relationship between width and height. A 9:16 aspect ratio means that for every 9 units of width, there are 16 units of height. In plain terms, it is a tall rectangle, taller than it is wide, designed for a phone held upright.
This matters because Instagram Reels play full-screen in the Reels tab. When your video is a true 9:16, it occupies every pixel of that vertical canvas. When it is not, Instagram has to make a decision, and that decision is rarely flattering.
Here is what goes wrong with the wrong ratio:
A 16:9 horizontal video (the classic landscape shape) gets sandwiched between thick black bars on the top and bottom, shrinking your content into a small strip in the middle.
A 1:1 square video leaves empty space above and below, wasting most of the screen.
A 4:5 portrait video (common for feed posts) comes close but still gets letterboxed or zoomed when forced into the Reels frame.
Instagram does technically accept a range of ratios on upload, but only 9:16 gives you that clean, immersive, full-screen experience that the algorithm and your audience both reward. If you are repurposing horizontal footage, plan to reframe it rather than letting the app crop it for you.
File size, format, frame rate, and resolution
Dimensions get the spotlight, but the supporting specs are what keep your Reel from looking cheap.
File size
Instagram allows Reels up to roughly 4 GB. You will almost never hit that ceiling with a well-exported short video, so file size is rarely the bottleneck. If your file is enormous, it is usually a sign your bitrate or length is higher than it needs to be.
Video format
Export as MP4 using the H.264 codec for the best balance of quality and compatibility. MOV also works well. Both are widely supported and compress predictably inside Instagram's pipeline.
Frame rate
Stick with 30 frames per second as your default. Instagram supports 24 to 60 fps, and 60 fps can look beautifully smooth for fast motion, but 30 fps is the reliable standard that uploads cleanly and avoids stutter on most feeds.
Resolution and bitrate
Always master and export at 1080 x 1920. Pair that with a healthy bitrate, somewhere in the range of 10 to 15 Mbps for 1080p video, so your footage has enough data to survive Instagram's compression without turning to mush. A high source bitrate is the single biggest defense against the dreaded "why is my Reel blurry" problem.
If exporting at the right settings sounds fiddly, it does not have to be. Tools like the Fliki AI video generator render in the correct 1080 x 1920 format automatically, so the technical heavy lifting is handled before you ever touch the upload button.
How long can an Instagram Reel be in 2026?
Reel length used to be simple. It is not anymore, so let us clear up the confusion.
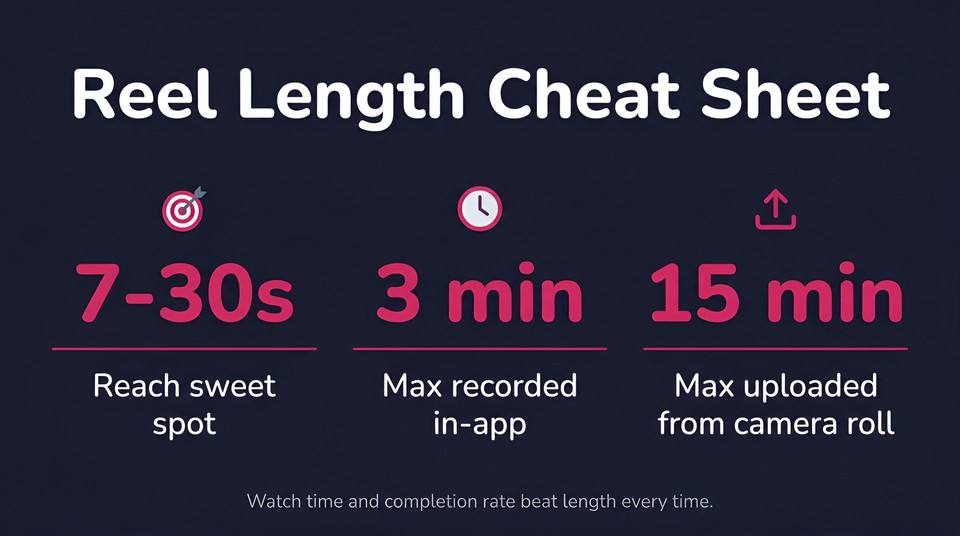
The minimum length is 3 seconds. Anything shorter will not publish as a Reel.
The maximum depends entirely on how you create the video:
Recording inside the Instagram camera: up to 3 minutes (180 seconds) for most accounts. Instagram raised this from the old 90-second cap, and a small set of accounts in an extended rollout can now record even longer.
Uploading a pre-edited video from your camera roll: up to roughly 15 minutes, which Instagram will still classify and display as a Reel.
But here is the part that actually moves the needle: just because you can post a long Reel does not mean you should. Instagram's algorithm still favors shorter videos for discovery. The platform's leadership has been open about the fact that watch time and completion rate are the top ranking signals, and longer Reels are far harder to keep people watching all the way through.
For reach, the sweet spot lives between 7 and 30 seconds. Educational or tutorial content can stretch to 30 to 60 seconds. Save the multi-minute formats for loyal followers who already want to hear you out. Match your length to your retention rate, not to the maximum the app allows.
The safe zone: where to keep your text and key visuals
This is the rule that separates polished Reels from amateur ones, and most creators ignore it.
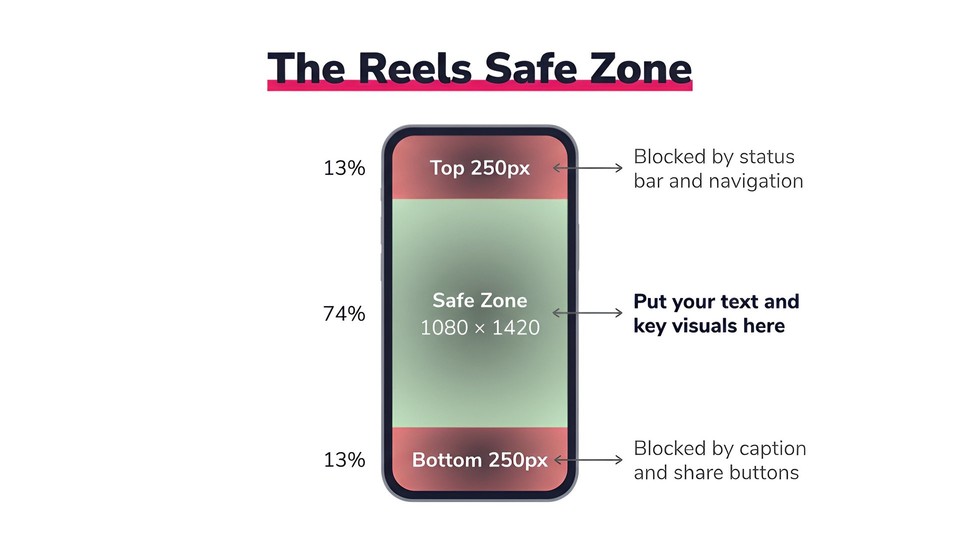
Instagram lays its own interface on top of your video. The bottom of the frame holds your username, caption, audio label, and the share buttons. The right edge stacks the like, comment, share, and save icons. The top holds status and navigation elements. If you place important text or your logo in those areas, the app will cover it.
The fix is to design inside the safe zone, the central region of the frame where nothing gets blocked. A reliable safe zone is roughly 1080 x 1420 pixels centered in your 1080 x 1920 canvas. In practical terms:
Keep critical text and calls to action clear of the bottom ~250 pixels.
Keep them clear of the top ~250 pixels.
Leave breathing room on the right side so the action buttons do not sit on top of your subtitles.
A simple habit: before you export, imagine the Instagram UI overlaid on your video and ask whether anything important is hiding behind it. If you burn in your own captions, keep them centered and slightly raised so the caption bar never swallows them.
Reel cover photo and thumbnail size
Your cover is the first impression people get on your profile grid, in search, and in the Reels tab, so do not treat it as an afterthought.
The recommended Instagram reel cover photo size is 1080 x 1920 pixels (9:16 aspect ratio), matching the video itself. You can either pick a frame from the Reel or upload a custom cover.
There is one important 2026 change to plan around. Instagram moved its profile grid to a rectangular display, so grid previews now crop closer to a 3:4 shape rather than the old square. That means a cover designed edge to edge in full 9:16 may get trimmed on the grid. The safe move is to center your key visual and any cover text so it survives whether someone sees the full 9:16 version in the Reels tab or the cropped preview on your profile.
If you want covers that pop without opening a design app, the Fliki AI thumbnail maker generates click-ready artwork with clean typography in seconds, which keeps your grid looking consistent and professional.
Common Instagram Reels sizing mistakes (and how to avoid them)
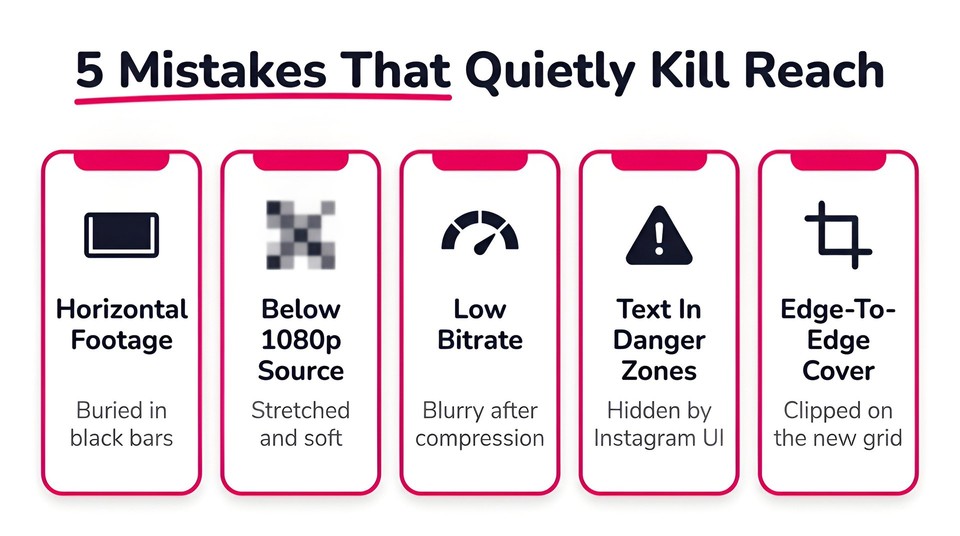
Once you know the specs, the mistakes become easy to spot. Here are the ones that quietly kill reach and how to dodge each one.
1. Posting horizontal footage as is
A 16:9 clip dropped straight into Reels gets buried in black bars. Reframe to 9:16 or shoot vertical from the start.
2. Uploading low-resolution video
Anything below 1080 x 1920 gets upscaled and looks soft. Always master at full vertical HD.
3. Exporting at a weak bitrate
Even a perfectly sized Reel turns blurry if the bitrate is too low to survive compression. Bump it up.
4. Ignoring the safe zone
Text tucked into the corners gets covered by the interface. Keep it centered.
5. Letting the app auto-crop
When you do not control the framing, Instagram does, and it rarely chooses well. Compose your shot for a true 9:16 frame.
6. Designing the cover edge to edge
With the new rectangular grid, anything near the edges may get clipped. Center it.
How to create perfectly sized Reels every time
You can absolutely build correctly sized Reels by hand in editors like CapCut, InShot, or Instagram's own tools, setting a 1080 x 1920 canvas and exporting as MP4 at 30 fps. That works.
But if you publish often, doing this manually for every video gets old fast. This is where an AI workflow earns its keep. With the Fliki AI reel generator, you can turn a script, a blog post, or even a single prompt into a finished 9:16 Reel complete with captions, B-roll, and a lifelike voiceover, all rendered in the correct 1080 x 1920 dimensions automatically. There is no resizing, no guesswork, and no black bars.
Marketers and faceless creators lean on this kind of automation to stay consistent without burning hours on exports. If you want to see the full workflow start to finish, our walkthrough on how to make AI Reels breaks it down step by step, and the dedicated Instagram video maker is built specifically for this format. You can try Fliki for free and have a properly sized Reel ready to post in minutes.
Final thoughts
Nailing your Instagram reels dimensions is one of those small, boring details that quietly separates content that looks professional from content that looks rushed. Lock in 1080 x 1920 at 9:16, respect the safe zone, export as a high-bitrate MP4 at 30 fps, design your cover for the new rectangular grid, and keep your length tight. Do that, and your Reels will look the way you intended on every screen, every time.
For the official platform specifications, you can always cross-check the Instagram Help Center, and when you are ready to produce sharp, correctly sized Reels at speed, Fliki handles the formatting so you can focus on the part that actually matters: the idea.
FAQs
The best size is 1080 x 1920 pixels with a 9:16 aspect ratio. This fills the entire vertical screen and compresses cleanly across the Reels tab, Explore, and your profile.
Yes. Both use 1080 x 1920 pixels at 9:16, so you can repurpose the same video across both platforms without resizing. Just adjust captions and hashtags to fit each audience.
They share the same 1080 x 1920, 9:16 frame, but they serve different purposes. Stories disappear after 24 hours and run in shorter segments, while Reels are permanent and built for wider discovery.
Usually a low source resolution or a low export bitrate. Master at 1080 x 1920 and export at a high bitrate (around 10 to 15 Mbps) so the video keeps its detail through Instagram's compression.
For maximum reach, aim for 7 to 30 seconds. You can go up to 3 minutes recorded in-app or 15 minutes via upload, but shorter videos with strong retention almost always perform better.