
Nobody finishes a bad training video
You already know the feeling. Someone shares a training video, you hit play, and forty seconds in you are quietly opening another tab. The audio has a hum, the presenter is reading a slide word for word, and the one thing you actually needed to see is buried at minute fourteen. That video did not fail because video is a bad format. It failed because of how it was recorded.
I have made a lot of training and tutorial videos over the years, and I have watched teams pour a full day into a recording that nobody watches to the end. The good news is that the difference between a training video people abandon and one they finish is not talent or budget. It is a handful of decisions you make before, during, and after you hit record, most of them backed by decades of research on how people actually learn from video.
This guide walks through all of it: how to plan and script a training video, how long it should really be, what to record it with, the recording workflow itself, and how to caption, publish, and keep it accessible. I will point you to a mix of tools, and yes, I will show you where Fliki fits, but the process here works no matter what software you use. If you would rather generate a narrated training video from a script or slide deck instead of recording live, our AI training video maker is built for exactly that, and I will come back to it later.
Let us start with the mistake that sinks most training videos before recording even begins.
First, decide what one video needs to teach
The most common reason a training video drags is that it tries to teach five things at once. Before you touch a recorder, write down the single learning objective in one sentence: "After this video, a new hire can submit an expense report." One video, one outcome. Everything that does not serve that outcome is what learning scientists call extraneous load, and it is the enemy of retention.
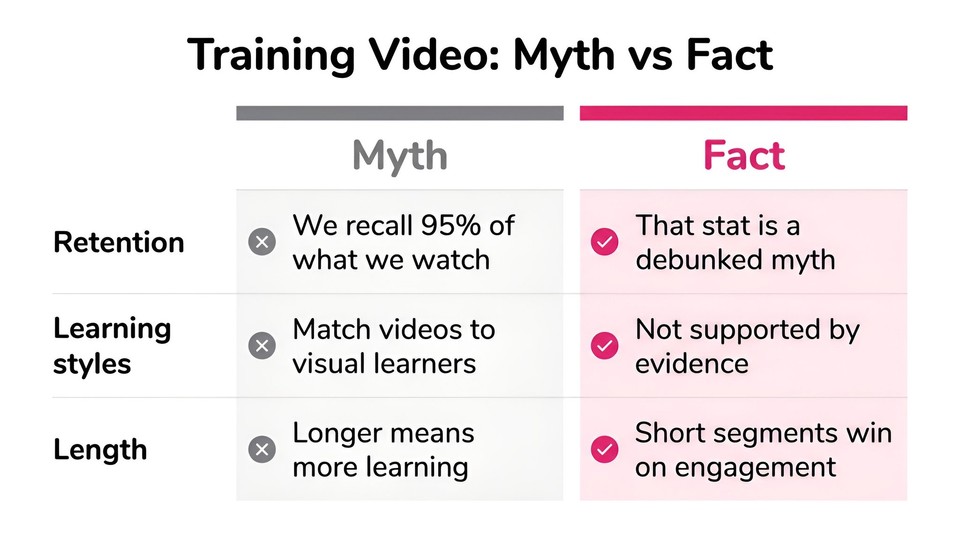
While we are talking about retention, let me clear up a myth you have almost certainly seen quoted in a training deck. The claim that "people remember 10 percent of what they read but 95 percent of what they watch" is not real. It traces back to a misattributed version of Dale's Cone of Experience, and researchers who went looking for the underlying study found the numbers were essentially fabricated and spread through decades of citation errors. The same goes for "matching videos to visual learners." The learning-styles idea is popular and, unfortunately, not supported by evidence. Video is genuinely powerful for training, but it earns that power through good design, not magic percentages.
What actually drives learning from video is well documented. The single best synthesis is Cynthia Brame's peer-reviewed paper Effective Educational Videos, published in CBE Life Sciences Education, which distills the research into three levers: manage cognitive load, hold attention, and prompt active learning. Nearly every tip below is a practical application of those three ideas.
How long should a training video be?
This is the question everyone asks, and the true answer has two parts.
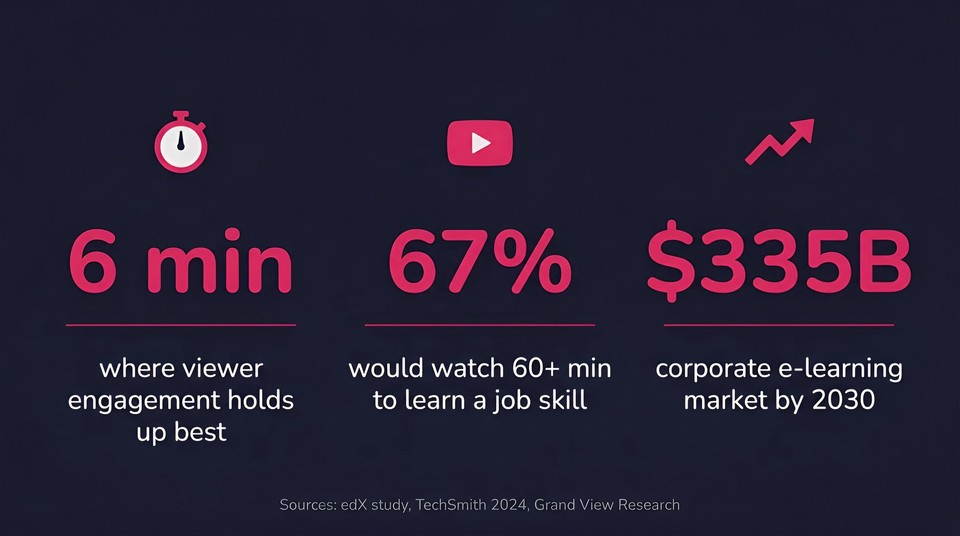
For most instructional content, shorter wins by a wide margin. The strongest data comes from a landmark study by Guo, Kim and Rubin, who analyzed 6.9 million video-watching sessions across four large online courses. Median engagement stayed high for videos under six minutes, then fell off a cliff. By nine to twelve minutes, engagement roughly halved, and beyond twelve minutes viewers largely checked out. Their takeaway became the most-cited rule in the field: aim for six minutes or less per video.
But here is the nuance most articles miss, and it matters for workplace training specifically. When someone is trying to learn a real job skill rather than skim a topic, they will happily watch longer. TechSmith's 2024 Video Viewer Trends Report, a survey of a thousand people, found that 67 percent would watch a video longer than an hour to learn a new skill, and the most-preferred length for instructional and how-to content was actually 10 to 19 minutes.
So the real rule is not "always be short." It is this: keep any single continuous segment tight, ideally under six minutes, and when a topic genuinely needs more time, break it into a series of short, well-labeled modules rather than one unbroken marathon. This is the segmenting principle, and it is one of the most reliable ways to improve completion. A 20-minute onboarding topic lands far better as four five-minute videos with clear beginnings and ends than as one 20-minute file.
Write a script, even a loose one
Unscripted walkthroughs are where training videos go to die. You get "um," backtracking, dead pauses, and a demo where you realize halfway through that you forgot to open the right screen. A script fixes all of that, and it does not need to be a word-for-word teleprompter. A bullet outline of the exact click-path and the key lines is often enough.
The structure I keep coming back to is the classic Tell-Show-Do pattern, which maps neatly onto how people absorb procedural content:
Hook (10 to 15 seconds): state the problem and why it matters. "Filing expenses wrong delays your reimbursement by weeks. Here is how to do it right in under two minutes."
Tell: explain the one concept in plain language.
Show: demonstrate it on screen, step by step, at a natural pace.
Do: give the viewer something to try, or a checkpoint question. Active recall dramatically improves retention, which is why quiz checkpoints between segments work so well.
Close (10 to 20 seconds): recap the key takeaway and the next step.
A few evidence-based writing habits make a real difference. Use conversational language and speak directly to "you," because a personal, informal tone measurably improves engagement. Speak faster than feels natural, since the edX research found engagement actually rises with an energetic speaking rate. And follow Richard Mayer's multimedia principles: narrate what is happening on screen rather than pasting full paragraphs of text that compete with your voice (the redundancy principle), put only a few key words on screen as signaling, and strip out background music and busy visuals that add load without adding meaning (the weeding principle). Synthesia has a solid, practical breakdown of how to write a training video script if you want a template to start from.
Choose the right recording method
There is no single best format. The right one depends on what you are teaching.
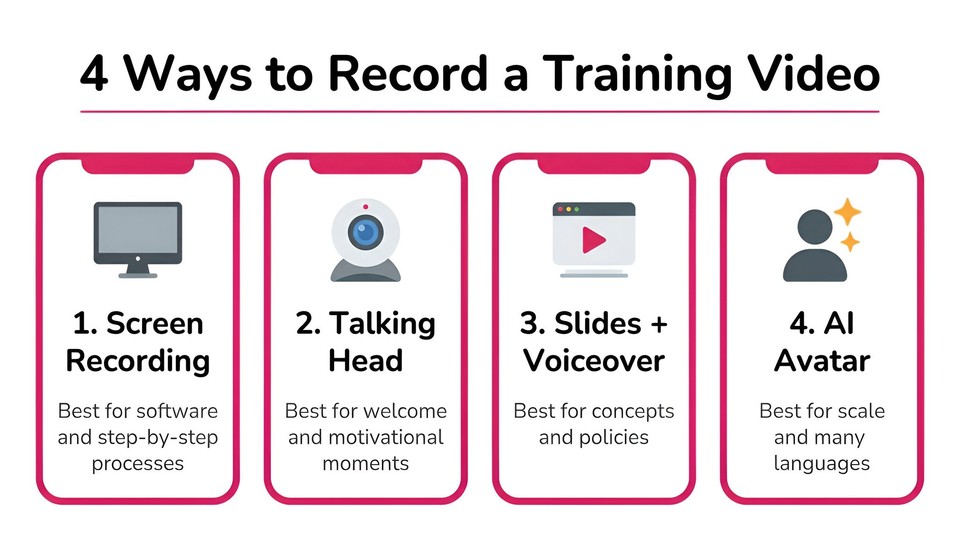
Screen recording (screencast) is the workhorse of training video. Anything involving software, a web app, a dashboard, or a step-by-step process should be a screen recording with clear narration. Show the actual clicks. As the team at Cult of Pedagogy notes, you should spend a large chunk of your prep time getting the on-screen visuals right, and you should speak faster and more conversationally than you think.
Talking head (webcam) puts a human face on screen. It is excellent for the emotional and motivational parts of training, welcome messages, culture and values, a leader setting context. The research on whether to add a face to instructional content is genuinely mixed: a talking head can be extraneous load during dense procedural steps, but combining a talking head with screen content has also been shown to increase watch time and satisfaction. The practical answer is to use a face for the intro and the human moments, then cut to the screen for the actual how-to.
Slides plus voiceover suits conceptual training, policies, and frameworks that do not have a screen to demonstrate. Keep slides sparse and let the narration carry the detail.
AI avatar is the newer option, and it has become a serious choice for L&D teams. Instead of filming a person, you generate a consistent on-screen trainer that delivers narration from your script. It shines when you need the same presenter across dozens of modules, when you need to update content without reshooting, and when you need to localize into many languages. It is less suited to warm, personal one-off messages where a real face matters. I will cover where this fits in the tools section.
The gear and software you actually need
You can overspend on this instantly, so here is the honest priority order.
Audio comes first. Bad audio is the single fastest way to make people click away, and it matters more than video quality. A dedicated USB microphone transforms a recording. A dynamic mic like the Samson Q2U (around 70 dollars) is a widely recommended starting point because it rejects room noise better than a sensitive condenser mic in an untreated room. Add a pop filter, record in a soft-furnished room rather than a bare one, and check your levels before you record a full take.
Then the screen recorder. Your options range from free to full studio:
Free built-in tools (Windows Game Bar, macOS screenshot toolbar) handle basic captures.
OBS Studio is free, powerful, and open-source, with no editor built in.
Loom is the fastest way to record and share a link, though its free tier caps you at 25 videos of five minutes each.
TechSmith Camtasia is the deep all-in-one recorder and editor for polished tutorials.
Fliki records screen, webcam, or both in the browser and then auto-captions, trims filler words, and lets you translate the result, all in one project.
We keep a fuller breakdown in our guide to the best screen recorders for Mac and Windows, and there is a comparison table further down.
Lighting and webcam only matter if you are on camera. A single soft light in front of you, not behind, and a decent webcam are enough. Do not let camera setup delay a recording that could be a screencast.
The step-by-step recording workflow
Here is the actual sequence I follow, and the one I would hand to anyone on a team recording their first training video.
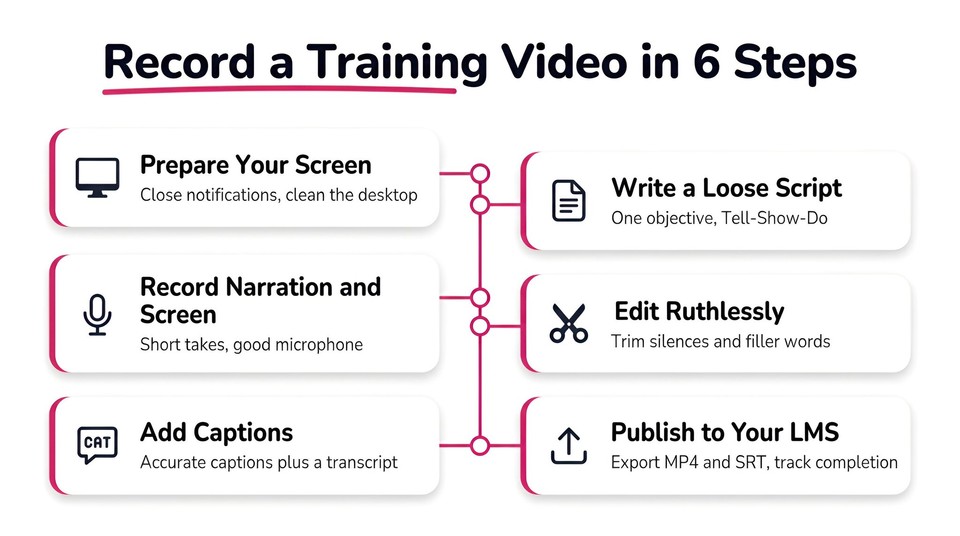
Step 1: Prepare your environment
Close every notification, chat app, and irrelevant tab. Clear your desktop. If you are demoing software, set up a clean account with realistic sample data so nothing sensitive appears on screen. Decide your aspect ratio up front: 16:9 for an LMS or YouTube, 9:16 if it is a quick tip for mobile.
Step 2: Record narration and screen deliberately
A pro move from TechSmith is to record your narration first, then capture the screen to match it, so your clicks follow a clean voice track instead of the other way around. If you prefer to record both together, that is fine too. Either way, record in short takes rather than one nervous 15-minute run. Short takes are far easier to fix.
Step 3: Capture with a browser recorder
If you want to skip installs and editing tools, a browser-based recorder keeps everything in one place. In Fliki's screen recorder you pick screen, webcam, or both in two clicks, record up to 30 minutes on the free plan, and pause and resume as needed. Recordings stay in your browser until you choose to save, which matters if you are capturing anything sensitive.
Step 4: Edit ruthlessly
This is where good training videos are made. Trim dead air and filler words, cut anything that does not serve your one objective, and tighten the pace. Fliki detects "um," "uh," and silences and trims them in a single pass, which can turn a rambling 12-minute walkthrough into a clean six-minute video without manual scrubbing. If a line came out awkward, you can edit the transcript and regenerate that section in an AI voice rather than re-recording the whole thing.
Step 5: Signal what matters
Direct the viewer's eye. Add zoom-ins on the cursor during key clicks, highlight rings around the button you want them to find, and put two or three key words on screen at the crucial moment. This is signaling, and it is one of the highest-return edits you can make. Do not overdo it: a handful of cues per video, not a light show.
Step 6: Add captions and a transcript
Turn on captions for every training video, without exception. Most people watch at least some video on mute, captions aid comprehension and retention, and they are a legal requirement in many workplaces (more on that next). Auto-captions get you most of the way, but edit them for accuracy. Fliki auto-captions recordings in 80-plus languages at 95 percent-plus accuracy, and exports an SRT file you can hand straight to an LMS.
Step 7: Publish where your learners are
Export a clean 1080p file and put it where people will actually find it: your LMS, an internal wiki, a knowledge base, or a video host. One tip that saves a lot of pain: YouTube "unlisted" is not truly private, so do not use it for confidential internal training. Use a privacy-focused host or your LMS for anything sensitive.
Make it accessible, because you have to
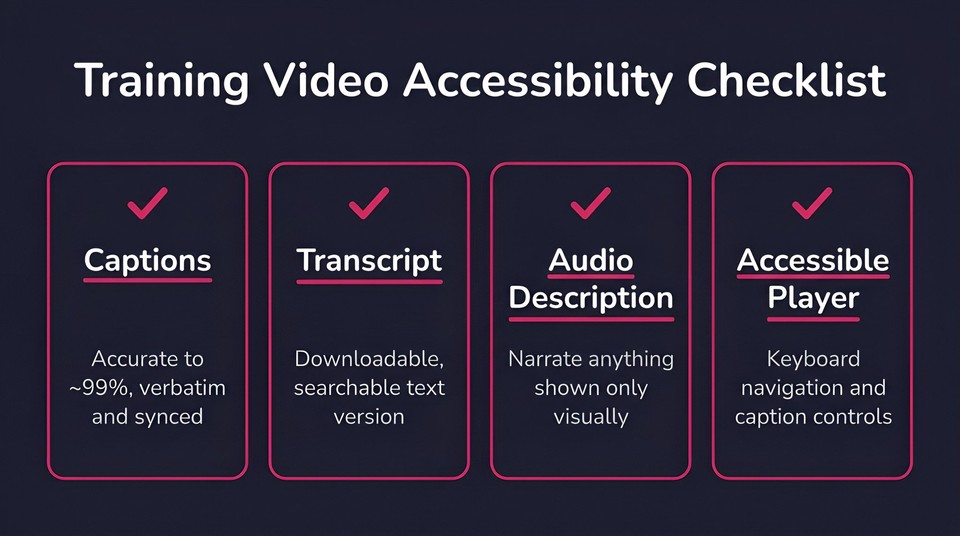
Accessibility is not a nice-to-have for workplace training, it is often a legal requirement, and it is the kind of detail that separates a professional resource from a hobby one.
In the United States, federal and federally-funded organizations must meet Section 508 standards, which reference WCAG 2.0 Level AA and require synchronized captions and, where visuals carry essential information, audio description. Under the ADA, employers are broadly expected to make workplace training accessible to employees with disabilities. The practical checklist is short but firm:
Captions that are accurate to roughly 99 percent, verbatim, correctly punctuated, and synced to the audio. Auto-captions must be reviewed and corrected to hit that bar.
A transcript available to download, which also helps searchability and people who prefer to read.
Audio description or on-screen narration of anything shown only visually, so a learner who cannot see the screen still gets the information.
A player that supports keyboard navigation and captions.
Build this into your process once and it stops being a scramble later. 3Play Media has a clear overview of which laws apply to which organizations if you need to check your specific obligations.
Publishing, hosting, and keeping videos current
For corporate and L&D use, most training lives in a learning management system so completion can be tracked. If your organization needs formal tracking, you will likely package the video as SCORM or export MP4 plus SRT and upload to a platform like Workday Learning, Cornerstone, Docebo, TalentLMS, or LearnUpon. According to LinkedIn's 2025 Workplace Learning Report, an LMS is now standard in the large majority of organizations, so plan for that destination early.
The quiet advantage of recorded training over live sessions is maintenance. When a process changes, you re-record one short module instead of redoing a full course, and if you built with a script-based tool, you often just edit a line of text. That is a big part of why demand keeps climbing: the corporate e-learning market was valued at 104.3 billion dollars in 2024 and is projected to reach roughly 335 billion by 2030, per Grand View Research.
Common mistakes to avoid
The mistakes that quietly ruin training videos are predictable, which means they are avoidable:
Bad audio. Fix this before anything else. A cheap dynamic mic in a soft room beats an expensive setup in an echoey one.
Too long and unfocused. One objective per video, and segment anything that runs long.
No script. Even a bullet outline eliminates most rambling and dead air.
A talking head narrating a process. Use the screen for steps and save the face for the human moments.
Walls of on-screen text that duplicate the narration. Signal with a few words, do not transcribe your own voice onto the slide.
No captions or transcript. An accessibility and compliance failure, and a completion killer.
Never updating. Outdated screens and steps erode trust fast. Schedule a review.
The best tools to record and make training videos
There is no universal winner, only the right fit for your content and scale. Here is how the main options compare as of 2026. Pricing shifts often, so confirm current numbers on each vendor's site.
Tool | Best for | What it does well | Rough pricing (verify) |
|---|---|---|---|
Fliki | Recording plus AI editing, captions, voiceover, and localization in one place | Browser screen and webcam recording, auto-captions in 80+ languages, filler-word trimming, AI voiceover, translation, avatar trainers, LMS and 1080p-ready exports | Free plan; paid from low monthly tiers |
TechSmith Camtasia | Polished, heavily edited tutorials | Deep recorder plus full timeline editor, callouts, and effects | ~$180/yr or one-time license |
Loom | Fast async messages and quick walkthroughs | Record-to-shareable-link speed, light AI editing | Free (25 videos, 5 min each); paid ~$15/user/mo |
OBS Studio | Power users who want free and flexible | Unlimited, high-quality capture and streaming | Free, open-source |
Synthesia | AI-avatar training at enterprise scale | Realistic avatars, 140+ languages, onboarding and compliance | From ~$29/mo; enterprise tiers |
Guidde | Auto-generated how-to videos from captures | Magic Capture turns clicks into narrated step videos | Free tier; paid from ~$23/creator/mo |
Scribe / Tango | Fast step-by-step text-and-screenshot guides (not video) | Auto-documented click-by-click guides | Free tier; paid from ~$16 to $23/user/mo |
A quick honest read on where each fits. If you need a heavily produced, effect-rich tutorial and you enjoy editing, Camtasia is hard to beat. If you just want to fire off a quick walkthrough link, Loom is the fastest. Scribe and Tango are excellent, but they make text guides with screenshots rather than video, so reach for them when a document is genuinely better than a video.
Where Fliki earns its place, and why it works as an all-in-one alternative to stitching several of these together, is the layer that sits on top of the recording. Most screen recorders stop at the export. Fliki records in the browser and then, in the same project, auto-captions the video, trims your filler words, lets you swap your voice for a cleaner AI narrator, adds an AI avatar trainer if you do not want to be on camera, and translates the whole thing into 80-plus languages with one click. For L&D teams, it also generates full modules from a script or slide deck, adds quiz checkpoints, and exports LMS-ready files. If your goal is "record once, make it accessible, and ship it to every region," that consolidation is the point. You can compare it against others on our alternatives page, and there is a broader roundup in our best AI video generators guide.
Final thoughts
Recording a training video that people finish is not about production polish. It is about respecting the viewer's attention: one clear objective, a tight script, clean audio, the right recording method for the content, ruthless editing, captions, and a sensible place to host it. Get those right and even a simple screen recording will outperform an expensive video that ignores them.
If you want to try the fast path, you can record your screen and turn it into a captioned, multilingual training video for free with Fliki. Record one short module, add captions, and see how close to publish-ready a single pass gets you.
FAQs
Plan around one learning objective, write a loose script using a Tell-Show-Do structure, record narration and screen deliberately in short takes with a good microphone, then edit tightly, add captions, and publish to your LMS or knowledge base. Screen recording suits software and process training, while a talking head or AI avatar suits welcome and conceptual content.
Keep any single continuous segment under about six minutes, which is where viewer engagement holds up best. For genuine skill training, longer is acceptable, and the most-preferred length for instructional content is around 10 to 19 minutes, but you should still break long topics into a series of short, clearly labeled modules rather than one long file.
At minimum, a screen recorder and a decent USB microphone. Free options include OBS Studio and built-in OS tools. Loom is fast for quick clips, Camtasia is best for polished editing, and Fliki records in the browser and adds captions, AI voiceover, and translation in one place.
No. Most procedural training is better as a narrated screen recording. Use your webcam for the intro and human moments, or use an AI avatar as a consistent on-screen trainer if you would rather not film yourself.
Add accurate captions (aim for around 99 percent accuracy), provide a downloadable transcript, describe anything shown only visually, and use a player that supports captions and keyboard navigation. Section 508 and the ADA make these requirements for many workplaces, not just nice-to-haves.
Reuse a script template, record in short takes, and use a tool that automates the slow parts: auto-captioning, filler-word trimming, and one-click translation. Generating narrated modules from an existing SOP or slide deck can cut a multi-day production down to under an hour.